
Transferring a song from PC to iPhone might seem complicated, but it’s a straightforward process that opens up a world of musical possibilities. At payoffsong.com, we’re dedicated to helping you maximize the potential and profitability of your music. Discover how to seamlessly transfer your favorite tracks and even monetize your own creations with these effective methods.
Ready to get your tunes onto your iPhone? This guide offers simple steps and valuable insights, ensuring you enjoy your music on the go and are well-equipped to explore licensing and royalty opportunities. Let’s dive into the world of mobile music and discover how to make your songs work for you, exploring pathways to licensing and royalty opportunities with payoffsong.com.
1. Understanding the Basics of Transferring Music
Transferring music from your PC to your iPhone involves a few essential methods, each with its own advantages. Whether you’re a musician looking to share your latest track or a music lover curating your personal playlist, knowing these methods is key.
1.1 Why Transfer Music from PC to iPhone?
There are many reasons you might want to transfer music from your PC to your iPhone. Perhaps you have a vast collection of songs stored on your computer, including rare tracks or personal recordings not available on streaming services. Maybe you’re a musician who wants to listen to your works in progress on the go or share them with collaborators for feedback. Understanding the “why” helps you choose the best transfer method.
Here’s a breakdown of common scenarios:
- Personal Music Collection: Enjoying songs not available on streaming platforms.
- Music Production: Evaluating your creations on different devices.
- Offline Playback: Listening to music without using data or Wi-Fi.
1.2 Common Methods for Transferring Music
Several methods exist for transferring music from your PC to your iPhone, each catering to different needs and preferences. From Apple’s official iTunes/Finder method to cloud-based services and third-party apps, understanding your options allows you to choose the most efficient and convenient approach.
Here’s a quick overview:
- iTunes/Finder: Apple’s built-in solution for syncing and managing music.
- Cloud Storage: Using services like Google Drive or Dropbox to transfer files.
- Third-Party Apps: Utilizing apps designed specifically for music transfer and management.
- Email: Sending songs as email attachments for quick, individual transfers.
2. Using iTunes/Finder to Transfer Music
iTunes (or Finder in macOS Catalina and later) is Apple’s primary method for managing and syncing content between your computer and iPhone. While it might seem a bit complex at first, mastering iTunes/Finder provides a reliable and comprehensive way to transfer music.
2.1 Preparing Your Music Library in iTunes/Finder
Before transferring any music, it’s crucial to organize your music library in iTunes/Finder. This ensures that your songs are properly tagged, organized, and ready for syncing. Correct metadata, such as song titles, artist names, and album art, makes browsing and searching your music library much easier.
Here’s how to prepare your music library:
- Import Music: Add songs to your iTunes/Finder library by dragging and dropping files or folders into the app.
- Edit Metadata: Correct any incorrect or missing information by right-clicking on a song and selecting “Get Info.”
- Create Playlists: Organize your music into playlists for easier management and syncing.
2.2 Step-by-Step Guide to Syncing Music via iTunes/Finder
Once your music library is organized, you can begin the syncing process. This involves connecting your iPhone to your computer and selecting the music you want to transfer.
Here’s a step-by-step guide:
- Connect Your iPhone: Connect your iPhone to your computer using a USB cable.
- Open iTunes/Finder: Launch iTunes (or Finder if you’re using macOS Catalina or later).
- Select Your Device: In iTunes, click on the iPhone icon in the top left corner. In Finder, your iPhone will appear in the sidebar under “Locations.”
- Navigate to Music: In iTunes, click on “Music” in the sidebar under “Settings.” In Finder, click on “Music” in the top menu.
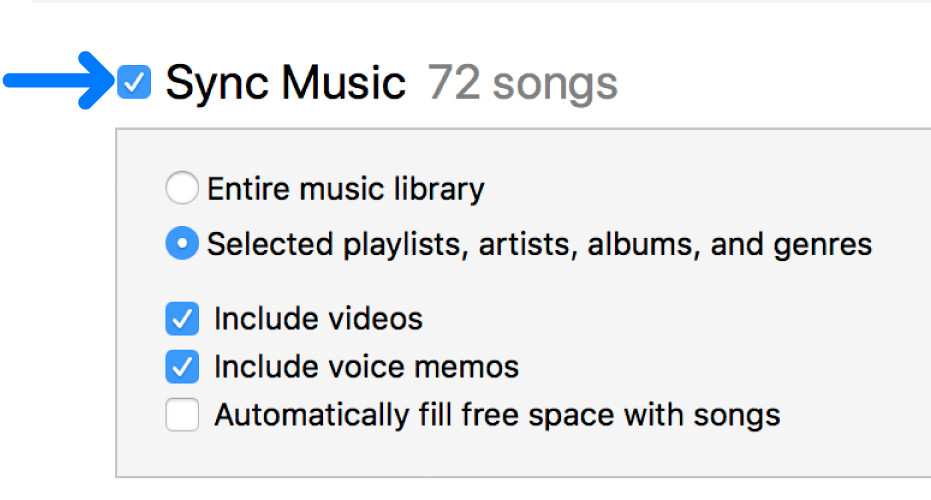 iTunes Music Sync Selection
Note: This image illustrates the “Sync Music” selection in iTunes, where you can choose to sync your entire library or selected items.
- Choose Sync Options: Select “Sync Music” and choose whether to sync your entire music library or selected playlists, artists, or albums.
- Apply and Sync: Click “Apply” in the bottom right corner, then click “Sync” to begin the transfer process.
2.3 Troubleshooting Common iTunes/Finder Sync Issues
While iTunes/Finder is a reliable method, you might encounter issues during the syncing process. Here are some common problems and their solutions:
- iPhone Not Recognized: Ensure your USB cable is properly connected and that your computer trusts the device.
- Syncing Errors: Restart both your computer and iPhone, and try syncing again.
- Music Not Appearing: Verify that the music files are compatible with iTunes/Finder and that they are properly tagged.
According to Apple Support, ensuring your devices are updated to the latest software versions can resolve many syncing issues.
3. Using Cloud Storage Services for Music Transfer
Cloud storage services like Google Drive, Dropbox, and OneDrive offer an alternative method for transferring music to your iPhone. These services allow you to upload your music to the cloud and then download it to your iPhone.
3.1 Uploading Music to Cloud Storage
The first step is to upload your music files to your chosen cloud storage service. This process is generally straightforward and involves dragging and dropping files into the cloud storage folder.
Here’s how to upload music to common cloud storage services:
- Google Drive: Drag and drop files into your Google Drive folder in your web browser or desktop app.
- Dropbox: Drag and drop files into your Dropbox folder in your web browser or desktop app.
- OneDrive: Drag and drop files into your OneDrive folder in your web browser or desktop app.
3.2 Downloading Music to Your iPhone
Once your music is uploaded to the cloud, you can download it to your iPhone using the cloud storage service’s mobile app.
Here’s how to download music to your iPhone:
- Install the App: Download and install the Google Drive, Dropbox, or OneDrive app from the App Store.
- Log In: Log in to your account using your credentials.
- Locate Music Files: Navigate to the folder where you uploaded your music files.
- Download Music: Tap on the music files to download them to your iPhone.
3.3 Advantages and Disadvantages of Cloud Storage
Cloud storage offers several advantages, including accessibility and convenience. However, it also has some disadvantages, such as reliance on an internet connection and potential storage limitations.
Here’s a breakdown of the pros and cons:
| Advantage | Disadvantage |
|---|---|
| Accessible from any device | Requires internet connection |
| Easy file sharing | Limited free storage |
| Automatic backup | Potential security concerns |
4. Utilizing Third-Party Apps for Music Transfer
Several third-party apps are designed specifically for transferring music from your PC to your iPhone. These apps often offer additional features and functionalities that iTunes/Finder and cloud storage services might lack.
4.1 Popular Music Transfer Apps
Some of the most popular music transfer apps include:
- CopyTrans Manager: A lightweight iTunes alternative for managing and transferring music.
- iMazing: A comprehensive iOS device management tool with advanced transfer capabilities.
- WALTR PRO: A user-friendly app that simplifies the process of transferring any music.
4.2 How to Use Third-Party Apps for Music Transfer
Using these apps generally involves connecting your iPhone to your computer, selecting the music you want to transfer, and initiating the transfer process.
Here’s a general guide:
- Install the App: Download and install the chosen third-party app on your computer.
- Connect Your iPhone: Connect your iPhone to your computer using a USB cable.
- Launch the App: Launch the third-party app and follow the on-screen instructions to connect to your iPhone.
- Select Music: Choose the music files or folders you want to transfer.
- Transfer Music: Initiate the transfer process and wait for the music to be copied to your iPhone.
4.3 Benefits of Using Third-Party Apps
Third-party apps often offer several benefits over traditional methods, including:
- Ease of Use: Simplified interface and intuitive workflow.
- Additional Features: Advanced features like automatic conversion and metadata editing.
- Flexibility: Support for a wider range of file formats and transfer options.
According to a review by TechRadar, CopyTrans Manager is praised for its simplicity and efficiency in managing music libraries.
5. Alternative Methods: Email and Wireless Transfer
While iTunes/Finder, cloud storage, and third-party apps are the most common methods, alternative approaches like email and wireless transfer can be useful in certain situations.
5.1 Transferring Music via Email
Emailing music files is a simple way to transfer individual songs or small collections. This method is particularly useful for sending files to collaborators or quickly transferring a song to your iPhone.
Here’s how to transfer music via email:
- Compose an Email: Create a new email in your email client.
- Attach Music Files: Attach the music files to the email.
- Send the Email: Send the email to your email address.
- Open on iPhone: Open the email on your iPhone and download the attached music files.
5.2 Wireless Transfer Options
Wireless transfer options like AirDrop (for Apple devices) and Wi-Fi sharing offer convenient ways to transfer music without using a USB cable.
- AirDrop: Allows you to wirelessly transfer files between Apple devices.
- Wi-Fi Sharing: Some apps offer Wi-Fi sharing features that allow you to transfer files between your computer and iPhone over a local Wi-Fi network.
5.3 When to Use These Alternative Methods
These alternative methods are best suited for specific situations:
- Email: Quick transfer of individual songs or small collections.
- AirDrop: Transferring files between Apple devices without a USB cable.
- Wi-Fi Sharing: Transferring files over a local Wi-Fi network without using cloud storage.
6. Managing Music on Your iPhone
Once you’ve transferred music to your iPhone, it’s important to manage your music library effectively. This includes organizing your songs, creating playlists, and deleting unwanted tracks.
6.1 Organizing Your Music Library
The Music app on your iPhone provides several options for organizing your music library. You can browse your music by songs, artists, albums, playlists, and more.
Here are some tips for organizing your music library:
- Use Playlists: Create playlists to group songs by genre, mood, or activity.
- Rate Your Music: Use the star rating system to rate your favorite songs.
- Edit Song Information: Correct any incorrect or missing information by editing the song metadata.
6.2 Creating and Managing Playlists
Playlists are a great way to organize your music and create custom listening experiences. You can create playlists directly on your iPhone or sync them from iTunes/Finder.
Here’s how to create a playlist on your iPhone:
- Open the Music App: Launch the Music app on your iPhone.
- Navigate to Playlists: Tap on “Library” at the bottom of the screen, then tap on “Playlists.”
- Create New Playlist: Tap on “New Playlist.”
- Name Your Playlist: Enter a name for your playlist.
- Add Music: Add songs to your playlist by tapping on the “+” button.
6.3 Deleting Unwanted Music
Over time, you might accumulate unwanted music on your iPhone. Deleting these tracks can free up storage space and keep your music library organized.
Here’s how to delete music from your iPhone:
- Open the Music App: Launch the Music app on your iPhone.
- Locate the Song: Find the song you want to delete.
- Delete the Song: Tap and hold on the song, then tap on “Delete from Library.”
7. Monetizing Your Music: Licensing and Royalties
For musicians and songwriters, transferring music to your iPhone is just the first step. The real opportunity lies in monetizing your music through licensing and royalties. payoffsong.com is here to help you navigate this exciting landscape.
7.1 Understanding Music Licensing
Music licensing involves granting permission to others to use your music in various contexts, such as movies, TV shows, commercials, and video games. Licensing can generate significant revenue for musicians.
There are several types of music licenses:
- Synchronization License: Allows the use of a song in visual media.
- Mechanical License: Grants the right to reproduce and distribute a song.
- Performance License: Allows the public performance of a song.
According to the National Music Publishers’ Association (NMPA), music licensing is a multi-billion dollar industry, with significant opportunities for independent artists.
7.2 Exploring Royalty Opportunities
Royalties are payments made to musicians and songwriters for the use of their music. These payments can come from various sources, including streaming services, radio airplay, and public performances.
There are several types of royalties:
- Performance Royalties: Paid to songwriters and publishers when their music is performed publicly.
- Mechanical Royalties: Paid to songwriters and publishers when their music is reproduced.
- Digital Royalties: Paid to artists and labels for digital downloads and streams.
7.3 How payoffsong.com Can Help
payoffsong.com offers a range of services to help musicians monetize their music:
- Licensing Opportunities: Connecting musicians with potential licensees.
- Royalty Collection: Helping musicians collect royalties from various sources.
- Legal Support: Providing legal assistance with licensing agreements and copyright issues.
Visit payoffsong.com to learn more about how you can turn your music into a revenue stream.
8. Copyright Considerations and Legal Aspects
When transferring and monetizing music, it’s crucial to understand copyright laws and legal aspects. Copyright protects your music from unauthorized use and ensures that you receive proper compensation for your work.
8.1 Understanding Copyright Law
Copyright law grants exclusive rights to creators of original works, including music. These rights include the right to reproduce, distribute, and display the work publicly.
Key aspects of copyright law include:
- Copyright Protection: Automatic protection for original works upon creation.
- Copyright Registration: Registering your copyright with the U.S. Copyright Office provides additional legal protection.
- Copyright Infringement: Unauthorized use of copyrighted material.
8.2 Protecting Your Music
There are several steps you can take to protect your music:
- Register Your Copyright: Register your songs with the U.S. Copyright Office.
- Use Copyright Notices: Include copyright notices on your recordings and sheet music.
- Monitor Your Music: Use tools to monitor the use of your music online.
8.3 Legal Resources for Musicians
Several resources are available to help musicians navigate copyright law and legal issues:
- U.S. Copyright Office: Provides information and resources on copyright law.
- ASCAP, BMI, SESAC: Performing rights organizations that collect and distribute royalties.
- Volunteer Lawyers for the Arts: Provides legal assistance to artists and arts organizations.
Address: 1601 Vine St, Los Angeles, CA 90028, United States. Phone: +1 (323) 469-2211. Website: payoffsong.com.
9. Optimizing Music for iPhone Playback
To ensure the best listening experience on your iPhone, it’s important to optimize your music files for playback. This includes choosing the right file format, adjusting the audio quality, and ensuring proper metadata.
9.1 Choosing the Right File Format
The iPhone supports a variety of audio file formats, including:
- MP3: A popular compressed audio format.
- AAC: A compressed audio format that offers better quality than MP3.
- WAV: An uncompressed audio format that provides the highest quality.
- AIFF: An uncompressed audio format similar to WAV.
For most users, AAC is the best choice, offering a good balance between file size and audio quality.
9.2 Adjusting Audio Quality
The audio quality of your music files can significantly impact the listening experience on your iPhone. Higher bitrates generally result in better audio quality, but also larger file sizes.
Here are some recommended bitrates:
- MP3: 128-320 kbps
- AAC: 128-256 kbps
9.3 Ensuring Proper Metadata
Proper metadata, such as song titles, artist names, and album art, makes it easier to browse and manage your music library on your iPhone. Make sure your music files are properly tagged before transferring them to your iPhone.
You can edit metadata using iTunes/Finder or third-party apps like MP3tag.
10. Staying Updated with Music Transfer Technologies
The technology landscape is constantly evolving, and new methods and tools for transferring music are always emerging. Staying updated with the latest technologies can help you streamline your music transfer process and take advantage of new opportunities.
10.1 Following Tech Blogs and Forums
Following tech blogs and forums is a great way to stay informed about the latest music transfer technologies. These resources often provide reviews, tutorials, and news about new apps and services.
Some popular tech blogs and forums include:
- TechRadar
- CNET
- Lifehacker
- Reddit’s r/Apple
10.2 Exploring New Apps and Software
регулярноexploring new apps and software can help you discover innovative ways to transfer and manage your music. Keep an eye on the App Store and software directories for new releases and updates.
10.3 Attending Industry Events
Attending industry events, such as music conferences and tech expos, can provide valuable insights into the latest trends and technologies in the music industry. These events often feature workshops, demonstrations, and networking opportunities.
FAQ: Transferring Music from PC to iPhone
1. Is it possible to transfer music from PC to iPhone without iTunes?
Yes, you can transfer music from your PC to your iPhone without iTunes by using cloud storage services like Google Drive or Dropbox, or third-party apps such as CopyTrans Manager or iMazing. These methods offer alternative ways to manage and transfer your music files.
2. How do I transfer music from my computer to my iPhone wirelessly?
To transfer music wirelessly, you can use cloud storage services, Wi-Fi sharing apps, or AirDrop (if you have a Mac). Upload your music to a cloud service like Google Drive, then download it to your iPhone. Alternatively, use apps that offer Wi-Fi sharing or AirDrop to transfer files directly.
3. What is the best file format for music on iPhone?
The best file format for music on iPhone is typically AAC (Advanced Audio Coding). It offers a good balance between audio quality and file size, ensuring optimal playback without consuming too much storage space.
4. How do I delete music from my iPhone?
You can delete music from your iPhone by opening the Music app, locating the song you want to delete, tapping and holding on the song, and then selecting “Delete from Library.” This will remove the song from your iPhone’s storage.
5. Can I use iCloud to transfer music from PC to iPhone?
Yes, if you subscribe to Apple Music and have iCloud Music Library enabled, you can upload your music to iCloud from your PC. Your music will then be available on all your devices, including your iPhone.
6. What do I do if my iPhone is not recognized by iTunes?
If your iPhone is not recognized by iTunes, first ensure that your USB cable is properly connected. Then, restart both your computer and iPhone. If the issue persists, check if you need to update iTunes or the device drivers on your computer.
7. How can payoffsong.com help me monetize my music on iPhone?
payoffsong.com helps you monetize your music by connecting you with licensing opportunities, assisting with royalty collection, and providing legal support for licensing agreements and copyright issues, ensuring you can earn from your musical creations.
8. Is it legal to transfer music from PC to iPhone?
Yes, it is legal to transfer music from PC to iPhone as long as you own the music files or have the necessary permissions to copy them. Transferring copyrighted music without permission is illegal and can result in legal consequences.
9. How much storage space do I need on my iPhone for music?
The amount of storage space you need depends on the size of your music library. A general estimate is that 1GB of storage can hold approximately 250 songs. Evaluate the number of songs you plan to store and choose an iPhone with sufficient storage capacity.
10. Can I transfer music from PC to iPhone using Spotify or other streaming services?
While you cannot directly transfer music files to your iPhone using Spotify or other streaming services, you can download music for offline listening within the app if you have a premium subscription. This allows you to enjoy your favorite songs without using data.
By following this comprehensive guide, you can easily transfer music from your PC to your iPhone and effectively manage your music library. For musicians and songwriters, remember that payoffsong.com is your partner in monetizing your music and navigating the complexities of the music industry. Embrace these tools and insights to make the most of your musical journey and turn your passion into profit.