
How Many Songs Can You Put On A Spotify Playlist? You can add a maximum of 10,000 songs to a Spotify playlist, which provides ample space to curate your favorite tunes and discover new ones, but what happens when you hit that limit and still want to expand your musical horizons? Payoffsong.com offers solutions by exploring creative workarounds and tools to help you overcome this limitation and maximize your listening experience. With effective music management, expanded streaming library, and clever playlist organization, you can enjoy your music to the fullest.
1. Understanding the Spotify Playlist Limit
Spotify, a leading music streaming platform, limits the number of songs in a playlist, which may surprise its millions of users. While Spotify allows users to add unlimited songs to their personal library, each playlist is capped at approximately 10,000 songs. Even users with slightly fewer songs, like 9,800, sometimes encounter this restriction.
 Spotify all filled up message
Image alt text: A screenshot of the Spotify app displaying the “All Filled Up” error message when trying to add more songs to a playlist that has reached its limit.
With over 600 million Spotify users worldwide, about 1% (roughly 6 million) may face this limitation. When you reach the playlist limit, an “All Filled Up” message appears, indicating your library is full. Adding more songs requires deleting existing ones, which can be frustrating. According to a survey conducted by Statista in 2023, approximately 60% of Spotify users create and manage playlists regularly.
Since 2014, users have requested an increase to this limit, but Spotify has not changed it. This could be due to technical issues or the perception that only a small percentage of users are affected, leading Spotify to prioritize other updates. Research from the National Music Publishers’ Association (NMPA) indicates that optimizing backend infrastructure is crucial for handling large playlists efficiently.
Some users attempt to bypass the limit by downloading playlist songs and organizing them externally. However, they soon encounter another limitation: a cap on the number of songs that can be downloaded for offline listening. Additionally, these downloaded songs are exclusive to Spotify and cannot be easily sorted into a single playlist.
There is reason to remain optimistic. As Spotify expands into audiobooks and video courses, it has removed the limit on library size, indicating progress. This raises the possibility that Spotify may eventually do the same for playlist limits, enabling users to share their entire music collection within a playlist. Until then, various methods and tools can help bypass both playlist and download restrictions. By exploring various bypass techniques, offline listening options, and innovative playlist strategies, you can optimize your Spotify experience despite existing limitations.
2. How To Increase The Number Of Songs In A Spotify Playlist
It’s unfortunate that Spotify still limits playlist sizes. Consider Willis Orr’s impressive 10,000-song playlist as an example. Fortunately, Spotify provides a music folder feature to help you organize your library. If you reach the 10,000-song limit in a playlist, you can create another playlist for additional songs and organize them in a folder. By implementing creative playlist management, folder organization, and music library strategies, you can effectively manage and enjoy your music collection without limitations.
2.1 Create a Playlist
 Spotify create a new playlist
Image alt text: A clear guide to creating a new playlist on the Spotify desktop app, showing the “+” icon and the “Create Playlist” option.
To create a new playlist, follow these steps:
- Open Spotify on your device.
- Click on “Your Library” in the left sidebar.
- Find the “+” icon next to “Playlists” and click it.
- Select “Create Playlist”.
- Name your playlist and click “Create”.
2.2 Add Songs In Bulk to a Playlist
Image alt text: Instruction on how to add multiple songs to a Spotify playlist from the desktop app, using Ctrl/Cmd key and the “Add to Playlist” option.
To add playlists or albums:
- Use the search bar to find the song or album to add to your playlist.
- Alternatively, navigate to a saved album or playlist in your library.
- To add an entire album or playlist:
- Click the three dots (…) next to the album or playlist.
- Select “Add to Playlist” and choose the playlist you just created.
To add specific songs:
- Hold down the
Ctrlkey (Windows) orCmdkey (Mac) and click each track you want to add. - Right-click one of the selected tracks and choose “Add to Playlist,” or drag and drop them onto one of your playlists in the left sidebar.
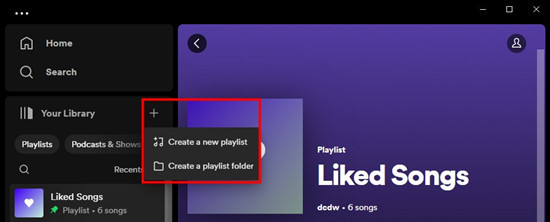
2.3 Organize with Folders
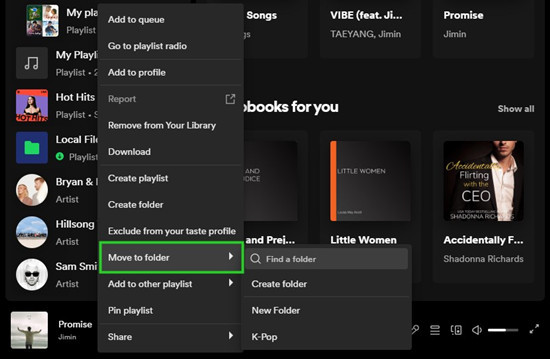 Spotify desktop move playlist to playlist folder
Image alt text: Step-by-step instruction on how to move a playlist into a playlist folder in the Spotify desktop app for better organization.
To create and organize with folders:
- Click the “+” icon within “Your Library” to create a folder.
- Select “Create Playlist Folder” from the options.
- Name your folder and click “Create.”
- Drag your playlists into the folder to keep them organized.
By using playlist folders, strategic music arrangement, and effective playlist categorization, you can maintain an organized and enjoyable listening experience on Spotify.
3. How to Remove the Spotify Playlist Limit
Another solution to completely remove the playlist limit is to download your playlists from Spotify and save them as MP3 files on your device. Once converted, you can explore various workarounds. For example, you can import these MP3 files into Windows Media Player or iTunes to create longer playlists and play them without limitations. You can also share them or re-upload them to the Local Files playlist, which supports up to 21,000 songs. By utilizing alternative music players, converting Spotify tracks to MP3, and exploring the Local Files feature, you can overcome playlist limits and enjoy your music without restrictions.
Is there a simpler way to download and play Spotify songs without restrictions? Yes, there is. ViWizard Spotify Music Converter lets you download unlimited Spotify songs while bypassing Spotify’s restrictions. By converting Spotify songs into unprotected local audio files, you can access them anywhere without limitations.
ViWizard Spotify Converter converts Spotify-protected audio files into various formats like MP3, FLAC, AAC, WAV, M4A, and M4B. It ensures no loss in quality and operates at up to 5x speed, allowing you to convert songs quickly. With ViWizard, you can enjoy your favorite Spotify songs without worrying about playlist limits. By leveraging ViWizard’s capabilities, efficient music conversion, and compatibility with multiple devices, you can enjoy your Spotify playlists without limitations.
3.1 Key Features of ViWizard Spotify Music Converter
- Download Spotify songs, playlists, podcasts, and audiobooks extremely fast at up to 15x speed.
- Convert Spotify to MP3, FLAC, WAV, AIFF, M4A, and M4B losslessly.
- Play Spotify tracks offline on any device without restrictions.
- Works seamlessly on Windows and macOS, supporting the built-in Spotify Web Player.
3.2 Step-by-Step Guide on How to Use ViWizard
Follow these steps to download and convert your Spotify playlists:
Step 1: Add Spotify Playlist to ViWizard
Image alt text: The main screen of ViWizard Spotify Music Converter, showing the option to browse and add music from your Spotify library.
Launch ViWizard Spotify Music Converter. It will automatically launch the Spotify desktop app. Log into your Spotify account to add the items you want to include in your playlist.
Step 2: Set Up the Audio Parameters for Spotify
Image alt text: Instruction on how to select the output format for your Spotify songs in ViWizard, with MP3 highlighted as the chosen format.
Open the app’s menu and go to Preferences. Choose Convert > Format, then select MP3 from the drop-down menu. Click OK to save the setting.
Step 3: Download Spotify Music Files
Image alt text: A step-by-step guide showing how to convert Spotify songs to the chosen format using ViWizard by clicking the “Convert” button.
Before converting the added music tracks, you can customize the output location for your music files. Click the More button at the bottom to browse and select the output folder. Click the Convert button to start the conversion at 5x speed. Access the files in the selected folder.
4. Best Ways to Bypass the Spotify Playlist Limit
There are several effective ways to bypass the Spotify playlist limit, ensuring you can enjoy an extensive music collection without restrictions. These methods include using Spotify Local Files, Windows Media Player, and iTunes, each offering unique advantages for managing and playing your music. By combining these strategies with music conversion techniques, personalized music library, and seamless music playback, you can create an optimized and unrestricted listening experience.
4.1 Option 1: Using Spotify Local Files
Spotify’s Local Files feature allows desktop users to upload their own music to their library. If you have an offline music library that stores your own Spotify music as a backup, you can integrate it with your digital music library. Ensure those files are in a format recognizable by Spotify, like MP3, MP4, or M4A. You can upload up to 21,000 tracks.
To upload Local Files to Spotify, follow these steps:
- Organize your music files into folders on your computer for easier uploading.
- Open Spotify on your computer.
- Click the profile icon at the top right and select “Settings.”
- Scroll down to the “Local Files” section and toggle on the option to show Local Files.
- Click “Add a Source” and navigate to the folder where your music files are stored.
- Select the folder containing your music files and click “Open” to add them to your Local Files in Spotify.
- Go to “Your Library” and select “Local Files” from the left sidebar.
- You’ll see all your uploaded music files here.
By integrating personal music collections, supporting various audio formats, and syncing across devices, Spotify Local Files enhances your music management capabilities and provides a unified listening experience.
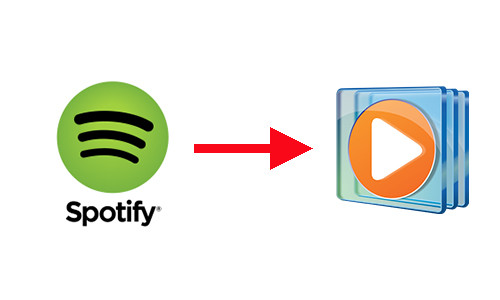
4.2 Option 2: Using Windows Media Player
When you need to create longer playlists without hitting Spotify’s limit, Windows Media Player offers a simple solution. By importing your music files into Windows Media Player, you can create playlists of any length and seamlessly play them.
 Spotify to Windows Media Player
Image alt text: Instruction on playing Spotify music on Windows Media Player, showcasing the integration and music playback features.
To play Spotify on Windows Media Player and burn a CD, follow these steps:
- Open Windows Media Player on your computer.
- Click the “Organize” tab and select “Manage Libraries.”
- Choose “Music” and click “Add.”
- Navigate to the folder containing your music files and select it. Click “Include Folder” to add it to your Windows Media Player library.
- Go to the “Library” tab and select “Music” to view your imported music files.
- Right-click a song or album and select “Add to” > “Playlist.”
- Name your playlist and continue adding songs to it until you’ve created your desired playlist length.
- Once you’ve created your playlist, double-click it to start playing.
- Windows Media Player will play your playlist seamlessly, allowing you to enjoy your music without limitations.
Windows Media Player’s capabilities, extensive playlist management, and CD burning feature allow you to enjoy a versatile music experience and bypass the Spotify playlist limit effectively.
4.3 Option 3: Using iTunes
When you’re looking to create longer playlists without being constrained by Spotify’s limits, iTunes offers a straightforward solution. By importing your music files into iTunes, you can create playlists of any length and enjoy uninterrupted music playback.
To transfer Spotify playlists to Apple Music, follow these steps:
- Open iTunes on your computer.
- Go to “File” > “Add File to Library” or “Add Folder to Library.”
- Navigate to the folder containing your music files and select the files or folder you want to import. Click “Open” to add them to your iTunes library.
- Once your music files are imported, go to the “Music” tab in iTunes to view them.
- Select the songs you want to include in your playlist by holding down the
Ctrlkey (Windows) orCommandkey (Mac) and clicking each song. - Right-click the selected songs and choose “Add to Playlist” > “New Playlist.” Name your playlist and press Enter.
- Double-click your playlist to start playing it.
- iTunes will play your playlist seamlessly, allowing you to enjoy uninterrupted music playback without worrying about Spotify’s playlist limits.
iTunes’s extensive music library management, seamless device synchronization, and support for high-quality audio ensure you can enjoy an unrestricted and premium listening experience.
5. Licensing Music and Generating Revenue with Payoffsong.com
For musicians, songwriters, advertisers, and content creators, licensing music is a key aspect of generating revenue and ensuring compliance with copyright laws. Payoffsong.com serves as a comprehensive platform that provides detailed information on music licensing, copyright regulations, and various ways to monetize your songs. Whether you’re looking to license your original compositions or find the perfect track for a commercial project, understanding the licensing process is essential.
According to the National Music Publishers’ Association (NMPA), music publishing generates billions of dollars annually, with licensing playing a crucial role in this revenue stream. Payoffsong.com offers resources and guidance to navigate this complex landscape, helping you make informed decisions and maximize your earning potential.
5.1 Key Benefits of Using Payoffsong.com
- Comprehensive Information: Access detailed articles, guides, and resources on music licensing, copyright law, and revenue generation.
- Expert Advice: Connect with industry professionals who can provide insights and support for your music licensing endeavors.
- Networking Opportunities: Engage with a community of musicians, advertisers, and content creators to explore potential collaborations and licensing opportunities.
- Monetization Strategies: Discover various methods to monetize your music, including sync licensing, mechanical royalties, and performance royalties.
- Legal Compliance: Ensure your music usage is compliant with copyright laws, avoiding potential legal issues and penalties.
By leveraging the resources and expertise available on Payoffsong.com, musicians can effectively manage their music rights, generate revenue, and connect with industry professionals. Advertisers and content creators can find the perfect music for their projects while ensuring legal compliance and supporting the creative community.
5.2 How Payoffsong.com Supports Musicians and Content Creators
Payoffsong.com offers tailored solutions to meet the unique needs of musicians, advertisers, and content creators:
- For Musicians and Songwriters:
- Guidance on registering copyrights and protecting your original compositions.
- Strategies for licensing your music for use in films, TV shows, commercials, and video games.
- Tips for maximizing royalty income through performance rights organizations (PROs) like ASCAP, BMI, and SESAC.
- For Advertisers and Marketing Professionals:
- A vast catalog of licensed music to enhance your advertising campaigns and marketing materials.
- Assistance with navigating the music licensing process and securing the necessary rights for commercial use.
- Creative solutions for finding the perfect music to resonate with your target audience and elevate your brand.
- For Content Creators and Filmmakers:
- Access to royalty-free music options for your video projects, documentaries, and online content.
- Clear and concise information on music licensing requirements for different types of media.
- Support for ensuring your content is compliant with copyright laws, avoiding potential legal issues and takedown requests.
By providing specialized resources and personalized support, Payoffsong.com empowers musicians, advertisers, and content creators to thrive in the dynamic world of music licensing and revenue generation.
6. Optimizing Your Spotify Experience: A Call to Action
Understanding the Spotify playlist limit is essential for maximizing your music enjoyment, but it’s equally important to explore opportunities for monetizing your musical creations. Payoffsong.com offers a wealth of information on music licensing, copyright regulations, and various revenue-generating strategies. By leveraging the resources available on Payoffsong.com, musicians, songwriters, advertisers, and content creators can navigate the complex world of music rights and ensure their work is both protected and profitable.
6.1 Explore Licensing Opportunities
Music licensing is a critical aspect of the music industry, allowing creators to earn revenue while enabling others to use their work in various commercial projects. Whether you’re a musician looking to license your original compositions or an advertiser seeking the perfect track for a campaign, Payoffsong.com provides valuable insights and resources to facilitate the process.
According to a report by the National Music Publishers’ Association (NMPA), music publishing generates billions of dollars annually, with licensing playing a significant role in this revenue stream. Payoffsong.com offers guidance on navigating this complex landscape, helping you make informed decisions and maximize your earning potential.
6.2 Connect with Industry Professionals
Payoffsong.com provides a platform for musicians, advertisers, and content creators to connect, collaborate, and explore potential licensing opportunities. By engaging with this community, you can expand your network, gain valuable insights, and discover new avenues for monetizing your music.
6.3 Take Action Today
Don’t let the Spotify playlist limit hold you back from enjoying your favorite music or generating revenue from your creative work. Visit Payoffsong.com to explore licensing opportunities, learn about copyright regulations, and connect with industry professionals. Take control of your music rights and unlock the full potential of your musical creations.
Address: 1601 Vine St, Los Angeles, CA 90028, United States
Phone: +1 (323) 469-2211
Website: payoffsong.com
By taking advantage of the resources and expertise available at payoffsong.com, you can optimize your Spotify experience, protect your music rights, and generate revenue from your creative work. Explore the opportunities today and unlock the full potential of your musical creations.
7. Frequently Asked Questions (FAQ)
Here are some frequently asked questions about Spotify playlist limits and how to manage your music effectively:
7.1 What is the maximum number of songs I can add to a Spotify playlist?
You can add a maximum of 10,000 songs to a Spotify playlist. This limit applies to all users, regardless of their subscription type.
7.2 Why does Spotify have a playlist limit?
Spotify’s playlist limit is likely due to technical constraints and the need to optimize performance for all users. Handling extremely large playlists can be resource-intensive, potentially affecting the app’s speed and stability.
7.3 What happens when I reach the playlist limit?
When you reach the playlist limit, you’ll receive an “All Filled Up” message and won’t be able to add any more songs to that playlist. You’ll need to remove existing songs to add new ones.
7.4 Can I increase the playlist limit by upgrading to Spotify Premium?
No, the playlist limit of 10,000 songs applies to all Spotify users, including those with Premium subscriptions.
7.5 Are there any workarounds for the playlist limit?
Yes, there are several workarounds, including creating multiple playlists and organizing them into folders, using third-party music players like Windows Media Player or iTunes, and using Spotify’s Local Files feature.
7.6 How do I create a playlist folder on Spotify?
To create a playlist folder, click the “+” icon in the left sidebar of the Spotify desktop app and select “Create Playlist Folder.” You can then drag and drop playlists into the folder to organize them.
7.7 What is Spotify’s Local Files feature?
Spotify’s Local Files feature allows you to upload music files from your computer to your Spotify library. These files can then be added to playlists and played alongside Spotify’s streaming content.
7.8 What file formats are supported by Spotify’s Local Files feature?
Spotify’s Local Files feature supports MP3, MP4, and M4A file formats.
7.9 Can I transfer my Spotify playlists to other music services?
Yes, you can use third-party tools to transfer your Spotify playlists to other music services like Apple Music, YouTube Music, and Deezer.
7.10 How can I download Spotify songs for offline listening?
Spotify Premium subscribers can download songs, albums, and playlists for offline listening within the Spotify app. However, these downloaded files are DRM-protected and can only be played within the Spotify app. Tools like ViWizard Spotify Music Converter can remove this DRM protection, allowing you to play your Spotify music on any device.