
Transferring songs from one iPhone to another is a common need, and How To Transfer Songs From One Iphone To Another is a process that can be straightforward with the right methods, ensuring you keep enjoying your favorite music, possibly leading to more listening and discovering potential income opportunities through music licensing, discussed further on payoffsong.com. Whether you’re upgrading your device or sharing tunes with a friend, several options are available, including both wired and wireless solutions. You can explore music licensing and synchronization rights for potential revenue.
1. Why Transfer Music Between iPhones?
There are many reasons why you might want to transfer music between iPhones. Understanding these reasons can help you choose the most suitable method for your needs.
1.1 Upgrading to a New iPhone
One of the most common reasons is upgrading to a new iPhone. When you get a new device, you naturally want to bring all your data, including your music library, with you. This ensures a seamless transition and allows you to continue enjoying your favorite songs without interruption.
1.2 Sharing Music with Friends and Family
Sharing music with friends and family is another popular reason. Perhaps you’ve created a fantastic playlist you want to share, or you want to introduce someone to your favorite artists. Transferring music can be a great way to connect and share your musical tastes.
1.3 Creating Backups
Backing up your music is crucial to prevent data loss. If your iPhone is lost, stolen, or damaged, having a backup ensures you won’t lose your precious music collection. Transferring music to another iPhone can serve as a convenient backup method.
1.4 Consolidating Music Libraries
Sometimes, you might have music spread across multiple iPhones. Maybe you had an old device with some unique tracks, and you want to consolidate everything onto your primary iPhone. Transferring music can help you bring all your music into one place for easier management.
1.5 Avoiding Subscription Restrictions
Some music streaming services have restrictions on the number of devices you can use with a single account. Transferring music files directly to your iPhone can bypass these restrictions, allowing you to listen to your music without worrying about device limits.
2. Understanding Different Transfer Methods
Several methods are available to transfer music from one iPhone to another. Each method has its pros and cons, so understanding them will help you choose the best option for your situation.
2.1 Using iTunes
iTunes, now integrated into the Finder on macOS Catalina and later, is a classic method for transferring music between iPhones. It involves connecting your iPhones to a computer and syncing your music library.
2.1.1 How iTunes Works
iTunes allows you to transfer purchased music and other media files between your iPhone and computer. You can select specific songs, albums, or playlists to sync, giving you control over what gets transferred.
2.1.2 Pros and Cons of Using iTunes
- Pros:
- Great for transferring purchased music.
- Works offline.
- Cons:
- Can be complex and time-consuming.
- May overwrite existing data on your iPhone.
- Doesn’t easily transfer non-purchased songs.
2.2 Using MobileTrans – Phone Transfer
MobileTrans – Phone Transfer is a third-party tool designed to simplify the process of transferring data between devices, including iPhones.
2.2.1 How MobileTrans Works
MobileTrans allows you to transfer music, photos, contacts, and other data with just a few clicks. It supports various file types and offers a user-friendly interface.
2.2.2 Pros and Cons of Using MobileTrans
- Pros:
- Simple and user-friendly interface.
- Fast transfer speeds.
- Supports a wide range of file types.
- Allows selective transfer of data.
- Cons:
- Requires a paid license for full functionality.
- Requires a computer.
2.3 Using Home Sharing
Home Sharing is a feature built into iTunes that allows you to stream music from one iPhone to another over a shared Wi-Fi network.
2.3.1 How Home Sharing Works
Home Sharing requires both iPhones to be connected to the same Wi-Fi network and signed in with the same Apple ID. You can then access the music library on one iPhone from the other.
2.3.2 Pros and Cons of Using Home Sharing
- Pros:
- No need to copy files.
- No cables required.
- Cons:
- Only streams music (does not permanently transfer).
- Requires the same Apple ID on both devices.
- Needs a stable Wi-Fi connection.
2.4 Using AirDrop
AirDrop is a wireless file transfer service built into iOS devices. It allows you to quickly and easily share files, including music, with nearby iPhones.
2.4.1 How AirDrop Works
AirDrop uses Bluetooth to discover nearby devices and Wi-Fi to transfer files. Both iPhones need to have AirDrop enabled and be within range of each other.
2.4.2 Pros and Cons of Using AirDrop
- Pros:
- Wireless and easy to use.
- Fast transfer speeds.
- No need for extra apps or software.
- Cons:
- Works only for DRM-free songs.
- Cannot transfer entire playlists.
- Can be unreliable at times.
2.5 Using iCloud
iCloud is Apple’s cloud storage service, which can be used to back up and sync your music library across devices.
2.5.1 How iCloud Works
You can upload your music library to iCloud from one iPhone and then download it to another. This requires an active internet connection and sufficient iCloud storage.
2.5.2 Pros and Cons of Using iCloud
- Pros:
- Works for all types of audio files.
- No third-party app required.
- Cons:
- Limited free storage (5GB).
- Requires a stable internet connection.
- Manual process required for each file.
2.6 Using iCloud Music Library
iCloud Music Library is a feature of Apple Music that syncs your music library across all your Apple devices.
2.6.1 How iCloud Music Library Works
With an Apple Music subscription, you can enable iCloud Music Library on both iPhones to automatically sync your music library.
2.6.2 Pros and Cons of Using iCloud Music Library
- Pros:
- No cables required.
- Automatically syncs music across devices.
- Cons:
- Requires an Apple Music subscription.
- Won’t work for non-Apple Music tracks.
2.7 Using Dropbox
Dropbox is a cloud-based file hosting service that can be used to transfer music files between iPhones.
2.7.1 How Dropbox Works
You can upload your music files to Dropbox from one iPhone and then download them to another. This requires a Dropbox account and an active internet connection.
2.7.2 Pros and Cons of Using Dropbox
- Pros:
- Accessible anywhere.
- Easy to use.
- Cons:
- Requires an internet connection.
- Limited free storage (2GB).
3. Step-by-Step Guides for Each Transfer Method
Now that you understand the different transfer methods, let’s dive into step-by-step guides for each one.
3.1 Method 1: Transferring Music with iTunes
iTunes, a media management tool, can be used to transfer music if the music was purchased with the same Apple ID.
3.1.1 Steps to Transfer Music with iTunes
- Connect the Old iPhone: Connect your old iPhone to your computer using a USB cable.
- Open iTunes: Open iTunes on your computer. If you’re using macOS Catalina or later, open Finder instead.
- Select Your iPhone: In iTunes, click on the iPhone icon in the top-left corner. In Finder, find your iPhone in the sidebar.
- Transfer Purchases: Go to File > Devices > Transfer Purchases from [Your iPhone Name]. This will copy all purchased music from your iPhone to your iTunes library.
- Disconnect the Old iPhone: Once the transfer is complete, disconnect your old iPhone.
- Connect the New iPhone: Connect your new iPhone to your computer.
- Sync Music: In iTunes, click on the Music tab. Check the “Sync Music” box and select the music you want to transfer to your new iPhone.
- Apply Changes: Click the “Apply” button to start syncing your music.
3.1.2 Tips for Using iTunes
- Make sure you have the latest version of iTunes installed.
- Ensure your computer has enough storage space for your music library.
- Be patient, as syncing large music libraries can take time.
3.2 Method 2: Transferring Music with MobileTrans – Phone Transfer
MobileTrans simplifies the transfer process, allowing you to move your music library with ease.
3.2.1 Steps to Transfer Music with MobileTrans
- Download and Install MobileTrans: Download and install MobileTrans – Phone Transfer on your computer from MobileTrans Official Website.
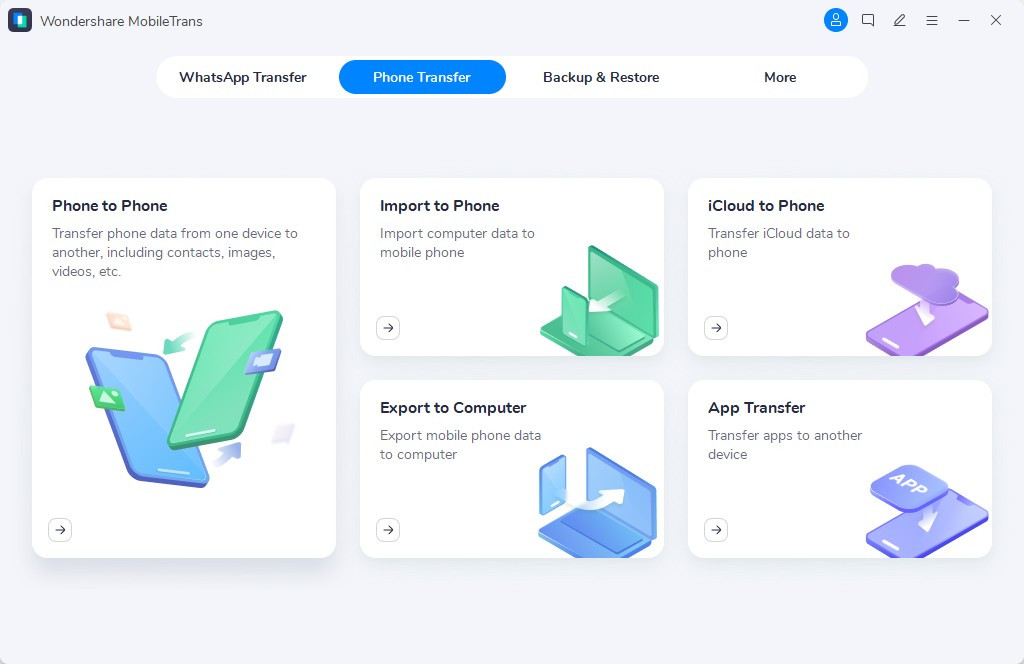 MobileTrans Home 01
Alt Text: MobileTrans welcome screen displaying options for phone transfer, WhatsApp transfer, and more.
- Launch MobileTrans: Open the MobileTrans application.
- Connect Both iPhones: Connect both your old and new iPhones to your computer using USB cables.
- Select Phone Transfer: Choose the “Phone Transfer” option from the main menu.
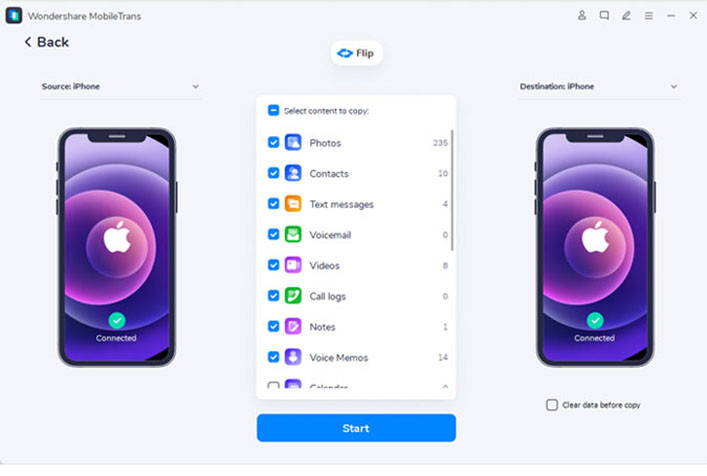 Phone Transfer iPhone to iPhone
Alt Text: MobileTrans interface showing two iPhones connected and ready for data transfer.
- Select Source and Destination: Ensure that your old iPhone is selected as the source and your new iPhone as the destination. If they are in the wrong order, click the “Flip” button to switch them.
- Choose Music to Transfer: Select the “Music” option from the list of data types.
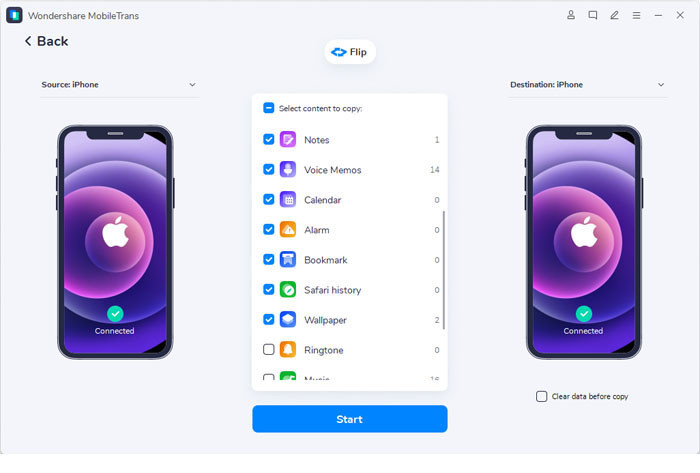 Transfer Music From iPhone to iPhone
Alt Text: MobileTrans screen showing the selection of music files for transfer between iPhones.
- Start Transfer: Click the “Start” button to begin transferring your music.
- Wait for Completion: Wait for the transfer to complete. Keep both iPhones connected during the process.
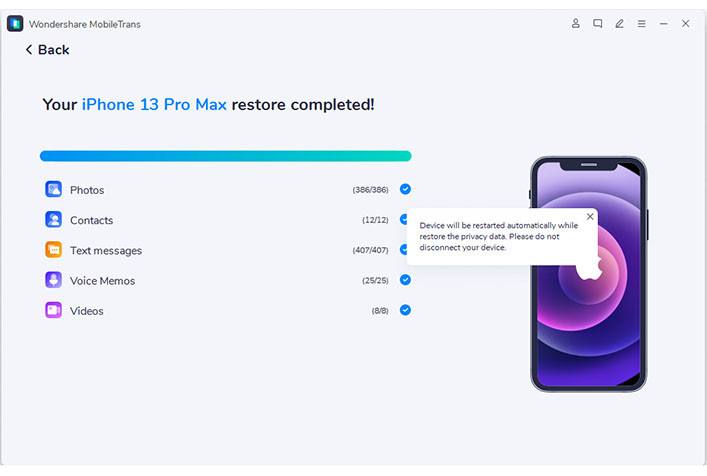 Phone Transfer Completed
Alt Text: MobileTrans displaying the completion of the phone transfer process.
3.2.2 Tips for Using MobileTrans
- Ensure both iPhones are fully charged before starting the transfer.
- Close any unnecessary applications on your computer to improve transfer speed.
- Consider purchasing a MobileTrans license for unlimited transfers.
3.3 Method 3: Transferring Music with Home Sharing
Home Sharing allows you to stream music from one iPhone to another, provided they are on the same network.
3.3.1 Steps to Transfer Music with Home Sharing
- Enable Home Sharing on Old iPhone: On your old iPhone, go to Settings > Music > Home Sharing.
- Sign In with Apple ID: Enter your Apple ID and password to enable Home Sharing.
- Enable Home Sharing on New iPhone: Repeat the process on your new iPhone, ensuring you use the same Apple ID.
- Open Music App: Open the Music app on your new iPhone.
- Access Shared Library: Tap on “Library” and then “Home Sharing” to access the music library on your old iPhone.
- Stream Music: You can now stream music from your old iPhone to your new iPhone.
3.3.2 Tips for Using Home Sharing
- Ensure both iPhones are connected to the same Wi-Fi network.
- Keep both iPhones powered on and within range of the Wi-Fi network.
- Home Sharing only allows streaming, not permanent transfer of files.
3.4 Method 4: Transferring Music with AirDrop
AirDrop allows for quick and easy sharing of DRM-free music files between iPhones.
3.4.1 Steps to Transfer Music with AirDrop
- Enable AirDrop on Both iPhones: Swipe down from the top-right corner of the screen to open the Control Center. Press and hold the Wi-Fi or Bluetooth icon to reveal the AirDrop option. Tap on AirDrop and choose “Everyone” or “Contacts Only.” You can also enable AirDrop in Settings > General > AirDrop.
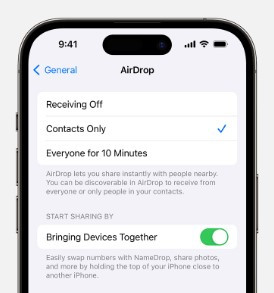 Airdrop On
Alt Text: iPhone settings showing AirDrop options set to “Everyone for 10 Minutes.”
- Open Music App: Open the Music app on your old iPhone.
- Select Song to Share: Find the song you want to share and tap the “Share” button (the square with an arrow pointing up).
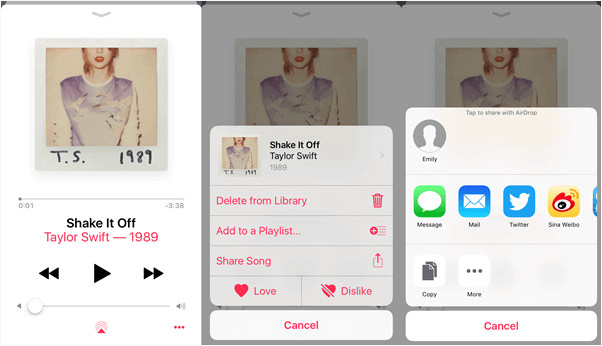 Share Music Through Airdrop
Alt Text: iPhone screen displaying the share options for a song, with AirDrop highlighted.
- Choose AirDrop: Tap on the AirDrop icon and select the name of your new iPhone.
- Accept on New iPhone: On your new iPhone, a pop-up will appear asking you to accept the file. Tap “Accept” to receive the song.
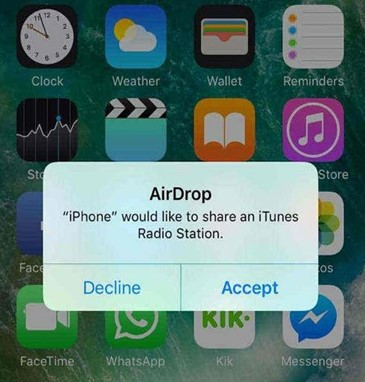 Receive
Alt Text: iPhone displaying a pop-up to accept an AirDrop file transfer.
3.4.2 Tips for Using AirDrop
- Ensure both iPhones are close to each other.
- AirDrop works best for individual songs rather than entire playlists.
- DRM-protected songs cannot be transferred via AirDrop.
3.5 Method 5: Transferring Music with iCloud
iCloud provides a way to backup and restore music between iPhones, although it can be a manual process.
3.5.1 Steps to Transfer Music with iCloud
- Backup Music on Old iPhone: On your old iPhone, go to Settings > [Your Name] > iCloud > Manage Storage > Backups.
- Select Backup Options: Tap “This iPhone” and ensure that the “Music” toggle is turned on. If it is not shown, tap “Show All Apps” and then turn on the toggle button for the Music app.
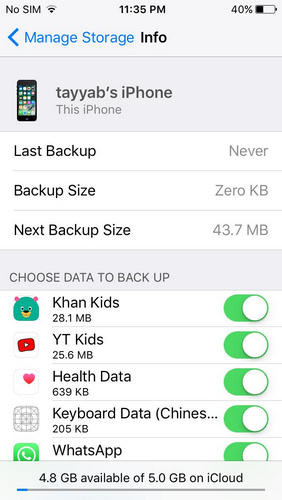 iCloud Backup Info
Alt Text: iPhone settings displaying iCloud backup options and storage usage.
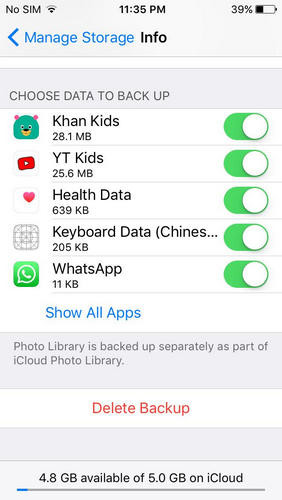 iCloud Manage
Alt Text: iPhone settings showing iCloud app management and backup options.
- Backup Now: Tap “Back Up Now” to start backing up your iPhone, including your music library, to iCloud. This process requires that your iPhone be connected to a Wi-Fi network and a power source while also the iCloud will wait for the screen to be off for the backup process to save power.
- Restore on New iPhone: On your new iPhone, go through the initial setup process. When prompted, choose to restore from an iCloud backup.
- Sign In with Apple ID: Sign in with the same Apple ID you used to back up your old iPhone.
- Select Backup: Choose the most recent backup from your old iPhone.
- Wait for Restore: Wait for the restore process to complete. This can take a while depending on the size of your backup.
3.5.2 Tips for Using iCloud
- Ensure you have enough iCloud storage space for your backup.
- Connect both iPhones to a stable Wi-Fi network during the backup and restore process.
- This method restores your entire iPhone, not just your music library.
3.6 Method 6: Transferring Music with iCloud Music Library
iCloud Music Library is ideal for Apple Music subscribers who want to keep their music synced across all devices.
3.6.1 Steps to Transfer Music with iCloud Music Library
- Enable Sync Library on Old iPhone: On your old iPhone, go to Settings > Music and toggle on “Sync Library.”
- Enable Sync Library on New iPhone: Repeat the process on your new iPhone, ensuring you use the same Apple ID.
- Wait for Sync: Wait for your music library to sync automatically. This can take some time depending on the size of your library and your internet connection speed.
3.6.2 Tips for Using iCloud Music Library
- You need an active Apple Music subscription to use iCloud Music Library.
- Ensure both iPhones are signed in with the same Apple ID.
- This method only works for music that is part of the Apple Music catalog or has been uploaded to your iCloud Music Library.
3.7 Method 7: Transferring Music with Dropbox
Dropbox allows you to upload and download music files, making it a flexible option for transferring music.
3.7.1 Steps to Transfer Music with Dropbox
- Download and Install Dropbox: Download and install the Dropbox app on both iPhones.
- Upload Music to Dropbox: On your old iPhone, open the Dropbox app and upload the music files you want to transfer. Tap the “Create” button and upload the music.
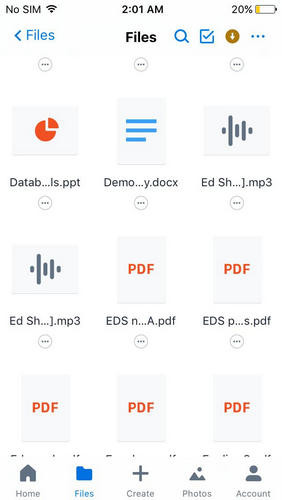 Music Dropbox
Alt Text: Dropbox app on an iPhone showing the option to create and upload files.
- Download Music on New iPhone: On your new iPhone, sign in to the Dropbox app with the same account. Navigate to the folder where you uploaded the music and download the files.
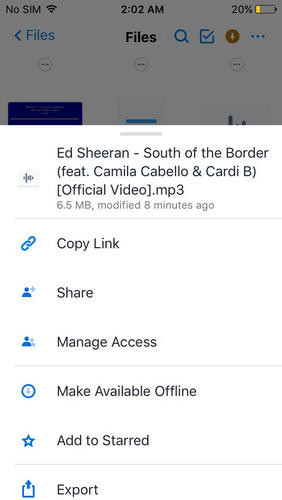 Access Music Dropbox
Alt Text: Dropbox app on an iPhone displaying uploaded music files ready for access and download.
3.7.2 Tips for Using Dropbox
- Ensure you have enough Dropbox storage space for your music library.
- Connect both iPhones to a stable Wi-Fi network for faster uploads and downloads.
- Consider upgrading to a paid Dropbox plan for more storage space.
4. Troubleshooting Common Issues
Transferring music between iPhones can sometimes be tricky. Here are some common issues and how to troubleshoot them:
4.1 iTunes Not Recognizing iPhone
If iTunes doesn’t recognize your iPhone, try the following:
- Ensure your iPhone is unlocked and trusts the computer.
- Update iTunes to the latest version.
- Restart your computer and iPhone.
- Try a different USB cable or port.
4.2 Slow Transfer Speeds
Slow transfer speeds can be frustrating. Here are some tips to improve them:
- Close unnecessary applications on your computer and iPhone.
- Use a USB 3.0 port for faster transfer speeds.
- Ensure your Wi-Fi network is stable and strong.
- Transfer music in smaller batches.
4.3 AirDrop Not Working
If AirDrop is not working, try the following:
- Ensure both iPhones have AirDrop enabled and are set to “Everyone” or “Contacts Only.”
- Turn Bluetooth and Wi-Fi off and on again on both iPhones.
- Restart both iPhones.
- Make sure the iPhones are within close proximity of each other.
4.4 iCloud Syncing Problems
If you’re experiencing issues with iCloud syncing, try the following:
- Ensure both iPhones are signed in with the same Apple ID.
- Check your iCloud storage space.
- Restart both iPhones.
- Update to the latest version of iOS.
4.5 DRM-Protected Songs Not Transferring
DRM-protected songs cannot be transferred via AirDrop or other methods that don’t support DRM. To transfer these songs, you need to use iTunes or iCloud Music Library.
5. Optimizing Your Music Library for Transfer
Before transferring your music, it’s a good idea to optimize your music library for a smoother experience.
5.1 Cleaning Up Your Music Library
Remove any duplicate songs, incorrect album art, or missing metadata. This will make your music library more organized and easier to manage.
5.2 Converting Music Formats
If you have music in different formats (e.g., MP3, AAC, FLAC), consider converting them to a consistent format. AAC is a good choice for iPhones as it offers a good balance of quality and file size.
5.3 Using High-Quality Audio Files
Opt for high-quality audio files whenever possible. This will ensure the best listening experience on your new iPhone.
6. Exploring Music Licensing Opportunities
Once you’ve successfully transferred your music, consider exploring opportunities to monetize your music through licensing.
6.1 Understanding Music Licensing
Music licensing involves granting permission for someone to use your music in exchange for payment. This can include synchronization licenses (for use in films, TV shows, and commercials) and mechanical licenses (for reproduction of your music).
6.2 Types of Music Licenses
- Synchronization License: Allows the use of a song in visual media.
- Mechanical License: Allows the reproduction and distribution of a song.
- Performance License: Allows the public performance of a song.
- Master Use License: Allows the use of a specific recording of a song.
6.3 How to License Your Music
- Register with a Performing Rights Organization (PRO): Organizations like ASCAP, BMI, and SESAC collect performance royalties on behalf of songwriters and publishers.
- Use a Music Licensing Platform: Platforms like payoffsong.com connect music creators with potential licensees.
- Network with Industry Professionals: Attend music conferences, workshops, and networking events to meet potential clients and collaborators.
6.4 Payoffsong.com: Your Partner in Music Licensing
Payoffsong.com offers a comprehensive platform for musicians and content creators to connect, explore licensing opportunities, and maximize their earnings. Whether you’re looking to license your original compositions or find the perfect track for your next project, payoffsong.com provides the tools and resources you need to succeed.
6.5 Success Stories in Music Licensing
Many artists have found success through music licensing. For example, Moby’s music has been extensively licensed for use in films and commercials, generating significant revenue. Similarly, indie artists like Ingrid Michaelson have seen their careers boosted by having their songs featured in popular TV shows.
7. Staying Updated with Music Industry Trends
The music industry is constantly evolving, so it’s important to stay updated with the latest trends and opportunities.
7.1 Following Music Industry News
Read music industry blogs, magazines, and websites to stay informed about new licensing opportunities, copyright laws, and emerging trends.
7.2 Attending Music Conferences and Workshops
Attend music conferences and workshops to learn from industry experts, network with peers, and discover new strategies for success.
7.3 Networking with Industry Professionals
Build relationships with music supervisors, publishers, and other industry professionals to increase your chances of landing licensing deals.
8. FAQs About Transferring Music Between iPhones
Here are some frequently asked questions about transferring music between iPhones:
8.1 Can I transfer music from an iPhone to an Android device?
Yes, but the process is different. You can use third-party apps like MobileTrans or cloud services like Google Play Music to transfer music between iPhones and Android devices.
8.2 Is it legal to transfer music between iPhones?
Yes, as long as you own the music or have the right to transfer it. Transferring copyrighted music without permission is illegal.
8.3 How do I transfer music that is not purchased from iTunes?
You can use methods like MobileTrans, AirDrop, iCloud, or Dropbox to transfer non-iTunes music between iPhones.
8.4 Can I transfer music without using a computer?
Yes, you can use methods like AirDrop, iCloud, or Dropbox to transfer music without a computer.
8.5 How much does it cost to transfer music between iPhones?
The cost depends on the method you use. Some methods, like AirDrop and iCloud (with limited storage), are free. Others, like MobileTrans, require a paid license.
8.6 What is DRM, and why does it affect music transfer?
DRM (Digital Rights Management) is a technology used to protect copyrighted content. DRM-protected music cannot be transferred via certain methods like AirDrop.
8.7 How do I check if a song is DRM-protected?
In iTunes, right-click on the song and select “Get Info.” Go to the “File” tab and look for “Kind.” If it says “Protected AAC audio file,” the song is DRM-protected.
8.8 Can I transfer music from an old iPod to an iPhone?
Yes, you can use iTunes to transfer music from an old iPod to an iPhone. Connect the iPod to your computer, transfer the music to iTunes, and then sync it with your iPhone.
8.9 What should I do if I run out of iCloud storage?
You can either delete files from your iCloud storage or upgrade to a paid iCloud plan for more storage space.
8.10 How can I ensure my music is backed up in case my iPhone is lost or stolen?
Regularly back up your iPhone to iCloud or your computer. This will ensure that your music and other data are safe in case of loss or theft.
9. Conclusion
Transferring music from one iPhone to another doesn’t have to be a daunting task. By understanding the various methods available and following the step-by-step guides, you can seamlessly move your music library and continue enjoying your favorite tunes on your new device. And with platforms like payoffsong.com, you can even explore opportunities to monetize your music and turn your passion into profit.
So, whether you’re upgrading to a new iPhone, sharing music with friends, or exploring music licensing opportunities, the possibilities are endless. Take control of your music library and start enjoying the benefits today.
Ready to take your music to the next level? Visit payoffsong.com to discover the resources, tools, and community you need to succeed in the music industry. Explore licensing opportunities, connect with industry professionals, and start turning your music into a valuable asset.
Address: 1601 Vine St, Los Angeles, CA 90028, United States
Phone: +1 (323) 469-2211
Website: payoffsong.com