
Want to enjoy your favorite computer songs on your iPhone? This guide from payoffsong.com will walk you through the seamless process of “How To Sync Songs From Computer To Iphone”, ensuring you have all your favorite tunes at your fingertips. Discover the best methods for music synchronization, manage your music library effectively, and enhance your overall listening experience. Dive in to learn about song management, music transfer, and playlist synchronization.
1. Understanding the Basics of Syncing Music to Your iPhone
What Does Syncing Mean for Your Music?
Syncing refers to the process of transferring data, in this case, music files, from your computer to your iPhone, ensuring both devices have the same content. It’s a fantastic way to keep your music library consistent across devices, allowing you to enjoy your favorite tracks wherever you go. Syncing ensures that your playlists, song information, and other metadata are accurately transferred, providing a seamless listening experience. This process is essential for anyone who wants to manage their music collection efficiently and enjoy their favorite songs on their iPhone.
Why Sync Music from Your Computer to Your iPhone?
There are several compelling reasons to sync music from your computer to your iPhone:
- Access to Your Entire Music Library: Syncing allows you to carry your entire music library with you, regardless of storage limitations on your iPhone.
- Offline Playback: Enjoy your favorite songs without relying on a constant internet connection. Perfect for travel, commutes, or areas with poor connectivity.
- Custom Playlists: Create and sync custom playlists from your computer to your iPhone, tailoring your listening experience to your mood and activities.
- High-Quality Audio: Transfer high-quality audio files from your computer to your iPhone, ensuring the best possible listening experience.
- Backup and Security: Syncing acts as a backup for your music library. If something happens to your computer, your music is safely stored on your iPhone.
What are the Different Methods to Sync Music from Your Computer to Your iPhone?
There are several methods to sync music from your computer to your iPhone, each with its own advantages:
- Using iTunes/Finder: The traditional method using Apple’s software.
- Using Apple Music Subscription: Syncing your cloud library.
- Using Third-Party Software: Various apps that offer more flexibility and features.
- Using Cloud Storage Services: Services like Google Drive or Dropbox to transfer music files.
2. Syncing Music Using iTunes or Finder
How to Prepare Your Computer and iPhone for Syncing
Before you begin syncing, ensure your computer and iPhone are properly prepared:
- Update Software: Make sure you have the latest version of iTunes (for older macOS versions) or Finder (for newer macOS versions) on your computer. Update your iPhone to the latest iOS version.
- Authorize Your Computer: Open iTunes, go to “Account” > “Authorizations” > “Authorize This Computer.” Enter your Apple ID and password.
- Connect Your iPhone: Connect your iPhone to your computer using a USB cable. Unlock your iPhone and tap “Trust This Computer” if prompted.
- Disable iCloud Music Library (If Necessary): If you’re not using Apple Music, turn off iCloud Music Library on your iPhone by going to “Settings” > “Music” and toggling off “Sync Library.”
- Backup Your iPhone: Before making any major changes, back up your iPhone to iCloud or your computer.
Step-by-Step Guide to Syncing Music with iTunes/Finder
Here’s a step-by-step guide to syncing music from your computer to your iPhone using iTunes or Finder:
- Open iTunes/Finder: Launch iTunes (on older macOS or Windows) or Finder (on newer macOS).
- Select Your iPhone: In iTunes, click the iPhone icon near the top left. In Finder, find your iPhone in the sidebar under “Locations.”
- Navigate to Music Settings: In iTunes, click “Music” in the sidebar. In Finder, click “Music” in the top menu.
- Choose Sync Options:
- Sync Entire Library: Select “Sync Music” and choose “Entire music library.” This will sync all the music in your iTunes library to your iPhone.
- Sync Selected Playlists, Artists, Albums, and Genres: Select “Sync Music” and choose “Selected playlists, artists, albums, and genres.” Then, select the specific items you want to sync.
- Apply Changes: Click the “Apply” button in the bottom right corner to start the syncing process.
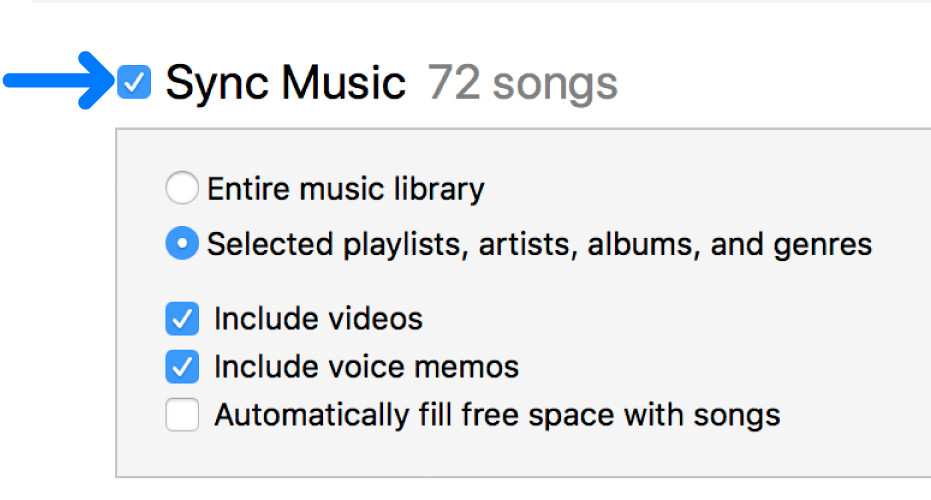 iTunes music syncing options with selected playlists, artists, albums, and genres, offering a tailored synchronization.
Managing Sync Settings and Preferences
You can customize your sync settings to manage your music library more effectively:
- Automatic Syncing: By default, iTunes/Finder syncs your iPhone whenever it’s connected to your computer. To disable this, uncheck “Automatically sync when this iPhone is connected” in the “Summary” tab.
- Manual Management: To manually manage your music, select “Manually manage music” in the “Summary” tab. This allows you to drag and drop songs directly to your iPhone.
- Sync Over Wi-Fi: To sync your iPhone over Wi-Fi, connect your iPhone to your computer via USB, select “Sync with this iPhone over Wi-Fi” in the “Summary” tab, and click “Apply.”
- Free Space: The bar at the bottom of the window shows how much free space remains on your device after you sync.
- Prevent Automatic Syncing: Choose Edit > Preferences, click Devices, then select “Prevent iPods, iPhones, and iPads from syncing automatically.”
Troubleshooting Common Syncing Issues with iTunes/Finder
If you encounter issues while syncing, try these troubleshooting steps:
- Check USB Connection: Ensure your USB cable is securely connected to both your computer and iPhone. Try using a different USB cable or port.
- Restart Devices: Restart both your computer and iPhone.
- Update Software: Make sure you have the latest versions of iTunes/Finder and iOS.
- Reauthorize Computer: Deauthorize and reauthorize your computer in iTunes.
- Reset Sync History: In iTunes, go to “Edit” > “Preferences” > “Advanced” and click “Reset Sync History.”
- Check Storage Space: Ensure your iPhone has enough storage space for the music you’re trying to sync.
- Disable VPN: VPN connections can sometimes interfere with the syncing process. Temporarily disable your VPN and try again.
- Apple Support: Refer to Apple Support for more in-depth troubleshooting guides.
3. Using Apple Music for Syncing
Understanding iCloud Music Library and Apple Music
iCloud Music Library, now known as “Sync Library,” is a feature that allows you to access your music library across all your devices using Apple Music. When you subscribe to Apple Music, your music library is stored in the cloud, and any changes you make on one device are automatically synced to all your other devices. This includes songs you’ve purchased from iTunes, songs you’ve added from Apple Music, and songs you’ve imported from CDs or other sources.
How to Enable Sync Library on Your iPhone and Computer
To enable Sync Library on your iPhone and computer:
- On Your iPhone: Go to “Settings” > “Music” and toggle on “Sync Library.”
- On Your Computer: Open iTunes (on older macOS or Windows) or the Music app (on newer macOS). Go to “Preferences” > “General” and select “Sync Library.”
- Sign In: Make sure you’re signed in to both devices with the same Apple ID.
- Merge or Replace: If prompted, choose to merge your local music library with your iCloud Music Library.
Adding Music to Your Apple Music Library
There are several ways to add music to your Apple Music library:
- Download from Apple Music: Browse the Apple Music catalog and download songs, albums, or playlists to your library.
- Import from CDs: Insert a CD into your computer, and iTunes/Music app will prompt you to import the songs.
- Purchase from iTunes Store: Buy songs or albums from the iTunes Store, and they’ll be added to your library.
- Upload from Your Computer: Drag and drop music files from your computer to the iTunes/Music app. These files will be uploaded to your iCloud Music Library.
Managing Your Music Library with Apple Music
With Apple Music, managing your music library is seamless:
- Create Playlists: Create custom playlists and access them on all your devices.
- Edit Song Information: Edit song titles, artist names, album art, and other metadata.
- Delete Songs: Remove songs from your library, and they’ll be deleted from all your devices.
- Rate Songs: Rate songs to help Apple Music learn your preferences and recommend new music.
Troubleshooting Common Issues with Apple Music Syncing
If you encounter issues with Apple Music syncing, try these solutions:
- Check Apple Music Subscription: Ensure your Apple Music subscription is active.
- Check Internet Connection: Make sure both your computer and iPhone have a stable internet connection.
- Restart Devices: Restart both your computer and iPhone.
- Update Software: Ensure you have the latest versions of iTunes/Music app and iOS.
- Sign Out and Sign In: Sign out of Apple Music on both devices and sign back in.
- iCloud Status: Check the iCloud system status page to see if there are any known issues.
- Contact Apple Support: Refer to Apple Support for more in-depth troubleshooting guides.
4. Using Third-Party Software for Syncing
Overview of Popular Third-Party Music Transfer Tools
Several third-party software options can help you sync music from your computer to your iPhone:
- AnyTrans: A comprehensive iOS data manager that allows you to transfer music, videos, photos, and more between your computer and iPhone.
- iMazing: A versatile iPhone management tool that offers advanced features for backing up, transferring, and managing your iOS devices.
- CopyTrans Manager: A free iTunes alternative that allows you to manage your music library and transfer songs to your iPhone without using iTunes.
- DearMob iPhone Manager: A user-friendly tool that lets you transfer music, videos, and photos between your computer and iPhone with ease.
- WALTR PRO: Converts and transfers any music, video, or Audiobook to your iPhone, iPad or iPod without iTunes.
Step-by-Step Guide to Using a Selected Tool (e.g., AnyTrans)
Here’s a step-by-step guide to syncing music from your computer to your iPhone using AnyTrans:
- Download and Install AnyTrans: Download AnyTrans from the iMobie website and install it on your computer.
- Connect Your iPhone: Connect your iPhone to your computer using a USB cable.
- Launch AnyTrans: Open AnyTrans on your computer.
- Select Music: In AnyTrans, click on the “Music” icon.
- Add Music: Click the “Add” button to select music files or folders from your computer.
- Transfer Music: AnyTrans will transfer the selected music files to your iPhone.
- View Music on iPhone: Once the transfer is complete, you can view the music on your iPhone in the Music app.
Advantages and Disadvantages of Using Third-Party Software
Advantages:
- User-Friendly Interface: Many third-party tools offer a more intuitive and user-friendly interface than iTunes.
- Advanced Features: Third-party software often includes advanced features such as automatic conversion of music formats, wireless transfer, and batch processing.
- No iTunes Required: Some tools allow you to transfer music without needing iTunes installed.
- Flexibility: Third-party software often provides more flexibility in managing your music library.
Disadvantages:
- Cost: Many third-party tools require a paid license.
- Security Concerns: Downloading software from unknown sources can pose security risks.
- Compatibility Issues: Some tools may not be fully compatible with the latest iOS versions.
Considerations for Choosing the Right Software
When choosing third-party software for syncing music, consider the following factors:
- Features: Look for software that offers the features you need, such as automatic conversion, wireless transfer, and batch processing.
- User Interface: Choose software with a user-friendly interface that is easy to navigate.
- Price: Compare the prices of different software options and choose one that fits your budget.
- Reviews: Read reviews from other users to get an idea of the software’s reliability and performance.
- Security: Download software only from trusted sources to avoid security risks.
- Compatibility: Ensure the software is compatible with your computer’s operating system and your iPhone’s iOS version.
5. Using Cloud Storage Services for Music Transfer
Overview of Cloud Storage Options (Google Drive, Dropbox, etc.)
Cloud storage services like Google Drive, Dropbox, and OneDrive offer a convenient way to transfer music files from your computer to your iPhone:
- Google Drive: A popular cloud storage service that provides 15 GB of free storage.
- Dropbox: A well-known cloud storage service that offers 2 GB of free storage.
- OneDrive: Microsoft’s cloud storage service that provides 5 GB of free storage.
Step-by-Step Guide to Transferring Music via Cloud Storage
Here’s a step-by-step guide to transferring music from your computer to your iPhone using cloud storage:
- Upload Music to Cloud Storage: On your computer, upload your music files to your preferred cloud storage service (e.g., Google Drive, Dropbox, OneDrive).
- Install Cloud Storage App on iPhone: Download and install the cloud storage app on your iPhone from the App Store.
- Access Music Files on iPhone: Open the cloud storage app on your iPhone and navigate to the folder where you uploaded your music files.
- Download Music Files: Download the music files to your iPhone. Depending on the app, you may be able to play the music directly from the cloud or save it to your device for offline playback.
- Import to Music App (Optional): Some cloud storage apps allow you to import the downloaded music files directly into the Music app on your iPhone.
Advantages and Disadvantages of Using Cloud Storage
Advantages:
- Convenience: Cloud storage allows you to access your music files from any device with an internet connection.
- No Cables Required: You don’t need a USB cable to transfer music files.
- Free Storage: Most cloud storage services offer a certain amount of free storage.
- Backup: Cloud storage acts as a backup for your music library.
Disadvantages:
- Internet Dependency: You need an internet connection to upload and download music files.
- Storage Limits: Free storage is limited, and you may need to pay for additional storage.
- Security Concerns: Storing your music files in the cloud may raise security concerns.
- Manual Process: Transferring music files manually can be time-consuming.
Tips for Efficiently Managing Music in the Cloud
Here are some tips for efficiently managing your music in the cloud:
- Organize Your Music: Create folders and subfolders to organize your music files in the cloud.
- Use Descriptive File Names: Use descriptive file names to make it easier to find your music files.
- Tag Your Music: Add metadata tags (e.g., title, artist, album) to your music files to make them easier to manage and search.
- Regularly Back Up Your Music: Regularly back up your music files to prevent data loss.
- Use a Music Player App: Use a music player app that supports cloud storage to easily access and play your music files.
6. Tips for Organizing and Managing Your Music Library
Best Practices for Naming and Tagging Music Files
Properly naming and tagging your music files is essential for organizing and managing your music library effectively:
- Consistent Naming Convention: Use a consistent naming convention for your music files (e.g., “Artist – Song Title.mp3”).
- Accurate Metadata Tags: Add accurate metadata tags (e.g., title, artist, album, genre, year) to your music files.
- Use a Music Tagging Tool: Use a music tagging tool (e.g., Mp3tag, MusicBrainz Picard) to automatically add or edit metadata tags.
- Embed Album Art: Embed album art into your music files for a visually appealing music library.
- Remove Duplicate Files: Use a duplicate file finder to remove duplicate music files and free up storage space.
Creating and Managing Playlists for Different Moods and Activities
Creating and managing playlists is a great way to organize your music library and tailor your listening experience to your mood and activities:
- Create Playlists for Different Genres: Create playlists for different genres of music (e.g., rock, pop, classical).
- Create Playlists for Different Moods: Create playlists for different moods (e.g., happy, sad, relaxed).
- Create Playlists for Different Activities: Create playlists for different activities (e.g., working out, studying, commuting).
- Use Smart Playlists: Use smart playlists to automatically create playlists based on specific criteria (e.g., recently added songs, highly rated songs).
- Regularly Update Your Playlists: Regularly update your playlists to keep them fresh and interesting.
Using iTunes/Finder Features for Library Management
iTunes/Finder offers several features for managing your music library:
- Smart Playlists: Create smart playlists based on specific criteria.
- Genius Playlists: Use Genius to create playlists based on a selected song.
- Column Browser: Use the column browser to quickly navigate through your music library.
- Search: Use the search bar to quickly find songs, artists, or albums.
- Edit Song Information: Edit song titles, artist names, album art, and other metadata.
Leveraging Music Management Software for Advanced Organization
For more advanced organization, consider using music management software:
- MusicBee: A feature-rich music manager and player that offers advanced organization features.
- MediaMonkey: A comprehensive media manager that allows you to organize, tag, and play your music files.
- foobar2000: A highly customizable music player that offers advanced organization features.
7. Optimizing Audio Settings for the Best Listening Experience
Understanding Audio File Formats (MP3, AAC, WAV, FLAC)
Understanding audio file formats is essential for optimizing your listening experience:
- MP3: A popular lossy audio format that offers a good balance between file size and audio quality.
- AAC: Another lossy audio format that is often used by Apple. AAC generally offers better audio quality than MP3 at the same file size.
- WAV: A lossless audio format that preserves all the original audio data. WAV files are typically larger than MP3 or AAC files.
- FLAC: Another lossless audio format that offers excellent audio quality and supports metadata tagging.
Choosing the Right Audio Quality Settings for Syncing
When syncing music, choose the right audio quality settings to balance file size and audio quality:
- For MP3: Choose a bitrate of 128 kbps for low-quality audio, 192 kbps for medium-quality audio, or 256 kbps for high-quality audio.
- For AAC: Choose a bitrate of 128 kbps for low-quality audio, 192 kbps for medium-quality audio, or 256 kbps for high-quality audio.
- For Lossless Formats: If you want the best possible audio quality, use lossless formats like WAV or FLAC.
Adjusting Equalizer Settings on Your iPhone
Adjusting the equalizer settings on your iPhone can enhance your listening experience:
- Open Settings: Go to “Settings” on your iPhone.
- Select Music: Scroll down and tap “Music.”
- Tap EQ: Tap “EQ” to access the equalizer settings.
- Choose a Preset: Choose a preset equalizer setting that matches your listening preferences (e.g., “Bass Booster,” “Treble Booster,” “Acoustic,” “Classical”).
- Experiment: Experiment with different equalizer settings to find the one that sounds best to you.
- Turn Off EQ: If you prefer the default sound, select “Off.”
Using Headphones and Audio Accessories for Enhanced Sound
Using high-quality headphones and audio accessories can significantly enhance your listening experience:
- Headphones: Invest in a good pair of headphones that provide clear and balanced sound.
- Wireless Earbuds: Consider using wireless earbuds for convenience and portability.
- Portable Amplifiers: Use a portable amplifier to boost the audio signal and improve sound quality.
- DACs: Use a digital-to-analog converter (DAC) to convert digital audio signals into analog audio signals with higher fidelity.
8. Addressing Copyright and Legal Considerations
Understanding Copyright Laws Related to Music
It’s important to understand copyright laws related to music to avoid legal issues:
- Copyright Protection: Copyright law protects the rights of music creators, including songwriters, composers, and recording artists.
- Copyright Infringement: Copyright infringement occurs when you use copyrighted music without permission from the copyright holder.
- Fair Use: Fair use is a legal doctrine that allows you to use copyrighted material for certain purposes without permission, such as criticism, commentary, news reporting, teaching, scholarship, and research.
- Public Domain: Music in the public domain is not protected by copyright and can be used freely.
According to the National Music Publishers’ Association (NMPA), copyright infringement can lead to substantial fines and legal penalties, so it’s crucial to respect copyright laws.
Legal Ways to Acquire and Sync Music
There are several legal ways to acquire and sync music:
- Purchase Music: Buy music from the iTunes Store or other online music stores.
- Subscribe to Music Streaming Services: Subscribe to music streaming services like Apple Music, Spotify, or Amazon Music.
- Use Music from Public Domain: Use music that is in the public domain.
- Obtain Permission: Obtain permission from the copyright holder to use copyrighted music.
Avoiding Illegal Music Downloads and Sharing
Avoid illegal music downloads and sharing to protect yourself from legal consequences:
- Use Legal Sources: Only download music from legal sources.
- Don’t Share Copyrighted Music: Don’t share copyrighted music without permission from the copyright holder.
- Respect Copyright Laws: Respect copyright laws and the rights of music creators.
Understanding Music Licensing and Royalties
Understanding music licensing and royalties is essential for musicians and anyone who wants to use music commercially:
- Music Licensing: Music licensing is the process of obtaining permission from the copyright holder to use copyrighted music.
- Royalties: Royalties are payments made to copyright holders for the use of their music.
- Performance Royalties: Performance royalties are paid to songwriters and publishers when their music is performed publicly (e.g., on the radio, in a concert, or in a business).
- Mechanical Royalties: Mechanical royalties are paid to songwriters and publishers when their music is reproduced (e.g., on a CD, in a digital download, or on a streaming service).
- Synchronization Royalties: Synchronization royalties are paid to songwriters and publishers when their music is used in a film, TV show, or video game.
Payoffsong.com offers valuable insights and resources for understanding music licensing and royalties, helping musicians navigate the complexities of music monetization.
9. Exploring Advanced Syncing Techniques
Using Home Sharing for Local Network Streaming
Home Sharing allows you to stream music from your computer to your iPhone over your local network:
- Turn on Home Sharing: On your computer, open iTunes/Music app and go to “File” > “Home Sharing” > “Turn On Home Sharing.” Enter your Apple ID and password.
- Enable Home Sharing on iPhone: On your iPhone, go to “Settings” > “Music” and sign in with the same Apple ID.
- Access Shared Library: Open the Music app on your iPhone and tap “Library” > “Home Sharing.”
- Stream Music: Select your computer’s library and stream music to your iPhone.
Syncing Music from Multiple Computers to One iPhone
Syncing music from multiple computers to one iPhone can be tricky, but it is possible:
- Use Apple Music: Subscribe to Apple Music and enable Sync Library to sync your music library across all your devices.
- Manually Manage Music: Manually manage your music library on your iPhone by dragging and dropping songs from different computers.
- Use Third-Party Software: Use third-party software that allows you to sync music from multiple computers.
Creating Custom Sync Rules and Filters
Creating custom sync rules and filters can help you manage your music library more effectively:
- Smart Playlists: Use smart playlists to automatically create playlists based on specific criteria.
- Genre Filters: Use genre filters to sync only certain genres of music.
- Rating Filters: Use rating filters to sync only songs with a certain rating.
Utilizing Command-Line Tools for Advanced Music Management
Advanced users can utilize command-line tools for music management:
- mp3gain: Adjusts the volume of MP3 files to a consistent level.
- ffmpeg: A powerful command-line tool for converting audio and video files.
- AtomicParsley: A command-line tool for adding and editing metadata tags in MP4 files.
10. Frequently Asked Questions (FAQ) about Syncing Music to iPhone
Q1: Can I sync music to my iPhone without iTunes?
Yes, you can sync music to your iPhone without iTunes by using Apple Music, third-party software, or cloud storage services. Each method offers different advantages in terms of flexibility and ease of use.
Q2: How do I sync my entire music library to my iPhone?
To sync your entire music library, use iTunes or Finder and select the “Sync Entire Music Library” option. Alternatively, subscribe to Apple Music and enable Sync Library to sync your library across all your devices.
Q3: What do I do if my music won’t sync to my iPhone?
If your music won’t sync, check your USB connection, restart your devices, update your software, reauthorize your computer, reset sync history, and ensure you have enough storage space on your iPhone.
Q4: How can I manage my music library on my iPhone?
Manage your music library on your iPhone by creating playlists, editing song information, deleting songs, and rating songs in the Music app.
Q5: Is it legal to download music from unofficial sources and sync it to my iPhone?
No, it is not legal to download music from unofficial sources and sync it to your iPhone. Doing so violates copyright laws and can lead to legal consequences.
Q6: Can I sync music to multiple iPhones from one computer?
Yes, you can sync music to multiple iPhones from one computer using iTunes or Finder. Connect each iPhone to your computer and sync them individually.
Q7: How do I remove music from my iPhone that I synced from my computer?
To remove music, deselect the music in iTunes/Finder and sync again, or manually delete the music from your iPhone in the Music app.
Q8: What are the best audio settings for syncing music to my iPhone?
The best audio settings depend on your preferences and storage space. MP3 or AAC at 256 kbps offers a good balance of quality and file size.
Q9: How do I transfer music from an Android phone to my iPhone?
To transfer music from an Android phone to your iPhone, use a computer as an intermediary or use a third-party app designed for cross-platform transfers.
Q10: What is iCloud Music Library, and how does it work?
iCloud Music Library, now known as Sync Library, stores your music library in the cloud and syncs it across all your devices. It requires an Apple Music subscription and allows you to access your music from anywhere.
Conclusion
Syncing music from your computer to your iPhone is essential for enjoying your favorite songs on the go. Whether you prefer using iTunes/Finder, Apple Music, third-party software, or cloud storage services, there’s a method that suits your needs. By following the tips and techniques outlined in this guide, you can efficiently manage your music library, optimize your listening experience, and avoid legal issues.
For more valuable insights and resources on music monetization and licensing, visit payoffsong.com and discover how you can make the most of your musical talents! Don’t forget, Address: 1601 Vine St, Los Angeles, CA 90028, United States. Phone: +1 (323) 469-2211. Website: payoffsong.com.