Personalizing your iPhone with a custom ringtone is a fantastic way to make it truly yours. Instead of settling for the default tones that everyone else uses, why not set your favorite song as your ringtone? With the GarageBand app, readily available on your iPhone, transforming any song into a unique ringtone is easier than you might think. This guide will walk you through each step, ensuring you can enjoy your chosen track every time your phone rings.
Getting Started with GarageBand
If GarageBand isn’t already on your iPhone, your first step is to download it. It’s a free app from Apple, available directly from the App Store.
- Download GarageBand: Open the App Store app on your iPhone and search for “GarageBand.” Tap “Get” to download and install the application.
Once GarageBand is installed, you’re ready to begin the ringtone creation process.
-
Create a New Audio Recording: Locate the GarageBand app icon on your Home Screen. A quick way to start a new project is by using the quick action menu. Touch and hold the GarageBand app icon until a menu pops up, then select “Create New Audio Recording.” This action will launch GarageBand and immediately prepare an audio track for you to work with.
-
Access Tracks View: When GarageBand opens, you’ll likely see an instrument interface. To work with audio files and create a ringtone, you need to switch to Tracks view. Look for the “Tracks” button at the top left of your screen, which resembles horizontal lines, and tap it. This will display the timeline-based interface where you’ll arrange your song.
-
Open the Loops Browser: In the Tracks view, you need to access the Loops Browser to import your chosen song. Tap the “Loops Browser” button, which looks like a loop, located at the top right side of the screen.
 Adding a song from Files to GarageBand Tracks view for iPhone ringtone creation.
Importing Your Song
GarageBand allows you to use songs from various sources to create your ringtone. You can use audio files stored on your iPhone or utilize songs from your Apple Music library, provided they are downloaded to your device and are not protected.
-
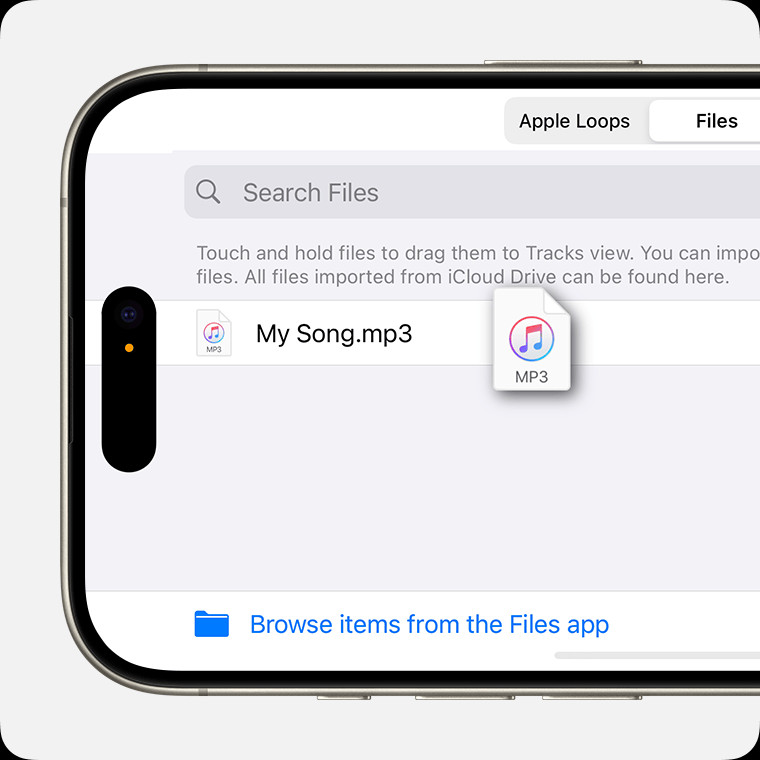
Choose Your Song Source: In the Loops Browser, you’ll see two tabs at the top: “Apple Loops” and “Files” or “Music”.
- From Files App: If your song is an audio file saved in your Files app or iCloud Drive, tap “Files.” Then, select “Browse items from the Files app” to navigate and find your audio file.
- From Apple Music: To use a song from your Apple Music library, tap “Music”. It’s crucial that the song is downloaded to your iPhone; streaming versions won’t work directly. Downloaded songs will appear in black text, while songs not downloaded or protected will be grayed out, indicating they can’t be used.
-
Import the Song to Tracks View: Once you’ve located your song in either “Files” or “Music,” touch and hold the song title. Drag it from the browser all the way to the left edge of the Tracks view timeline. This action imports your selected song into GarageBand, ready for editing.
Editing Your Song for Ringtone Length
Ringtones on iPhones have a duration limit of 30 seconds. GarageBand allows you to select and trim a specific section of your song to fit this time constraint, ensuring you get the perfect 30-second snippet.
-
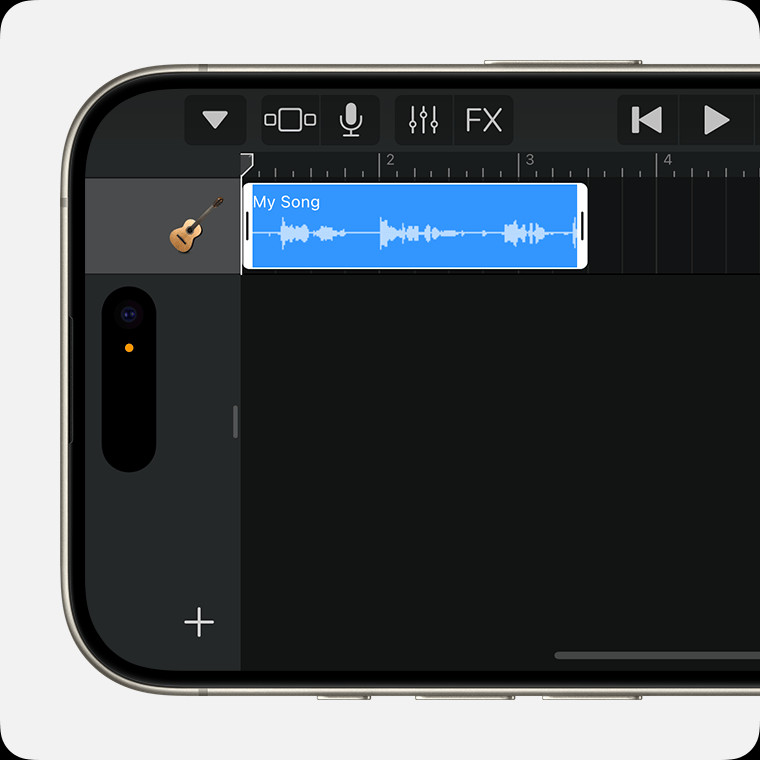
Trim Your Song Section:
- Select the Audio File: Tap the imported audio file within the Tracks view. This will highlight the audio region, showing yellow handles at the edges.
- Adjust Start and End Points: Drag the yellow handles on either the left or right edge of the audio region to trim the beginning and end of your song. By dragging these handles, you’re selecting the portion of the song you want to use as your ringtone.
- Zoom for Precision: For finer adjustments, touch and hold either edge handle to zoom in on the waveform. This magnified view allows for more precise trimming, helping you pinpoint the exact 30-second section you desire.
- Position at the Start: After selecting your desired 30-second section, drag the trimmed audio region all the way to the leftmost point of the track. This ensures there’s no silence at the beginning of your ringtone.
 Trimming an audio file in GarageBand on iPhone to set custom ringtone length.
Exporting Your Song as a Ringtone
With your song trimmed and ready, the final steps involve saving your project and exporting it as a ringtone that your iPhone can recognize.
-
Return to My Songs Browser: Tap the “Navigation” button, which resembles an inverted triangle, located on the top left. Then, tap “My Songs.” This action saves your current GarageBand project and takes you back to the My Songs browser, where all your GarageBand projects are listed.
-
Select Your Song for Sharing: In the My Songs browser, find the song you just worked on. Tap the “More” button, represented by three dots, beneath the song icon. From the menu that appears, tap “Select,” and then tap on your song to select it.
-
Initiate Ringtone Export: With your song selected, tap the “Share” button at the bottom left of the screen. This button looks like a square with an arrow pointing upwards. In the share sheet that appears, choose “Ringtone.”
-
Name and Export Your Ringtone: GarageBand will prompt you to enter a name for your ringtone. Type in your desired name, and then tap “Export” at the top right corner. If your selected song portion is longer than 30 seconds, GarageBand will notify you and offer to shorten it automatically. You can tap “Continue” to let GarageBand shorten it or “Cancel” to go back and adjust the trimming yourself.
-
Set Your Ringtone: Once the export process is complete, a “Ringtone Export Successful” message will appear, offering options to “Use sound as…”. Tap this option, and you’ll be presented with choices:
- Standard Ringtone: Sets your new ringtone as the default ringtone for all incoming calls.
- Standard Text Tone: Sets your new ringtone as the default sound for new text messages.
- Assign to contact: Allows you to assign this specific ringtone to a particular contact in your address book, creating a personalized caller ID by sound.
- Done: Returns you to the My Songs browser without immediately assigning the ringtone, saving it for later use.
Choose the option that suits your needs. If you select “Assign to contact,” your Contacts app will open, letting you choose the contact for this custom ringtone.
Congratulations! You’ve successfully turned your favorite song into a custom iPhone ringtone using GarageBand. Now you can enjoy a personalized sound every time your phone rings, reflecting your unique taste and style.