Looking to export a song from GarageBand and turn your musical creation into a profitable venture? Payoffsong.com provides the solutions and expert guidance you need. Learn how to optimize your tracks, understand music licensing, and explore opportunities for commercial success. Let’s dive in, and transform your musical talent into revenue streams with strategic exports, royalty collection tips, and effective song promotion.
1. Understanding Export Options in GarageBand
GarageBand is a fantastic tool for creating music, but knowing how to export your songs correctly is crucial for sharing or selling your work. What are the best export options for GarageBand to maximize your song’s potential?
The best export options in GarageBand depend on your intended use. For collaborative work or further editing, save as a GarageBand project. For general sharing, MP3 is a good balance of quality and file size. If quality is paramount, especially for commercial projects, use AIFF or WAV formats.
When exporting from GarageBand, you have several options, each with its own advantages and disadvantages. Understanding these can help you make the right choice for your project.
1.1 Saving as a GarageBand Project
Saving your work as a GarageBand project is ideal if you plan to revisit and edit it later. It preserves all tracks, edits, and settings.
- Open Your Project: Launch GarageBand and open the song you wish to save.
- Go to File: Click on “File” in the top menu.
- Select “Save As”: Choose “Save As” to create a new, editable copy.
- Name Your Project: Give your project a descriptive name.
- Choose Save Location: Select where to save the file, such as your desktop or a project folder.
- Click Save: Hit “Save,” and your project is safely stored.
1.2 Exporting as an Audio File
Exporting as an audio file is crucial for sharing your music beyond GarageBand. Here’s how to ensure top-notch quality:
- Open Your Project: Open the GarageBand project you wish to export.
- Go to Share: Click on “Share” in the top menu.
- Select “Export Song to Disk”: Choose this option to prepare your song for export.
- Choose File Format:
- MP3: A compressed format, good for general sharing due to its smaller file size.
- AAC: Another compressed format, similar to MP3 but can offer slightly better quality at the same file size.
- AIFF: An uncompressed format that maintains high audio quality, ideal for professional use.
- WAV: Similar to AIFF, an uncompressed format compatible with both Mac and Windows.
- Set Quality:
- Low, Medium, High, Best: Adjust the quality settings based on your needs. For commercial use, always choose “Best” to ensure the highest possible quality.
- Choose Export Location: Select where to save the exported file.
- Click Export: Hit “Export” to start the process. GarageBand will “bounce” your project, creating the audio file.
1.3 Understanding File Formats: MP3, AAC, AIFF, and WAV
Choosing the right file format can significantly impact the quality and usability of your exported song.
| File Format | Description | Use Cases |
|---|---|---|
| MP3 | A compressed format that reduces file size while maintaining reasonable audio quality. | General sharing, streaming, and listening on mobile devices. |
| AAC | Similar to MP3, but often provides better audio quality at the same file size. Used by Apple Music and other streaming services. | Streaming on Apple devices, online distribution. |
| AIFF | An uncompressed audio format that preserves all the details of the original recording. Mac compatible. | Professional audio editing, archiving, and situations where audio quality is paramount. |
| WAV | An uncompressed audio format similar to AIFF, but compatible with both Mac and Windows. | Professional audio editing, archiving, and cross-platform use. |
Consider your target audience and how they will access your music when choosing a format.
1.4 Optimizing Export Settings for Different Platforms
Different platforms have different requirements for audio files. Here’s how to optimize your export settings for various uses:
- Streaming Services (Spotify, Apple Music):
- Format: AAC or MP3
- Bitrate: 320kbps (for MP3), 256kbps (for AAC)
- Sample Rate: 44.1 kHz
- YouTube:
- Format: MP3 or AAC
- Bitrate: 128kbps or higher
- Sample Rate: 44.1 kHz or 48 kHz
- Film and TV:
- Format: WAV or AIFF
- Bit Depth: 24-bit
- Sample Rate: 48 kHz or 96 kHz
- CDs:
- Format: WAV or AIFF
- Bit Depth: 16-bit
- Sample Rate: 44.1 kHz
Always check the specific requirements of the platform you are using to ensure optimal playback and quality.
2. Preparing Your Song for Export: A Checklist
Before exporting your song, it’s essential to ensure it’s in the best possible condition. What steps should you take to prepare your song for export from GarageBand?
To prepare your song for export from GarageBand, review your mix for balance and clarity, ensure all edits are finalized, remove any unwanted silences, and check the overall dynamics for consistency. A polished track ensures a professional-sounding final product.
Here’s a comprehensive checklist to help you prepare your song:
2.1 Finalizing Your Mix
Your mix is the balance of all the elements in your song. It’s crucial to get it right before exporting.
- Balance Levels: Adjust the volume of each track to ensure no single element overpowers the others.
- Panning: Use panning to create space in the stereo field, placing instruments to the left, right, or center.
- EQ: Use equalization to shape the sound of each track, removing unwanted frequencies and enhancing the desirable ones.
- Compression: Apply compression to control the dynamic range of your tracks, making them sound more consistent and punchy.
- Reverb and Delay: Use these effects sparingly to add depth and space to your mix, but avoid overdoing it, which can muddy the sound.
- Automation: Automate volume, panning, and effects to create movement and interest in your mix.
2.2 Checking for Clarity and Balance
Clarity and balance are key to a professional-sounding mix.
- Listen on Different Devices: Check your mix on headphones, speakers, and even your phone to ensure it sounds good on various playback systems.
- Use Reference Tracks: Compare your mix to professionally produced songs in a similar genre to identify areas for improvement.
- Get Feedback: Ask other musicians or audio engineers to listen to your mix and provide constructive criticism.
2.3 Removing Unwanted Noises and Silences
Cleanliness is crucial in a final mix.
- Trim Silence: Remove any unnecessary silence at the beginning and end of your song.
- Eliminate Background Noise: Use noise reduction tools to remove any unwanted hums, hisses, or other background noises.
- Cut Unnecessary Sounds: Remove any coughs, clicks, or other unwanted sounds from your tracks.
2.4 Ensuring Consistent Dynamics
Consistent dynamics ensure your song sounds balanced from start to finish.
- Use Compression: Apply compression to individual tracks and the master track to control the overall dynamic range.
- Avoid Clipping: Ensure your master track never exceeds 0dB to avoid distortion.
- Check Loudness: Use a loudness meter to measure the overall loudness of your song and ensure it meets industry standards.
2.5 Backing Up Your Project
Always back up your project before exporting.
- Save a Copy: Save a separate copy of your project with a descriptive name, such as “Song Title – Final Mix.”
- Create a Backup Folder: Create a backup folder on an external hard drive or cloud storage service.
- Copy Your Project: Copy your project file and all associated audio files to the backup folder.
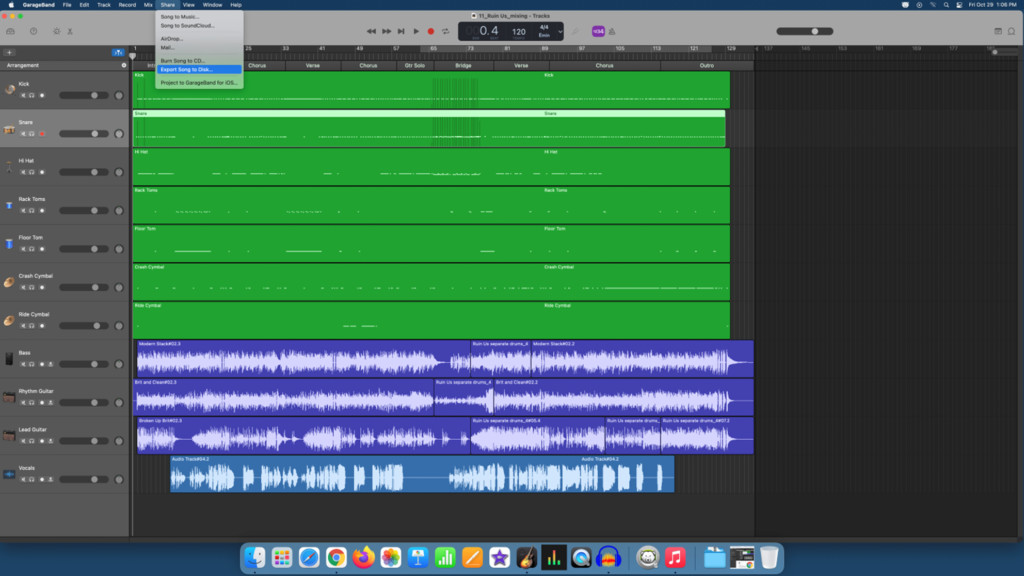 Garageband Interface
3. Optimizing Your Song for Commercial Use
To make your song commercially viable, consider various optimization strategies. What are the key steps to optimize your song for commercial use after exporting from GarageBand?
After exporting from GarageBand, focus on mastering to enhance the overall sound, consider professional mixing for improved clarity, research music licensing options to monetize your work, and promote your music through relevant channels to reach your target audience.
3.1 Mastering Your Track
Mastering is the final step in the audio production process, and it can significantly enhance the quality of your song.
- Hire a Professional Mastering Engineer: A professional mastering engineer has the expertise and equipment to bring out the best in your track.
- Use Mastering Software: If you prefer to master your own track, use mastering software like iZotope Ozone or FabFilter Pro-L.
- Adjust Loudness: Increase the overall loudness of your track to meet industry standards for streaming and radio play.
- Enhance Clarity: Use EQ and compression to enhance the clarity and punch of your track.
- Check for Distortion: Ensure your track is free of distortion and other artifacts.
3.2 Understanding Music Licensing
Music licensing is crucial for earning revenue from your music.
- Copyright: Understand your rights as a songwriter and copyright holder.
- Performance Rights Organizations (PROs): Register with a PRO like ASCAP, BMI, or SESAC to collect royalties for public performances of your music.
- Mechanical Licenses: Obtain mechanical licenses for any cover songs you record and distribute.
- Synchronization Licenses: Obtain synchronization licenses for any use of your music in film, TV, or video games.
3.3 Exploring Opportunities for Sync Licensing
Sync licensing involves licensing your music for use in visual media. This can be a lucrative revenue stream.
- Create High-Quality Instrumentals: Many sync opportunities require instrumental versions of your songs.
- Tag Your Music: Use descriptive tags to make your music searchable by music supervisors.
- Submit to Music Libraries: Submit your music to reputable music libraries and sync agencies.
- Network with Music Supervisors: Attend industry events and network with music supervisors to build relationships.
According to research from the National Music Publishers’ Association (NMPA), sync licensing revenues have been steadily increasing, providing significant income for songwriters and publishers.
3.4 Promoting Your Music
Promoting your music is essential for reaching a wider audience and increasing your chances of commercial success.
- Social Media: Use social media platforms like Instagram, Facebook, and Twitter to connect with fans and promote your music.
- Streaming Platforms: Submit your music to streaming platforms like Spotify, Apple Music, and Amazon Music.
- Music Blogs and Playlists: Reach out to music blogs and playlist curators to get your music featured.
- Live Performances: Perform live shows to build a fanbase and generate buzz around your music.
- Website: Create your website and sell beats to music creators.
4. Step-by-Step Guide to Exporting for Specific Purposes
The purpose of your export will dictate the best settings and format. How do you export from GarageBand for specific uses like sharing, licensing, or collaboration?
To export from GarageBand for sharing, use MP3 format. For licensing, AIFF or WAV is preferable. For collaboration, save as a GarageBand project. Tailor your export to meet the requirements of each specific purpose.
4.1 Exporting for Sharing Online
To share your music online, follow these steps:
- Open Your Project: Open the GarageBand project you wish to export.
- Go to Share: Click on “Share” in the top menu.
- Select “Export Song to Disk”: Choose this option.
- Choose MP3 Format: Select MP3 as the file format.
- Set Quality: Choose “High” or “Best” for good audio quality.
- Choose Export Location: Select where to save the file.
- Click Export: Hit “Export” to start the process.
- Upload to Platforms: Upload the MP3 file to platforms like SoundCloud, YouTube, or social media.
4.2 Exporting for Music Licensing
For music licensing, high-quality audio is essential:
- Open Your Project: Open the GarageBand project.
- Go to Share: Click “Share” in the top menu.
- Select “Export Song to Disk”: Choose this option.
- Choose WAV or AIFF Format: Select either WAV or AIFF.
- Set Quality: Choose “Best” to ensure the highest possible quality.
- Choose Export Location: Select a save location.
- Click Export: Hit “Export” to start the process.
- Submit to Libraries: Submit the high-quality file to music libraries and sync agencies.
4.3 Exporting for Collaboration
To collaborate with other musicians or producers:
- Open Your Project: Open the GarageBand project.
- Go to File: Click on “File” in the top menu.
- Select “Save As”: Choose “Save As.”
- Name Your Project: Give your project a descriptive name.
- Choose Save Location: Select a save location.
- Click Save: Hit “Save.”
- Share the Project File: Share the GarageBand project file with your collaborators.
- Include Audio Files: Include any associated audio files they may need.
5. Advanced Techniques for Optimizing Audio Quality
Beyond basic export settings, advanced techniques can further enhance your audio quality. What advanced techniques can improve audio quality when exporting from GarageBand?
Advanced techniques for improving audio quality when exporting from GarageBand include using professional-grade plugins for mixing and mastering, exporting at higher bit depths and sample rates, and employing dithering to minimize quantization noise.
5.1 Using Professional-Grade Plugins
Professional-grade plugins can significantly improve the sound of your tracks.
- EQ Plugins: Use plugins like FabFilter Pro-Q 3 or Waves SSL E-Channel to shape the sound of your tracks with precision.
- Compression Plugins: Use plugins like Waves CLA-2A or Universal Audio 1176 to control the dynamic range of your tracks.
- Reverb Plugins: Use plugins like Valhalla Room or Lexicon PCM Native Reverb Bundle to add depth and space to your mix.
- Mastering Plugins: Use plugins like iZotope Ozone or FabFilter Pro-L to master your tracks with professional results.
5.2 Exporting at Higher Bit Depths and Sample Rates
Exporting at higher bit depths and sample rates can capture more detail and nuances in your audio.
- Set Project Settings: In GarageBand, go to “File” > “Project Settings” > “Audio.”
- Choose Bit Depth: Select 24-bit as the bit depth.
- Choose Sample Rate: Select 48 kHz or 96 kHz as the sample rate.
- Export Your Song: Export your song using the AIFF or WAV format with the chosen settings.
5.3 Dithering to Minimize Quantization Noise
Dithering is a technique used to minimize quantization noise when reducing the bit depth of an audio file.
- Use Dithering Plugins: Use dithering plugins like iZotope Ozone or Voxengo Elephant to add dither to your track during the mastering process.
- Choose the Right Dither Mode: Choose the appropriate dither mode based on the target bit depth and audio content.
- Apply Dither as the Last Step: Apply dither as the very last step in the mastering process, after all other processing has been completed.
5.4 Understanding Gain Staging
Proper gain staging ensures a clean and balanced mix.
- Set Input Levels: Adjust the input levels of your tracks to avoid clipping.
- Monitor Levels: Monitor the levels of your tracks throughout the mixing process to ensure they are not too loud or too quiet.
- Use Gain Plugins: Use gain plugins to adjust the overall volume of your tracks without affecting their dynamic range.
6. Monetizing Your GarageBand Creations
Turning your GarageBand projects into revenue streams requires strategic planning and execution. How can you effectively monetize your GarageBand creations?
Effectively monetize your GarageBand creations by licensing your music, selling beats, distributing your songs on streaming platforms, offering freelance music production services, and creating and selling sample packs.
6.1 Licensing Your Music for Film, TV, and Ads
Licensing your music for use in visual media can generate significant income.
- Submit to Music Libraries: Submit your music to reputable music libraries and sync agencies that specialize in placing music in film, TV, and ads.
- Create High-Quality Instrumentals: Many sync opportunities require instrumental versions of your songs.
- Tag Your Music: Use descriptive tags to make your music searchable by music supervisors.
- Network with Music Supervisors: Attend industry events and network with music supervisors to build relationships.
6.2 Selling Beats Online
Selling beats online is a popular way for producers to generate income.
- Create High-Quality Beats: Produce high-quality beats in various genres that appeal to different types of artists.
- Set Up an Online Store: Set up an online store using platforms like BeatStars, Airbit, or Bandcamp.
- Promote Your Beats: Promote your beats on social media, YouTube, and other online platforms.
- Offer Exclusive Licenses: Offer exclusive licenses to artists who want to own the rights to your beats.
6.3 Distributing Your Music on Streaming Platforms
Distributing your music on streaming platforms like Spotify, Apple Music, and Amazon Music can generate royalties.
- Use a Distribution Service: Use a music distribution service like DistroKid, TuneCore, or CD Baby to get your music on streaming platforms.
- Create an Artist Profile: Create an artist profile on each platform to showcase your music and connect with fans.
- Promote Your Music: Promote your music on social media and other channels to drive streams and increase your royalty earnings.
6.4 Offering Freelance Music Production Services
Offering freelance music production services can be a lucrative way to use your GarageBand skills.
- Build a Portfolio: Build a portfolio of your best work to showcase your skills and attract clients.
- Create a Website: Create a website to promote your services and provide information about your experience and pricing.
- Network with Musicians: Network with musicians and other industry professionals to find clients.
- Offer Competitive Pricing: Offer competitive pricing for your services to attract clients.
6.5 Creating and Selling Sample Packs
Creating and selling sample packs is another way to monetize your GarageBand creations.
- Create High-Quality Samples: Create high-quality samples of drums, synths, and other instruments.
- Organize Your Samples: Organize your samples into categories to make them easy to find and use.
- Sell Your Sample Packs: Sell your sample packs on platforms like Splice, Loopmasters, or your own website.
- Promote Your Sample Packs: Promote your sample packs on social media, YouTube, and other online platforms.
7. Legal Considerations and Copyright Issues
Navigating the legal landscape of music production is crucial. What are the key legal and copyright considerations when exporting and monetizing music from GarageBand?
Key legal considerations when exporting and monetizing music from GarageBand include understanding copyright law, obtaining necessary licenses, registering your original music with a PRO, and ensuring you have proper agreements in place for collaborations or commissioned work.
7.1 Understanding Copyright Law
Copyright law protects your original musical works from unauthorized use.
- Copyright Protection: Copyright protection begins automatically as soon as you create a musical work in a fixed form, such as a recording or written notation.
- Copyright Registration: Registering your copyright with the U.S. Copyright Office provides additional legal protections and benefits.
- Copyright Infringement: Copyright infringement occurs when someone uses your copyrighted work without your permission.
7.2 Obtaining Necessary Licenses
Obtaining the necessary licenses is essential for using copyrighted material in your music.
- Mechanical Licenses: Obtain mechanical licenses for any cover songs you record and distribute.
- Synchronization Licenses: Obtain synchronization licenses for any use of copyrighted music in film, TV, or video games.
- Sample Clearances: Obtain sample clearances for any samples you use in your music.
7.3 Registering Your Music with a PRO
Registering your music with a Performance Rights Organization (PRO) allows you to collect royalties for public performances of your music.
- ASCAP, BMI, SESAC: Register with a PRO like ASCAP, BMI, or SESAC to collect performance royalties.
- Performance Royalties: Performance royalties are generated when your music is played on the radio, TV, or in live venues.
- Membership Requirements: Each PRO has its own membership requirements and fee structures.
7.4 Ensuring Proper Agreements for Collaborations
Proper agreements for collaborations protect your rights and interests when working with other musicians.
- Collaboration Agreements: Create collaboration agreements that outline each collaborator’s contributions, ownership rights, and royalty splits.
- Work-for-Hire Agreements: Use work-for-hire agreements when commissioning someone to create music for you.
- Legal Review: Have your agreements reviewed by an attorney to ensure they are legally sound and protect your interests.
Address: 1601 Vine St, Los Angeles, CA 90028, United States.
Phone: +1 (323) 469-2211.
Website: payoffsong.com.
8. Resources and Tools for Music Creators
Numerous resources and tools are available to help music creators succeed. What are some essential resources and tools for music creators to enhance their skills and career?
Essential resources for music creators include online courses, music production software, collaboration platforms, licensing agencies, legal services, and marketing tools to enhance their skills and advance their careers.
8.1 Online Courses and Tutorials
Online courses and tutorials can help you improve your music production skills and learn new techniques.
- Coursera, Udemy, Skillshare: Platforms like Coursera, Udemy, and Skillshare offer a wide range of courses on music production, mixing, mastering, and music business.
- YouTube Tutorials: YouTube is a great resource for free tutorials on various music production topics.
- Official Documentation: Consult the official documentation for your music production software and plugins.
8.2 Music Production Software and Plugins
Music production software and plugins are essential tools for creating high-quality music.
- DAWs: Digital Audio Workstations (DAWs) like Ableton Live, Logic Pro X, and Pro Tools are the foundation of modern music production.
- EQ Plugins: EQ plugins like FabFilter Pro-Q 3 and Waves SSL E-Channel allow you to shape the sound of your tracks with precision.
- Compression Plugins: Compression plugins like Waves CLA-2A and Universal Audio 1176 help you control the dynamic range of your tracks.
- Reverb Plugins: Reverb plugins like Valhalla Room and Lexicon PCM Native Reverb Bundle add depth and space to your mix.
8.3 Collaboration Platforms
Collaboration platforms make it easy to work with other musicians remotely.
- Soundtrap, Splice, Kompoz: Platforms like Soundtrap, Splice, and Kompoz allow you to collaborate with other musicians on projects in real-time.
- File Sharing Services: Use file sharing services like Dropbox or Google Drive to share project files and audio files with your collaborators.
8.4 Music Licensing Agencies
Music licensing agencies help you license your music for use in film, TV, and ads.
- Pump Audio, Musicbed, Songtradr: Agencies like Pump Audio, Musicbed, and Songtradr specialize in placing music in visual media.
- Direct Submissions: Submit your music directly to music supervisors and production companies.
8.5 Legal Services for Musicians
Legal services can help you navigate the complex legal issues related to music production and copyright.
- Entertainment Attorneys: Hire an entertainment attorney to review your contracts, negotiate deals, and protect your rights.
- Copyright Registration Services: Use copyright registration services to register your copyrights with the U.S. Copyright Office.
8.6 Marketing and Promotion Tools
Marketing and promotion tools can help you reach a wider audience and promote your music.
- Social Media Management Tools: Use social media management tools like Hootsuite or Buffer to schedule and manage your social media posts.
- Email Marketing Services: Use email marketing services like Mailchimp or Constant Contact to build an email list and send newsletters to your fans.
- Analytics Tools: Use analytics tools like Google Analytics to track your website traffic and measure the effectiveness of your marketing campaigns.
9. Common Mistakes to Avoid When Exporting
Avoiding common mistakes can save you time and ensure your music is presented in the best possible light. What are common mistakes to avoid when exporting from GarageBand?
Common mistakes to avoid when exporting from GarageBand include using incorrect file formats, neglecting to finalize your mix, failing to optimize export settings, ignoring copyright considerations, and not backing up your project.
9.1 Using Incorrect File Formats
Using the wrong file format can result in poor audio quality or compatibility issues.
- Choose the Right Format: Select the appropriate file format based on your intended use.
- Consider Compression: Understand the trade-offs between file size and audio quality when choosing a compressed format like MP3 or AAC.
- Use Uncompressed Formats: Use uncompressed formats like WAV or AIFF when audio quality is paramount.
9.2 Neglecting to Finalize Your Mix
Failing to finalize your mix can result in a subpar final product.
- Balance Levels: Ensure the levels of your tracks are properly balanced.
- Check for Clarity: Check for clarity and ensure each element in your mix is audible.
- Remove Unwanted Noises: Remove any unwanted noises or silences from your tracks.
9.3 Failing to Optimize Export Settings
Failing to optimize your export settings can result in a file that is not suitable for its intended purpose.
- Choose the Right Quality: Select the appropriate quality setting based on your needs.
- Set the Sample Rate: Set the sample rate to 44.1 kHz for CDs and streaming platforms, or 48 kHz or higher for film and TV.
- Choose the Bit Depth: Choose the bit depth of 16-bit for CDs and streaming platforms, or 24-bit for professional audio production.
9.4 Ignoring Copyright Considerations
Ignoring copyright considerations can lead to legal issues.
- Obtain Licenses: Obtain the necessary licenses for any copyrighted material you use in your music.
- Register Your Copyrights: Register your copyrights with the U.S. Copyright Office to protect your original works.
- Use Royalty-Free Content: Use royalty-free music and samples to avoid copyright issues.
9.5 Not Backing Up Your Project
Not backing up your project can result in the loss of your work.
- Save Regularly: Save your project regularly to avoid losing your work due to crashes or other issues.
- Create Backups: Create backups of your project files on an external hard drive or cloud storage service.
- Use Version Control: Use version control to track changes to your project and revert to previous versions if necessary.
10. Future Trends in Music Production and Monetization
Staying informed about future trends can help you stay ahead in the music industry. What are some future trends in music production and monetization?
Future trends in music production and monetization include the rise of AI-assisted music creation, increased focus on personalized music experiences, the growing importance of virtual concerts, expanded opportunities in the metaverse, and innovative blockchain-based music platforms.
10.1 AI-Assisted Music Creation
AI-assisted music creation tools are becoming increasingly sophisticated.
- AI-Powered DAWs: AI-powered DAWs can help you generate melodies, harmonies, and rhythms automatically.
- AI-Based Mixing and Mastering: AI-based mixing and mastering tools can help you achieve professional-sounding results quickly and easily.
10.2 Personalized Music Experiences
Personalized music experiences are becoming more popular.
- AI-Driven Playlists: AI-driven playlists curate music based on your listening habits and preferences.
- Interactive Music: Interactive music allows listeners to customize the music they hear based on their mood or activity.
10.3 Virtual Concerts and Events
Virtual concerts and events are becoming more common.
- Live Streaming Platforms: Platforms like Twitch and YouTube Live allow you to live stream your performances to a global audience.
- Virtual Reality Concerts: Virtual reality concerts offer immersive and interactive experiences for fans.
10.4 Metaverse Opportunities
The metaverse is creating new opportunities for musicians.
- Virtual Performances: Perform virtual concerts in the metaverse and connect with fans in new ways.
- NFTs: Create and sell NFTs (non-fungible tokens) of your music, artwork, and other digital assets.
- Virtual Merchandise: Sell virtual merchandise to fans in the metaverse.
10.5 Blockchain-Based Music Platforms
Blockchain-based music platforms are disrupting the traditional music industry.
- Decentralized Streaming: Decentralized streaming platforms allow you to earn royalties directly from your fans without intermediaries.
- Smart Contracts: Use smart contracts to automate royalty payments and ensure transparency in the music industry.
By following these tips and strategies, you can successfully export your songs from GarageBand and turn your musical creations into profitable ventures. Visit payoffsong.com for more information and expert guidance.
Address: 1601 Vine St, Los Angeles, CA 90028, United States.
Phone: +1 (323) 469-2211.
Website: payoffsong.com.
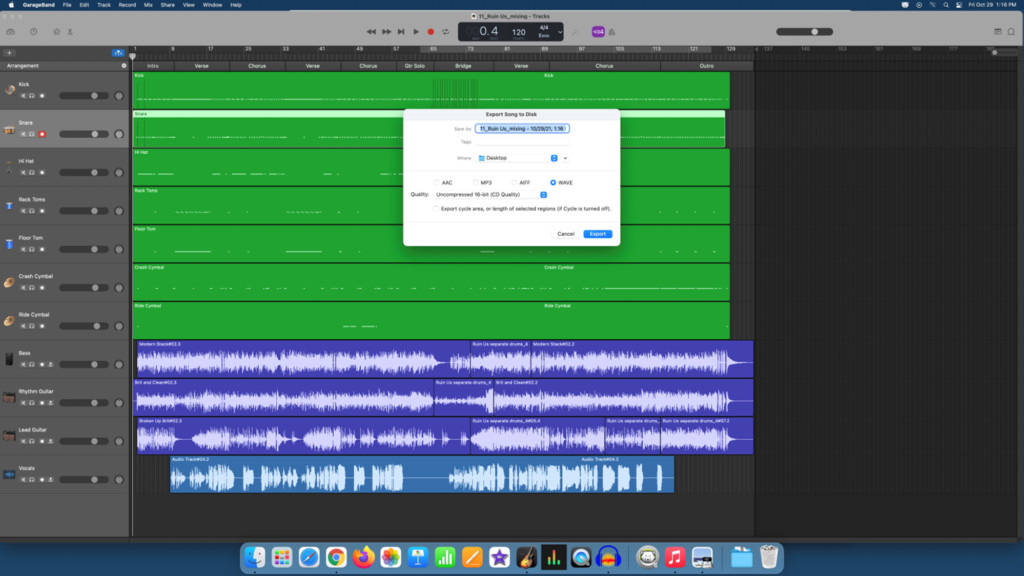 Garageband Export Window
FAQ: Exporting Music from GarageBand
1. How do I export a song from GarageBand as an MP3?
To export a song from GarageBand as an MP3, go to Share > Export Song to Disk, select MP3 as the file format, choose your desired quality, and click Export. MP3 is ideal for general sharing due to its smaller file size.
2. What is the best file format to export from GarageBand for professional use?
For professional use, the best file formats to export from GarageBand are AIFF or WAV. These uncompressed formats preserve the highest audio quality, making them suitable for editing, mastering, and commercial projects.
3. How do I optimize my GarageBand export settings for streaming services like Spotify?
Optimize your GarageBand export settings for streaming services like Spotify by using AAC or MP3 format, setting the bitrate to 320kbps (for MP3) or 256kbps (for AAC), and ensuring the sample rate is 44.1 kHz.
4. What steps should I take to prepare my song for export from GarageBand?
Prepare your song for export from GarageBand by finalizing your mix, checking for clarity and balance, removing unwanted noises and silences, ensuring consistent dynamics, and backing up your project.
5. How can I ensure my GarageBand export sounds good on different devices?
Ensure your GarageBand export sounds good on different devices by listening to your mix on headphones, speakers, and mobile devices. Use reference tracks to compare your mix to professionally produced songs and get feedback from other musicians.
6. What is sync licensing, and how can I explore opportunities for my GarageBand creations?
Sync licensing is licensing your music for use in visual media such as film, TV, and ads. Explore opportunities by creating high-quality instrumentals, tagging your music descriptively, submitting to music libraries, and networking with music supervisors.
7. How do I register my music with a Performance Rights Organization (PRO) like ASCAP or BMI?
Register your music with a PRO like ASCAP, BMI, or SESAC by visiting their respective websites, completing the membership application, and submitting your songs. Registration allows you to collect royalties for public performances of your music.
8. What are the legal considerations I should keep in mind when exporting and monetizing my music from GarageBand?
When exporting and monetizing your music from GarageBand, understand copyright law, obtain necessary licenses for any copyrighted material, register your original music with a PRO, and ensure you have proper agreements in place for collaborations or commissioned work.
9. How can I sell beats created in GarageBand online?
Sell beats created in GarageBand online by creating high-quality beats in various genres, setting up an online store using platforms like BeatStars or Airbit, promoting your beats on social media and YouTube, and offering exclusive licenses to artists.
10. What are some future trends in music production and monetization that I should be aware of?
Future trends in music production and monetization include the rise of AI-assisted music creation, increased focus on personalized music experiences, the growing importance of virtual concerts, expanded opportunities in the metaverse, and innovative blockchain-based music platforms.