
Downloading songs from Apple Music lets you enjoy your favorite tunes offline and discover new revenue streams. At payoffsong.com, we provide expert insights and opportunities to maximize your musical success. This guide will walk you through downloading songs from Apple Music and exploring how to leverage your music for financial gains. Learn about music licensing, royalties, and monetization options, and turn your passion into profit with payoffsong.com.
1. What Are The Steps To Download A Song From Apple Music?
Downloading songs from Apple Music is straightforward. First, ensure you have an active Apple Music subscription. Then, add the desired song to your library, find the song or album, and tap the download icon, usually represented by a cloud with a downward arrow. Once downloaded, you can listen offline, anywhere, anytime.
Step-by-Step Guide to Downloading Music on Various Devices
Downloading music from Apple Music is a breeze, whether you’re using an iPhone, iPad, Android device, Mac, or PC. Here’s a detailed guide for each platform:
Downloading on iPhone or iPad
- Open the Apple Music App: Launch the Apple Music app on your iPhone or iPad.
- Find Music: Search for the song, album, or playlist you want to download.
- Add to Library: If the music isn’t already in your library, tap the “Add” button (often a plus sign) at the top of the album or playlist, or tap the “More” button (three dots) next to a song and select “Add to Library.”
- Download the Music:
- For an album or playlist, tap the download icon (a cloud with a downward arrow) at the top.
- For a single song, tap the “More” button next to the song and then tap “Download.”
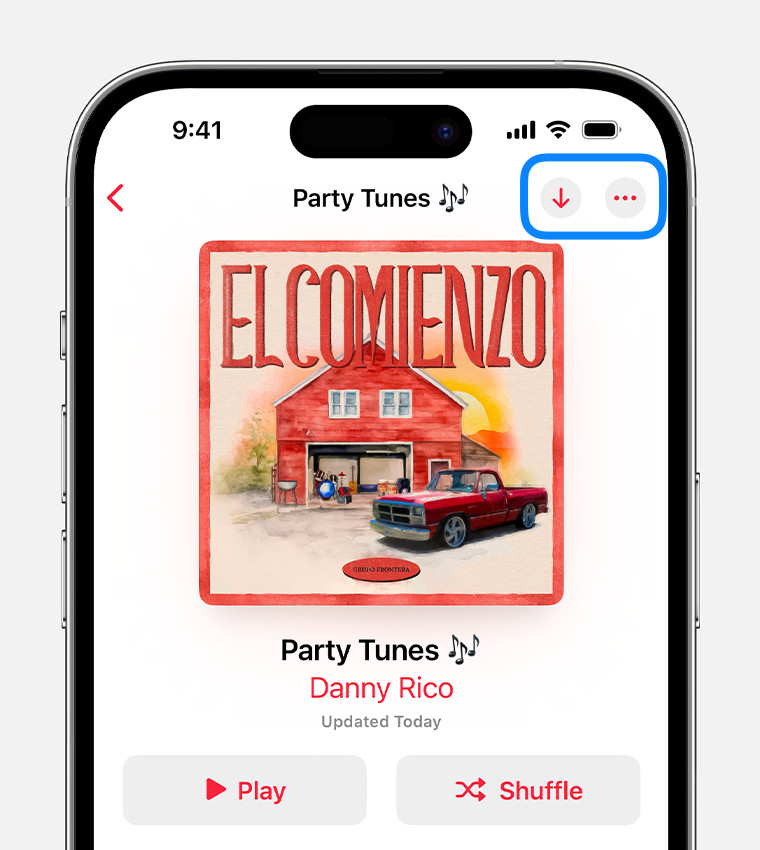 iPhone showing the Download and More button in the Apple Music app
Downloading on Android
- Open the Apple Music App: Launch the Apple Music app on your Android device.
- Find Music: Search for the song, album, or playlist you wish to download.
- Add to Library: If the music isn’t already in your library, tap the “Add” button (often a plus sign) at the top of the album or playlist, or tap the “More” button (three dots) next to a song and select “Add to Library.”
- Download the Music:
- For an album or playlist, tap the download icon (a cloud with a downward arrow) at the top.
- For a single song, tap the “More” button next to the song and then tap “Download.”
Downloading on Mac
- Open the Apple Music App: Launch the Apple Music app on your Mac.
- Find Music: Search for the song, album, or playlist you want to download.
- Add to Library: If the music isn’t already in your library, click the “Add” button (+Add) for an album or playlist or the “Add” button for a single song.
- Download the Music: Click the download icon (a cloud with a downward arrow) next to the song or at the top of the album or playlist.
Downloading on PC (iTunes)
- Open iTunes: Launch the iTunes application on your PC.
- Find Music: Search for the song, album, or playlist you want to download.
- Add to Library: If the music isn’t already in your library, click the “Add” button (+Add) for an album or playlist or the “Add” button for a single song.
- Download the Music: Click the download icon (a cloud with a downward arrow) next to the song or at the top of the album or playlist.
Troubleshooting Download Issues
Sometimes, you might encounter issues when downloading music from Apple Music. Here are some common problems and their solutions:
- Insufficient Storage: Ensure your device has enough storage space. Delete unnecessary files or transfer them to an external storage device.
- Internet Connectivity Issues: A stable internet connection is required for downloading. Check your Wi-Fi or cellular data connection.
- Apple Music Subscription Issues: Verify that your Apple Music subscription is active and up-to-date.
- Software Glitches: Restart the Apple Music app or your device to resolve minor software glitches.
- Regional Restrictions: Some songs might not be available for download in your region due to licensing agreements.
- Corrupted Downloads: Delete the partially downloaded song and try downloading it again.
Benefits of Downloading Music
Downloading music offers several advantages:
- Offline Listening: Enjoy your favorite songs without using data or needing an internet connection.
- High-Quality Audio: Downloaded music is often available in higher quality, providing a better listening experience.
- No Buffering: Playback is smooth and uninterrupted, as the music is stored locally on your device.
- Data Savings: Avoid using your cellular data when listening to music on the go.
Tips for Managing Downloaded Music
Managing your downloaded music efficiently ensures you make the most of your Apple Music subscription:
- Create Playlists: Organize your downloaded songs into playlists for different moods, activities, or genres.
- Regularly Update Library: Keep your library fresh by adding new songs and removing those you no longer listen to.
- Utilize Smart Downloads: Enable the Smart Downloads feature in Apple Music settings to automatically download new music you add to your library.
- Check Storage Regularly: Monitor your device’s storage to ensure you have enough space for new downloads.
- Back Up Your Library: Regularly back up your music library to avoid losing your downloaded songs if something happens to your device.
Monetizing Downloaded Music Through Payoffsong.com
Once you have your music downloaded, consider how you can leverage it for financial gain. Payoffsong.com offers resources and opportunities to monetize your music through licensing, royalties, and other avenues.
Licensing Opportunities
Licensing your music means granting permission for others to use your songs in various projects, such as films, TV shows, advertisements, and video games. This can generate substantial income.
Royalties Collection
Ensure you are registered with a Performing Rights Organization (PRO) like ASCAP, BMI, or SESAC. These organizations collect royalties on your behalf when your music is played publicly.
Music Monetization Strategies
Explore various strategies to monetize your music:
- Sync Licensing: License your music for use in visual media projects.
- Mechanical Royalties: Earn royalties from the reproduction and distribution of your songs.
- Performance Royalties: Collect royalties when your music is performed publicly.
- Digital Distribution: Distribute your music through online platforms like Spotify, Apple Music, and Amazon Music.
By following these steps and leveraging the resources at payoffsong.com, you can easily download music from Apple Music and explore the potential for financial success in the music industry.
2. Can You Download Music From Apple Music To A Computer?
Yes, you can download music from Apple Music to your computer using the Apple Music app on macOS or iTunes on Windows. After adding the music to your library, click the download icon next to the song or album to save it for offline listening. This allows you to enjoy your favorite tracks without an internet connection.
Detailed Steps for Downloading Music to Your Computer
Downloading music to your computer from Apple Music is a simple process, whether you’re using a Mac or a Windows PC. Here’s a detailed guide:
Downloading on a Mac
- Open the Apple Music App:
- Launch the Apple Music app on your Mac. If you’re running macOS Catalina or later, the Apple Music app comes pre-installed. For older versions of macOS, ensure you have the latest version of iTunes installed.
- Find Music:
- Use the search bar to find the specific song, album, or playlist you want to download.
- Alternatively, browse through the Apple Music catalog to discover new music.
- Add to Library:
- Before downloading, you need to add the music to your library.
- For a single song, click the “Add” button (often represented by a plus sign “+”).
- For an album or playlist, click the “+Add” button located near the top of the album or playlist.
- Download the Music:
- Once the music is added to your library, you can download it.
- For a single song, click the download icon (a cloud with a downward arrow) next to the song title.
- For an album or playlist, click the download icon at the top of the album or playlist page.
- Check Download Status:
- The download icon will change to a stop icon while the music is downloading.
- Once the download is complete, the icon will disappear, indicating that the music is available offline.
- Access Downloaded Music:
- To find your downloaded music, go to the “Library” section in the Apple Music app.
- You can sort your library by “Downloaded” to view only the music that is stored on your computer.
Downloading on a Windows PC (Using iTunes)
- Install iTunes:
- If you don’t have iTunes installed on your Windows PC, download it from the official Apple website or the Microsoft Store.
- Follow the installation instructions to set up iTunes on your computer.
- Open iTunes:
- Launch the iTunes application.
- Find Music:
- Use the search bar to find the specific song, album, or playlist you want to download.
- You can also browse the iTunes Store to discover new music.
- Add to Library:
- Before downloading, you need to add the music to your library.
- For a single song, click the “Add” button (often represented by a plus sign “+”).
- For an album or playlist, click the “+Add” button located near the top of the album or playlist.
- Download the Music:
- Once the music is added to your library, you can download it.
- For a single song, click the download icon (a cloud with a downward arrow) next to the song title.
- For an album or playlist, click the download icon at the top of the album or playlist page.
- Check Download Status:
- The download icon will change to a stop icon while the music is downloading.
- Once the download is complete, the icon will disappear, indicating that the music is available offline.
- Access Downloaded Music:
- To find your downloaded music, go to the “Library” section in iTunes.
- You can sort your library by “Downloaded” to view only the music that is stored on your computer.
Managing Your Music Library on Your Computer
Once you’ve downloaded music to your computer, you can manage your library to keep it organized and make the most of your music collection.
Creating Playlists
- Mac: In the Apple Music app, select “File” > “New” > “Playlist.” Give your playlist a name and add songs by dragging them from your library to the playlist.
- Windows (iTunes): In iTunes, select “File” > “New” > “Playlist.” Name your playlist and add songs by dragging them from your library to the playlist.
Editing Metadata
- Mac: Right-click on a song in the Apple Music app and select “Get Info.” You can edit details like the song title, artist, album, and genre.
- Windows (iTunes): Right-click on a song in iTunes and select “Get Info.” Edit the song’s metadata in the “Details” tab.
Backing Up Your Music Library
- Regularly back up your music library to prevent data loss.
- You can use Time Machine on Mac or Windows Backup on PC to create backups of your entire system, including your music library.
- Alternatively, you can manually copy your music files to an external hard drive or cloud storage service.
Leveraging Payoffsong.com to Monetize Your Music
Now that you have your music library on your computer, consider how you can use it to generate income through Payoffsong.com.
Sync Licensing Opportunities
- Introduction to Sync Licensing: Sync licensing involves licensing your music for use in films, TV shows, commercials, and video games. This can be a lucrative source of revenue.
- How to Get Started: Visit Payoffsong.com to learn how to list your music for sync licensing opportunities. Ensure your metadata is accurate and your tracks are properly tagged for easy discovery.
Royalties and Music Publishing
- Understanding Royalties: There are various types of royalties, including performance royalties, mechanical royalties, and sync royalties.
- Joining a PRO: Register with a Performing Rights Organization (PRO) like ASCAP, BMI, or SESAC to collect performance royalties when your music is played publicly.
- Music Publishing: Consider working with a music publisher to maximize your royalty collection and explore additional licensing opportunities.
Creating Music for Commercial Use
- Understanding Market Demand: Research the types of music that are in demand for commercial use. Focus on creating high-quality tracks that fit popular genres and themes.
- Production Tips: Invest in professional-grade recording equipment and software. Learn how to mix and master your tracks to achieve a polished, commercial sound.
By following these steps, you can easily download music from Apple Music to your computer and explore ways to monetize your music through platforms like Payoffsong.com.
3. What Is The Difference Between Adding And Downloading A Song On Apple Music?
Adding a song to your Apple Music library simply saves it to your collection. Downloading a song saves it to your device for offline listening. Adding requires an internet connection to play, while downloading allows you to listen without one, making it ideal for travel or areas with limited connectivity.
Elaborating on Adding Songs to Your Apple Music Library
Adding songs to your Apple Music library is a fundamental way to organize and curate your favorite music within the Apple ecosystem. Here’s a more detailed look at what this entails:
Purpose of Adding Songs
- Organization: Adding songs to your library allows you to keep track of the music you enjoy. It creates a personalized collection that is easily accessible from any device where you are logged in with your Apple ID.
- Discovery: When you add songs, albums, or playlists to your library, Apple Music uses this information to suggest similar music that you might like. This helps you discover new artists and songs based on your listening preferences.
- Accessibility: Your library is synced across all your devices. This means that any song you add on your iPhone will also be available on your iPad, Mac, and other devices connected to your Apple Music account.
How to Add Songs
- From the Apple Music Catalog:
- Single Songs: When browsing the Apple Music catalog, you can add a single song by tapping the “+” button next to the song title. This adds the song to your library without downloading it.
- Albums and Playlists: To add an entire album or playlist, navigate to the album or playlist page and tap the “+Add” button. This adds all the songs from the album or playlist to your library.
- From Search Results:
- You can also add songs directly from the search results. When you search for a song, album, or artist, tap the “+” button next to the song or album in the search results to add it to your library.
- Using Siri:
- You can use Siri to add songs to your library. Simply say, “Hey Siri, add this song to my library,” while playing a song on your device.
Managing Your Library
- Creating Playlists: Once you have added songs to your library, you can create playlists to organize them further. Playlists allow you to group songs based on mood, genre, or any other criteria you choose.
- Removing Songs: If you no longer want a song in your library, you can remove it by tapping the “More” button (three dots) next to the song title and selecting “Remove from Library.”
- Sorting and Filtering: Apple Music allows you to sort and filter your library by artist, album, song title, and more. This makes it easy to find the music you’re looking for.
In-Depth Explanation of Downloading Songs on Apple Music
Downloading songs on Apple Music takes your listening experience to the next level by allowing you to enjoy your favorite music offline. Here’s a detailed look at what downloading entails:
Purpose of Downloading Songs
- Offline Listening: The primary reason to download songs is to listen to them without an internet connection. This is particularly useful when traveling, commuting, or in areas with poor connectivity.
- Data Savings: Downloading songs can save you a significant amount of mobile data, especially if you listen to music frequently while on the go.
- Uninterrupted Playback: Downloaded songs play without buffering, providing a seamless listening experience, regardless of your internet connection.
How to Download Songs
- After Adding to Library:
- You can only download songs that have been added to your library. Once a song, album, or playlist is in your library, a download icon (a cloud with a downward arrow) will appear next to it.
- Downloading Individual Songs:
- To download a single song, tap the download icon next to the song title. The icon will change to a progress indicator while the song is downloading.
- Downloading Albums and Playlists:
- To download an entire album or playlist, tap the download icon at the top of the album or playlist page. This will download all the songs in the album or playlist to your device.
- Using Automatic Downloads:
- Apple Music has a feature called Automatic Downloads that automatically downloads songs you add to your library. To enable this feature, go to Settings > Music and toggle on “Automatic Downloads.”
Managing Downloaded Music
- Viewing Downloaded Music: To see only the music that is downloaded to your device, go to Library and tap “Downloaded Music.” This will show you all the songs, albums, and playlists that are stored on your device for offline listening.
- Removing Downloads: If you need to free up storage space on your device, you can remove downloaded music. Tap the “More” button (three dots) next to a song, album, or playlist and select “Remove.” You can choose to remove the download from your device or remove the song from your library entirely.
- Storage Optimization: Apple Music also offers storage optimization features that automatically remove downloaded music that you haven’t listened to in a while. You can adjust these settings in Settings > Music > Optimize Storage.
Key Differences Summarized
| Feature | Adding Songs to Library | Downloading Songs |
|---|---|---|
| Purpose | Organize music, discover new music, access across devices | Listen offline, save data, uninterrupted playback |
| Internet | Requires internet connection to play | No internet connection required to play |
| Storage | Does not use device storage | Uses device storage |
| Accessibility | Available on all devices connected to your Apple Music account | Only available on the device where the song is downloaded |
Monetizing Your Music with Payoffsong.com
Understanding the nuances of adding and downloading songs on Apple Music is just the beginning. To truly leverage your music for financial gain, consider these strategies:
Sync Licensing
- What It Is: Sync licensing involves licensing your music for use in films, TV shows, commercials, and video games.
- How to Get Started: Visit Payoffsong.com to learn how to submit your music for sync licensing opportunities. Ensure your tracks are properly tagged and your metadata is accurate for easy discovery.
Royalties and Music Publishing
- Understanding Royalties: There are several types of royalties, including performance royalties, mechanical royalties, and sync royalties.
- Joining a PRO: Register with a Performing Rights Organization (PRO) such as ASCAP, BMI, or SESAC to collect performance royalties when your music is played publicly.
- Music Publishing: Consider partnering with a music publisher to maximize your royalty collection and explore additional licensing opportunities.
Creating Music for Commercial Use
- Market Demand: Research the types of music that are in demand for commercial use. Focus on creating high-quality tracks that fit popular genres and themes.
- Production Tips: Invest in professional-grade recording equipment and software. Learn how to mix and master your tracks to achieve a polished, commercial sound.
By grasping these concepts and utilizing resources like Payoffsong.com, you can effectively manage your music on Apple Music and explore opportunities to monetize your work.
4. Where Are Apple Music Downloads Stored?
Apple Music downloads are stored in a protected location on your device. On iOS and Android, they are within the Apple Music app’s storage. On macOS, they are typically in the “Music” folder within your user directory, inside the “Apple Music” or “iTunes” folder. These files are DRM-protected and can only be played within the Apple Music app.
Detailed Look at Storage Locations on Different Devices
Knowing where Apple Music downloads are stored on your devices can be helpful for troubleshooting, managing storage, and understanding how Apple Music organizes your files. Here’s a detailed breakdown:
On iOS (iPhone and iPad)
- Protected Storage:
- Apple Music downloads on iOS devices are stored in a protected location within the Apple Music app. This means you cannot directly access these files through the Files app or any other file management system.
- Accessing Downloaded Music:
- To view the music you’ve downloaded, open the Apple Music app and go to “Library.” From there, tap “Downloaded Music” to see all the songs, albums, and playlists that are stored on your device for offline listening.
- Managing Storage:
- To manage the storage used by Apple Music, go to Settings > Music. Here, you can find options like “Optimize Storage,” which automatically removes downloaded music that you haven’t listened to in a while to free up space.
On Android
- Internal Storage:
- Similar to iOS, Apple Music downloads on Android are stored in a protected location within the app’s data directory. The exact path may vary depending on your device and Android version, but it is generally inaccessible to users without rooting the device.
- Accessing Downloaded Music:
- Open the Apple Music app and go to “Library.” Tap “Downloaded Music” to view the music stored on your device.
- Managing Storage:
- To manage storage, go to Settings within the Apple Music app. Look for storage settings where you can clear the cache, manage downloads, and optimize storage usage.
On macOS
- Default Location:
- By default, Apple Music downloads on macOS are stored in the “Music” folder within your user directory. The specific path is usually:
~/Music/Apple Music/Media.localized/ - If you are using an older version of macOS with iTunes, the path might be:
~/Music/iTunes/iTunes Media/
- By default, Apple Music downloads on macOS are stored in the “Music” folder within your user directory. The specific path is usually:
- Accessing Downloaded Files:
- Open Finder and navigate to the “Music” folder in your home directory. You will find folders organized by artist and album, containing the downloaded music files.
- Changing the Download Location:
- You can change the default download location in the Apple Music app preferences. Go to Apple Music > Preferences > Files and specify a new location for your music files.
- File Format and DRM:
- The downloaded files are typically in AAC format and are DRM-protected, meaning they can only be played within the Apple Music app or on devices authorized with your Apple ID.
On Windows PC (Using iTunes)
- Default Location:
- By default, Apple Music downloads on Windows PC are stored in the “iTunes Media” folder within your user’s “Music” directory. The specific path is usually:
C:Users[Your Username]MusiciTunesiTunes Media
- By default, Apple Music downloads on Windows PC are stored in the “iTunes Media” folder within your user’s “Music” directory. The specific path is usually:
- Accessing Downloaded Files:
- Open File Explorer and navigate to the “Music” folder in your user directory. You will find the “iTunes” folder containing your downloaded music files.
- Changing the Download Location:
- You can change the default download location in iTunes preferences. Go to Edit > Preferences > Advanced and specify a new location for your music files.
- File Format and DRM:
- The downloaded files are typically in AAC format and are DRM-protected, meaning they can only be played within iTunes or on devices authorized with your Apple ID.
Managing Storage Effectively
Regardless of the device you are using, managing your storage effectively is crucial for maintaining optimal performance and ensuring you have enough space for new downloads.
Tips for Managing Storage
- Regularly Review Downloads:
- Periodically review your downloaded music and remove songs, albums, or playlists you no longer listen to.
- Use Optimize Storage Feature:
- Enable the “Optimize Storage” feature in Apple Music settings to automatically remove downloaded music that you haven’t listened to in a while.
- Clear Cache:
- Clear the cache in the Apple Music app to remove temporary files that can take up storage space.
- Store Music on External Drive:
- On macOS and Windows, consider storing your music library on an external hard drive to free up space on your primary storage device.
- Cloud Storage:
- Utilize cloud storage services like iCloud Music Library to keep your music in the cloud and stream it on demand, rather than downloading it to your device.
Monetizing Your Music with Payoffsong.com
Now that you understand where Apple Music downloads are stored and how to manage your storage effectively, let’s explore how you can monetize your music using Payoffsong.com.
Licensing Your Music
- Sync Licensing:
- Sync licensing involves licensing your music for use in films, TV shows, commercials, and video games.
- How to Get Started:
- Visit Payoffsong.com to learn how to submit your music for sync licensing opportunities. Make sure your tracks are properly tagged and your metadata is accurate for easy discovery.
Royalties and Music Publishing
- Understanding Royalties:
- There are various types of royalties, including performance royalties, mechanical royalties, and sync royalties.
- Joining a PRO:
- Register with a Performing Rights Organization (PRO) such as ASCAP, BMI, or SESAC to collect performance royalties when your music is played publicly.
- Music Publishing:
- Consider partnering with a music publisher to maximize your royalty collection and explore additional licensing opportunities.
Creating Music for Commercial Use
- Market Demand:
- Research the types of music that are in demand for commercial use. Focus on creating high-quality tracks that fit popular genres and themes.
- Production Tips:
- Invest in professional-grade recording equipment and software. Learn how to mix and master your tracks to achieve a polished, commercial sound.
By understanding how to manage your Apple Music downloads and exploring opportunities with Payoffsong.com, you can effectively monetize your music and achieve financial success.
5. Can I Transfer Apple Music Downloads To Another Device?
No, you cannot directly transfer Apple Music downloads to another device due to DRM (Digital Rights Management) protection. These files are encrypted and can only be played on devices authorized with your Apple ID and within the Apple Music app.
Understanding DRM Protection
Digital Rights Management (DRM) is a technology used by Apple and other content providers to protect their copyrighted material. It restricts the free use and distribution of digital content, ensuring that only authorized users can access and play the content.
How DRM Works on Apple Music
- Encryption:
- When you download a song from Apple Music, the file is encrypted with DRM. This encryption prevents the file from being played on unauthorized devices or applications.
- Authorization:
- To play DRM-protected content, your device must be authorized with your Apple ID. This authorization process verifies that you have an active Apple Music subscription.
- Playback Restrictions:
- DRM-protected files can only be played within the Apple Music app or on devices that are authorized with your Apple ID. You cannot transfer these files to other devices or burn them to CDs for playback.
Alternatives to Transferring Music
While you cannot directly transfer Apple Music downloads to another device, there are alternative ways to access your music on multiple devices:
iCloud Music Library
- Syncing Your Library:
- iCloud Music Library allows you to sync your music library across all your devices. This includes songs you’ve added from the Apple Music catalog, as well as songs you’ve uploaded from other sources.
- Enabling iCloud Music Library:
- To enable iCloud Music Library, go to Settings > Music and toggle on “Sync Library” on iOS devices.
- On macOS, go to Apple Music > Preferences > General and check “Sync Library.”
- Once enabled, your music library will be available on all your devices connected to your Apple ID.
Family Sharing
- Sharing Your Subscription:
- Apple Music Family Sharing allows you to share your subscription with up to five family members. Each family member gets their own Apple Music account, but the subscription is billed to the family organizer.
- Setting Up Family Sharing:
- To set up Family Sharing, go to Settings > [Your Name] > Family Sharing on iOS devices.
- Follow the instructions to invite family members to join your family group.
- Once set up, each family member can access Apple Music on their own devices using their own Apple ID.
Downloading Music on Each Device
- Direct Downloads:
- The simplest way to access your music on multiple devices is to download the songs directly on each device.
- Open the Apple Music app on each device, go to your library, and download the songs you want to listen to offline.
Monetizing Your Music with Payoffsong.com
Even though you can’t transfer Apple Music downloads, you can still leverage your music for financial gain. Payoffsong.com offers various opportunities to monetize your music.
Sync Licensing
- What It Is:
- Sync licensing involves licensing your music for use in films, TV shows, commercials, and video games.
- How to Get Started:
- Visit Payoffsong.com to learn how to submit your music for sync licensing opportunities. Ensure your tracks are properly tagged and your metadata is accurate for easy discovery.
Royalties and Music Publishing
- Understanding Royalties:
- There are different types of royalties, including performance royalties, mechanical royalties, and sync royalties.
- Joining a PRO:
- Register with a Performing Rights Organization (PRO) like ASCAP, BMI, or SESAC to collect performance royalties when your music is played publicly.
- Music Publishing:
- Consider partnering with a music publisher to maximize your royalty collection and explore additional licensing opportunities.
Creating Music for Commercial Use
- Market Demand:
- Research the types of music that are in demand for commercial use. Focus on creating high-quality tracks that fit popular genres and themes.
- Production Tips:
- Invest in professional-grade recording equipment and software. Learn how to mix and master your tracks to achieve a polished, commercial sound.
Legal Considerations
It’s essential to respect copyright laws and the terms of service of Apple Music. Attempting to circumvent DRM or illegally distribute copyrighted content can lead to legal consequences.
By understanding DRM protection and exploring alternative ways to access your music on multiple devices, you can enjoy your Apple Music subscription to the fullest while also exploring opportunities to monetize your music with payoffsong.com.
6. How Do I Manage Storage For Apple Music Downloads?
Managing storage for Apple Music downloads involves regularly reviewing your downloaded content, using the “Optimize Storage” feature, and clearing the app’s cache. On iOS, you can find these settings in Settings > Music. On macOS and Windows, manage storage through the Apple Music app or iTunes preferences.
Detailed Steps for Managing Storage on Different Devices
Effectively managing storage for Apple Music downloads ensures that you have enough space for your favorite tunes without cluttering your device. Here’s a comprehensive guide for managing storage on various devices:
On iOS (iPhone and iPad)
- Accessing Storage Settings:
- Open the Settings app on your iPhone or iPad.
- Scroll down and tap “Music.”
- Optimize Storage:
- Enable Optimize Storage: This feature automatically removes downloaded music that you haven’t listened to in a while, freeing up space on your device. You can choose different storage limits, such as 2GB, 4GB, 8GB, 16GB, or 32GB.
- How it Works: When your device reaches the specified storage limit, Apple Music will automatically remove the least recently played songs. The songs remain in your library and can be re-downloaded at any time.
- Viewing Downloaded Music:
- In the Music app, go to “Library” and tap “Downloaded Music” to see all the songs, albums, and playlists that are stored on your device.
- Removing Downloads Manually:
- To remove a specific song, album, or playlist, tap the “More” button (three dots) next to it.
- Select “Remove” and choose “Remove Download” to delete the downloaded file from your device.
On Android
- Accessing Storage Settings:
- Open the Apple Music app on your Android device.
- Tap the three horizontal lines in the upper-left corner to open the menu.
- Scroll down and tap “Settings.”
- Manage Downloads:
- Look for the “Downloads” section.
- Here, you can see the storage used by your downloaded music and manage your download settings.
- Clear Cache:
- In the settings menu, look for an option to clear the cache. Clearing the cache removes temporary files and can free up storage space.
- Removing Downloads Manually:
- Go to “Library” and tap “Downloaded Music” to see all the songs stored on your device.
- Tap the “More” button (three dots) next to a song, album, or playlist.
- Select “Remove Download” to delete the downloaded file from your device.
On macOS
- Accessing Preferences:
- Open the Apple Music app on your Mac.
- In the menu bar, click “Music” and select “Preferences.”
- Files Settings:
- Click the “Files” tab in the Preferences window.
- Optimize Storage:
- iCloud Music Library: Ensure that “Sync Library” is checked to enable iCloud Music Library. This allows you to stream music from the cloud rather than storing it locally.
- Managing Downloaded Music:
- Go to “Library” in the Apple Music app to see your music collection.
- To view only downloaded music, select “Downloaded Music” in the sidebar.
- Removing Downloads Manually:
- Right-click on a song, album, or playlist.
- Select “Remove” and choose “Remove Download” to delete the downloaded file from your device.
On Windows PC (Using iTunes)
- Accessing Preferences:
- Open iTunes on your Windows PC.
- In the menu bar, click “Edit” and select “Preferences