
Changing songs on your AirPods Pro is straightforward and enhances your listening experience; let’s explore how! This guide on payoffsong.com will help you master music control, ensuring seamless enjoyment and maximizing your audio experience. Discover advanced techniques and hidden features to elevate your AirPods Pro usage and unlock their full potential in music management and beyond. Dive in to master effortless song transitions and transform how you interact with your music!
1. Understanding the Controls on Your AirPods Pro
Mastering the controls on your AirPods Pro will significantly enhance your music listening experience. Understanding these features allows for seamless navigation and control, making your audio experience more enjoyable.
1.1. Overview of Touch Controls
The AirPods Pro feature intuitive touch controls on the stems of each earbud. These controls allow you to manage music playback, answer calls, and activate Siri, all without reaching for your device. Touch controls are designed for convenience and efficiency, making it easier to interact with your AirPods Pro on the go.
- Single Press: Play or pause audio, answer or mute calls.
- Double Press: Skip forward to the next track.
- Triple Press: Skip back to the previous track.
- Press and Hold: Activate Siri, switch between Active Noise Cancellation and Transparency mode (on AirPods Pro 1st and 2nd generation).
- Swipe Up/Down: Adjust the volume (AirPods Pro 2nd generation only).
1.2. Force Sensor Functionality (AirPods Pro 1st Generation)
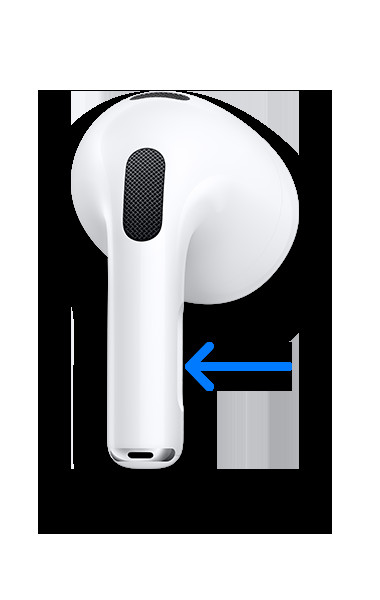 AirPods force sensor
The first-generation AirPods Pro uses a force sensor located on the stem of each earbud. This sensor responds to pressure, allowing you to control various functions with precise presses. The force sensor provides tactile feedback, making it easier to understand and control your device.
- Single Press: Play or pause audio, answer or mute calls.
- Double Press: Skip forward to the next track.
- Triple Press: Skip back to the previous track.
- Press and Hold: Switch between Active Noise Cancellation and Transparency mode.
1.3. Touch Control Features (AirPods Pro 2nd Generation)
The second-generation AirPods Pro introduces enhanced touch controls with the addition of volume adjustment. This feature allows you to swipe up or down on the stem to increase or decrease the volume, providing greater control over your audio experience. The upgraded touch controls offer a more intuitive and responsive way to manage your music.
- Single Press: Play or pause audio, answer or mute calls.
- Double Press: Skip forward to the next track.
- Triple Press: Skip back to the previous track.
- Press and Hold: Activate Siri, switch between Active Noise Cancellation and Adaptive Transparency mode.
- Swipe Up: Increase the volume.
- Swipe Down: Decrease the volume.
2. Changing Songs on AirPods Pro: Step-by-Step Guide
Changing songs on your AirPods Pro is a simple process that can be done using touch controls or Siri. This step-by-step guide will help you navigate your music effortlessly.
2.1. Using Touch Controls to Skip Tracks
To skip to the next song, double-press the touch control on the stem of either AirPod. To return to the previous song, triple-press the touch control. This method provides a quick and easy way to change tracks without reaching for your device.
- Double Press: Skip to the next track.
- Triple Press: Skip back to the previous track.
2.2. Utilizing Siri for Voice Commands
 AirPods tap gesture
Siri can be activated by saying “Hey Siri” and then giving a voice command, such as “Skip to the next song” or “Play the previous track.” This hands-free method is particularly useful when you are unable to use touch controls.
- Activate Siri: Say “Hey Siri.”
- Give Command: Say “Skip to the next song” or “Play the previous track.”
2.3. Adjusting Volume While Changing Songs
On the AirPods Pro 2nd generation, you can adjust the volume by swiping up or down on the touch control. While changing songs, you can quickly adjust the volume to your preferred level, enhancing your listening experience.
- Swipe Up: Increase the volume.
- Swipe Down: Decrease the volume.
3. Customizing AirPod Pro Controls for Enhanced Functionality
Customizing your AirPods Pro controls can significantly enhance your listening experience. This allows you to tailor the controls to your specific needs and preferences.
3.1. Accessing AirPod Settings on iOS Devices
To customize your AirPods Pro controls, you need to access the settings on your iOS device. This can be done through the Bluetooth menu.
- Open Settings: Go to the Settings app on your iPhone or iPad.
- Select Bluetooth: Tap on Bluetooth.
- Find AirPods Pro: Locate your AirPods Pro in the list of connected devices and tap the “i” icon next to them.
3.2. Changing Double-Tap Functions
In the AirPod settings, you can change the function assigned to the double-tap gesture on each AirPod. This allows you to set different actions for the left and right AirPods.
- Choose Left or Right: Select either the left or right AirPod to customize.
- Select Function: Choose from options like Siri, Play/Pause, Next Track, or Previous Track.
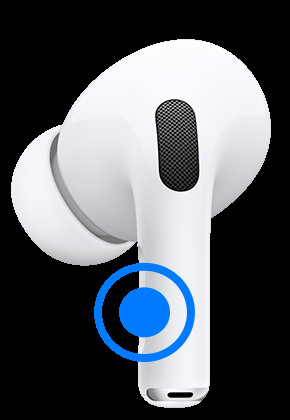
3.3. Setting Up Siri Activation
 press the Touch control to play and pause audio
You can set up Siri activation by pressing and holding the touch control on either AirPod. This allows you to quickly access Siri for voice commands and other functions.
- Enable Siri: Make sure Siri is enabled in your iPhone settings.
- Assign to Press and Hold: In the AirPod settings, ensure that the press and hold function is set to activate Siri.
4. Troubleshooting Common Issues with AirPod Pro Controls
Sometimes, you may encounter issues with your AirPods Pro controls. Troubleshooting these common problems can help you resolve them quickly.
4.1. Unresponsive Touch Controls
If the touch controls on your AirPods Pro are not responding, there are several steps you can take to troubleshoot the issue.
- Clean the AirPods: Make sure the touch controls are clean and free from dirt or debris.
- Restart AirPods: Place the AirPods in their case, wait 15 seconds, and then take them out again.
- Reconnect AirPods: Disconnect and reconnect the AirPods to your device via Bluetooth.
- Update Firmware: Ensure your AirPods have the latest firmware by keeping them connected to your iOS device.
4.2. Siri Not Activating
If Siri is not activating when you press and hold the touch control, there are a few things you can check.
- Enable Siri: Make sure Siri is enabled in your iPhone settings.
- Check Bluetooth Connection: Ensure the AirPods are properly connected to your device via Bluetooth.
- Restart Device: Restart your iPhone or iPad to resolve any software glitches.
4.3. Volume Control Problems
If you are experiencing issues with volume control on your AirPods Pro 2nd generation, try the following steps.
- Clean the Touch Surface: Ensure the touch surface on the stem is clean and responsive.
- Restart AirPods: Place the AirPods in their case, wait 15 seconds, and then take them out again.
- Reconnect AirPods: Disconnect and reconnect the AirPods to your device via Bluetooth.
5. Tips and Tricks for Seamless Music Control
To make the most of your AirPods Pro, here are some tips and tricks for seamless music control.
5.1. Using Head Gestures (AirPods Pro 2nd Generation)
 double-press the Touch control to skip forward
The AirPods Pro 2nd generation supports head gestures for answering calls and controlling music. You can set up head gestures in the accessibility settings on your iOS device.
- Open Settings: Go to the Settings app on your iPhone or iPad.
- Select Accessibility: Tap on Accessibility.
- Choose AirPods: Select AirPods and enable Head Gestures.
- Customize Gestures: Customize the gestures for answering calls and controlling music.
5.2. Creating Custom Siri Commands
You can create custom Siri commands to control your music more effectively. This allows you to set specific commands for various actions.
- Open Shortcuts App: Open the Shortcuts app on your iPhone or iPad.
- Create New Shortcut: Tap the “+” icon to create a new shortcut.
- Add Actions: Add actions for controlling music, such as playing a specific playlist or skipping to the next track.
- Assign Siri Command: Assign a custom Siri command to the shortcut.
5.3. Utilizing the Apple Watch for Music Control
You can use your Apple Watch to control music playback on your AirPods Pro. This provides a convenient way to manage your music without reaching for your iPhone.
- Open Now Playing: Open the Now Playing app on your Apple Watch.
- Control Playback: Use the controls to play, pause, skip tracks, and adjust the volume.
- Use Digital Crown: Turn the Digital Crown to adjust the volume of your AirPods Pro.
6. Exploring Advanced Features for Music Enthusiasts
For music enthusiasts, the AirPods Pro offer several advanced features that can enhance your listening experience.
6.1. Spatial Audio and Personalized Spatial Audio
Spatial Audio creates a theater-like experience by placing sound all around you. Personalized Spatial Audio tailors the sound to your unique head and ear shape, providing an even more immersive experience. According to Apple, Personalized Spatial Audio uses the TrueDepth camera on your iPhone to create a custom profile that optimizes the sound for your ears.
- Enable Spatial Audio: Go to Settings > Bluetooth > AirPods Pro > Spatial Audio and turn it on.
- Set Up Personalized Spatial Audio: Follow the on-screen instructions to scan your head and ears for a personalized profile.
6.2. Adaptive Transparency Mode
 triple-press the Touch control to skip back
Adaptive Transparency mode allows you to hear the world around you while still enjoying your music. This mode dynamically adjusts the volume of external sounds to provide a comfortable listening experience.
- Activate Transparency Mode: Press and hold the touch control on either AirPod to switch to Transparency mode.
- Adaptive Transparency: The AirPods Pro will automatically adjust the volume of external sounds based on your environment.
6.3. Conversation Boost
Conversation Boost is designed to help you hear conversations more clearly. This feature focuses on the voices in front of you, making it easier to hear and understand what people are saying.
- Enable Conversation Boost: Go to Settings > Accessibility > AirPods > Audio Accessibility Settings and turn on Conversation Boost.
- Adjust Settings: Customize the settings to optimize the sound for your hearing needs.
7. Maximizing Your Audio Experience with Third-Party Apps
Third-party apps can further enhance your audio experience with AirPods Pro. These apps offer additional features and customization options.
7.1. Equalizer Apps for Custom Sound Profiles
Equalizer apps allow you to create custom sound profiles that optimize the audio for your specific preferences. These apps offer a range of settings to adjust the bass, treble, and other frequencies.
- Download Equalizer App: Download a reputable equalizer app from the App Store, such as Boom or Denon Audio.
- Create Custom Profiles: Use the app to create custom sound profiles for different genres of music.
- Apply Settings: Apply the settings to your AirPods Pro for an enhanced listening experience.
7.2. Music Streaming Apps with Enhanced Features
Some music streaming apps offer enhanced features that can improve your audio experience with AirPods Pro. These features include high-quality audio streaming, personalized playlists, and more.
- Choose Streaming App: Select a music streaming app with enhanced features, such as Apple Music, Spotify, or Tidal.
- Adjust Settings: Adjust the settings in the app to optimize the audio quality for your AirPods Pro.
- Explore Features: Explore the app’s features, such as personalized playlists and high-quality audio streaming.
7.3. Podcast Apps with AirPod Integration
Podcast apps with AirPod integration offer a seamless listening experience with features like automatic playback control and voice command support.
- Download Podcast App: Download a podcast app with AirPod integration, such as Overcast or Pocket Casts.
- Connect AirPods: Connect your AirPods Pro to the app.
- Use Features: Use the app’s features, such as automatic playback control and voice command support, to enhance your podcast listening experience.
8. Ensuring Optimal Performance and Longevity of Your AirPods Pro
To ensure optimal performance and longevity of your AirPods Pro, it is important to follow some best practices.
8.1. Cleaning and Maintenance Tips
Regular cleaning and maintenance can help keep your AirPods Pro in good condition.
- Clean Regularly: Clean your AirPods Pro regularly with a soft, dry cloth.
- Remove Earwax: Remove any earwax or debris from the ear tips using a small, soft brush.
- Avoid Moisture: Avoid exposing your AirPods Pro to excessive moisture or humidity.
8.2. Proper Storage Techniques
Proper storage can help protect your AirPods Pro from damage.
- Use Charging Case: Store your AirPods Pro in their charging case when not in use.
- Avoid Extreme Temperatures: Avoid storing your AirPods Pro in extreme temperatures or direct sunlight.
- Keep Away from Liquids: Keep your AirPods Pro away from liquids and chemicals.
8.3. Battery Care for Extended Lifespan
Proper battery care can help extend the lifespan of your AirPods Pro.
- Avoid Full Discharges: Avoid fully discharging your AirPods Pro battery.
- Charge Regularly: Charge your AirPods Pro regularly to keep the battery healthy.
- Use Optimized Battery Charging: Enable Optimized Battery Charging in your iPhone settings to reduce battery aging.
9. Understanding Copyright and Music Licensing for Commercial Use
If you plan to use music for commercial purposes, it is important to understand copyright and music licensing.
9.1. Basics of Music Copyright Law
Music copyright law protects the rights of songwriters and composers. It gives them exclusive control over how their music is used. According to the U.S. Copyright Office, copyright protection begins automatically when an original work of authorship is fixed in a tangible medium.
- Copyright Protection: Copyright protects original musical works, including compositions and sound recordings.
- Exclusive Rights: Copyright owners have exclusive rights to reproduce, distribute, perform, and display their works.
- Infringement: Using copyrighted music without permission is considered infringement and can result in legal penalties.
9.2. Types of Music Licenses
There are several types of music licenses that allow you to use copyrighted music legally.
- Synchronization License: Allows you to use a song in a visual work, such as a film, TV show, or video game.
- Mechanical License: Allows you to reproduce and distribute a song on physical media or digital platforms.
- Public Performance License: Allows you to publicly perform a song, such as in a concert or broadcast.
- Master Use License: Allows you to use a specific recording of a song in your project.
9.3. How to Obtain Music Licenses
To obtain music licenses, you need to contact the copyright owner or their representative.
- Identify Copyright Owner: Determine who owns the copyright to the music you want to use.
- Contact Licensing Agency: Contact a licensing agency, such as ASCAP, BMI, or SESAC, to obtain the necessary licenses.
- Negotiate Fees: Negotiate the licensing fees and terms of use with the copyright owner or licensing agency.
- Obtain Written Permission: Obtain written permission to use the music in your project.
10. Exploring Opportunities with Payoffsong.com
Payoffsong.com offers various opportunities for musicians and businesses looking to leverage music for commercial success.
10.1. Licensing Music through Payoffsong.com
Payoffsong.com provides a platform for licensing music to businesses and content creators. This allows musicians to earn revenue from their music while providing businesses with access to high-quality music for their projects.
- Create Account: Create an account on Payoffsong.com.
- Upload Music: Upload your music to the platform.
- Set Licensing Terms: Set the licensing terms and fees for your music.
- Promote Music: Promote your music to potential licensees.
10.2. Finding the Right Music for Commercial Projects
Payoffsong.com helps businesses find the right music for their commercial projects. The platform offers a wide selection of music from various genres and styles, making it easy to find the perfect soundtrack for your project.
- Search Music: Search for music on Payoffsong.com using keywords, genres, and styles.
- Preview Tracks: Preview tracks to find the perfect fit for your project.
- Obtain License: Obtain the necessary license to use the music in your commercial project.
10.3. Connecting with Music Professionals
Payoffsong.com provides a platform for connecting with music professionals, including musicians, producers, and licensing experts. This allows you to build your network and collaborate on projects.
- Create Profile: Create a profile on Payoffsong.com.
- Search Professionals: Search for music professionals on the platform.
- Connect and Collaborate: Connect with professionals and collaborate on projects.
By following this comprehensive guide, you can master the art of changing songs on your AirPods Pro, customize your listening experience, and explore opportunities for commercial success with payoffsong.com.