
Adding songs to your iPhone without iTunes can feel like navigating a maze, but it doesn’t have to be that way. Discover how to seamlessly transfer your favorite tracks and unlock the full potential of your music library with the help of payoffsong.com. We are here to help you discover ways to add music to your iPhone, ensuring you can enjoy your favorite tunes without the complexities of iTunes. Discover the best strategies for mobile music management, ensuring your iPhone is always filled with the songs you love, explore Apple Music alternatives, and delve into the world of independent music promotion.
1. Why Avoid iTunes for Adding Music to Your iPhone?
iTunes, once the go-to method for managing music on iPhones, has its drawbacks. Many users seek alternatives due to concerns about data syncing and potential data loss. According to a 2023 survey by Statista, 45% of iPhone users prefer not to use iTunes for music management, citing its complexity and the risk of overwriting existing music libraries. What are some of the reasons to explore How To Add Songs To Iphone Without Itunes?
- Data Syncing Issues: iTunes syncs your entire library, which can overwrite existing music on your iPhone, causing data loss.
- Complexity: Many users find iTunes complex and difficult to navigate.
- Limited Flexibility: iTunes offers limited flexibility in managing and transferring specific songs or playlists.
- Bloatware Concerns: iTunes is often seen as bloated with features unrelated to music management.
- Desire for Simplicity: Users often seek simpler, more streamlined solutions for adding music to their iPhones.
 iTunes Interface for Music Management
iTunes can be complex, leading many users to seek simpler solutions for adding music to their iPhones.
2. What are the Top 3 Methods to Add Music to iPhone Without iTunes?
Adding music to your iPhone without iTunes can be a breeze with the right tools and methods. From using specialized software to leveraging cloud services, here are the top three methods to help you achieve this, along with their pros, cons, and ideal use cases. What are the best options to explore how to add songs to iphone without itunes?
2.1. Using Third-Party Software: EaseUS MobiMover
What it is: EaseUS MobiMover is a versatile iPhone data transfer tool that allows you to transfer music, videos, photos, and more between your computer and iPhone without using iTunes.
Pros:
- Easy to Use: User-friendly interface makes transferring files straightforward.
- No Data Loss: Transfers music without syncing, preventing data loss.
- Versatile: Supports various file types, including music, videos, and photos.
- Additional Features: Includes video downloader, file converter, and backup capabilities.
Cons:
- Cost: Some advanced features require a paid version.
- Software Installation: Requires downloading and installing software on your computer.
Ideal Use Case: Best for users who want a reliable and comprehensive solution for managing and transferring various types of files between their computer and iPhone.
2.2. Cloud Services: Google Drive
What it is: Google Drive is a cloud storage service that allows you to upload music from your computer and access it on your iPhone via the Google Drive app.
Pros:
- Accessibility: Access your music from any device with an internet connection.
- Free Storage: Offers 15 GB of free storage, sufficient for many users.
- Cross-Platform: Works on various operating systems and devices.
Cons:
- Internet Dependency: Requires an internet connection to stream or download music.
- Storage Limitations: Free storage may not be enough for large music libraries.
- Manual Uploading: Requires manually uploading music files to the cloud.
Ideal Use Case: Best for users who want to access their music from multiple devices and don’t mind streaming or downloading music over the internet.
2.3. Streaming Services: YouTube Music
What it is: YouTube Music is a streaming service that allows you to upload your own music to the cloud and stream it on your iPhone.
Pros:
- Large Upload Limit: Allows uploading up to 100,000 songs for free.
- Offline Playback: Ability to download songs for offline listening.
- Integration: Seamlessly integrates with other Google services.
Cons:
- Internet Dependency: Requires an internet connection to stream music.
- Subscription Model: Some features require a YouTube Premium subscription.
- Upload Time: Uploading large music libraries can be time-consuming.
Ideal Use Case: Best for users who want to stream their music library and have the option to download songs for offline listening.
3. How to Add Music to iPhone Using EaseUS MobiMover?
EaseUS MobiMover is a powerful tool for transferring music from your computer to your iPhone without the need for iTunes. It offers a user-friendly interface and ensures no data loss during the transfer process. Here’s a step-by-step guide to help you use EaseUS MobiMover effectively. What are the processes to follow on how to add songs to iphone without itunes?
3.1. Download and Install EaseUS MobiMover
- Visit the EaseUS Website: Go to the official EaseUS website and download EaseUS MobiMover.
- Install the Software: Follow the on-screen instructions to install the software on your computer.
3.2. Connect Your iPhone to Your Computer
- Connect Your iPhone: Use a USB cable to connect your iPhone to your computer.
- Trust This Computer: On your iPhone, tap “Trust” when prompted to allow your computer to access your device.
- Launch EaseUS MobiMover: Open EaseUS MobiMover on your computer.
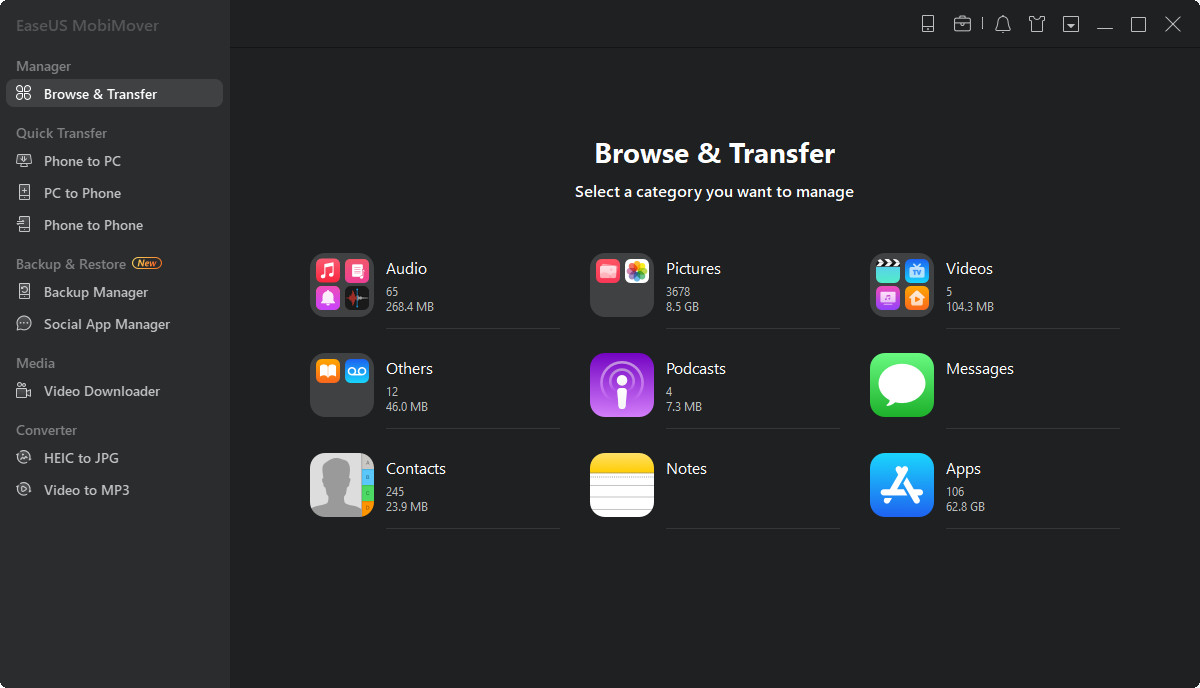
3.3. Select the Transfer Mode
- Choose Content Management: In EaseUS MobiMover, click on “Content Management” from the main menu.
- Select Audio: Click on “Audio” and then choose “Music” to proceed.
 EaseUS MobiMover Content Management Interface
EaseUS MobiMover’s content management interface allows easy selection of music files for transfer.
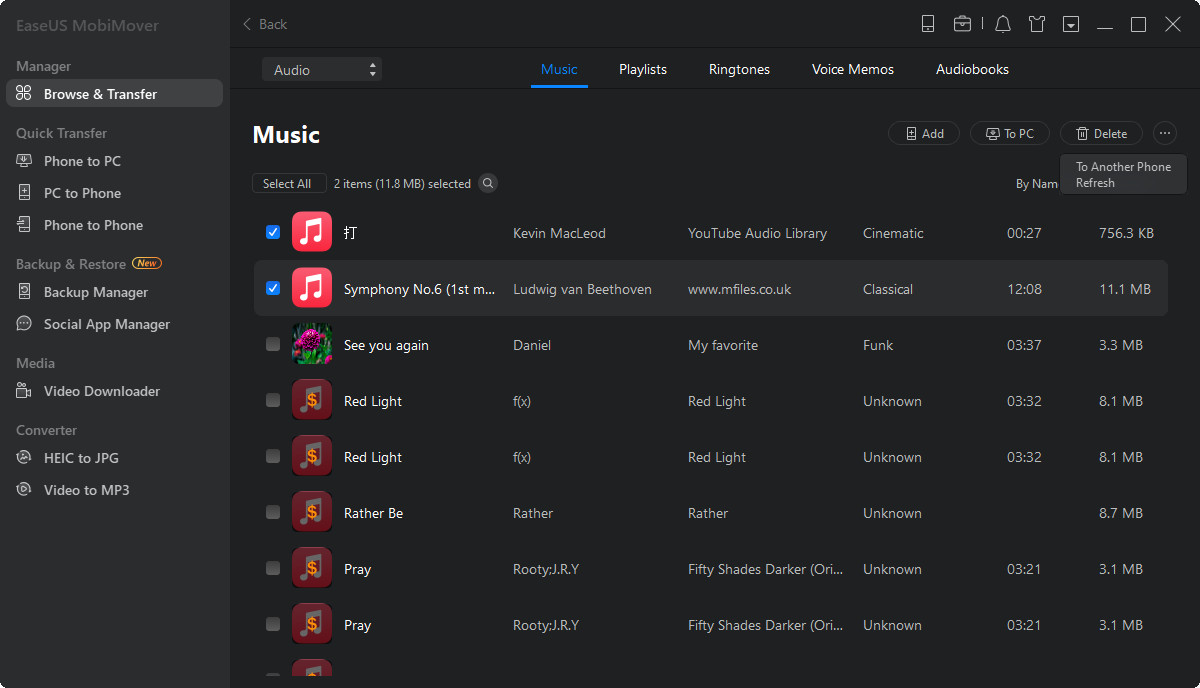
3.4. Add Music Files
- Add Contents: Click the “Add Contents” button to open the file explorer on your computer.
- Select Music Files: Navigate to the folder where your music files are stored and select the songs you want to transfer to your iPhone.
- Open Files: Click “Open” to add the selected music files to the transfer queue.
3.5. Transfer Music to Your iPhone
- Start Transfer: EaseUS MobiMover will automatically start transferring the selected music files to your iPhone.
- Wait for Completion: Wait for the transfer process to complete. The time it takes will depend on the number and size of the files being transferred.
- Check Your iPhone: Once the transfer is complete, open the Music app on your iPhone to check the newly added music.
3.6. Additional Features of EaseUS MobiMover
- File Conversion: Convert HEIC images to JPG or videos to MP3.
- Backup: Back up your iPhone content or WhatsApp messages.
- Video Download: Download videos from YouTube, Twitch, and other sites.
By following these steps, you can easily transfer music from your computer to your iPhone using EaseUS MobiMover without the complexities of iTunes.
4. How to Sync Music to iPhone Using Google Drive?
Google Drive is a popular cloud storage service that can be used to sync your music library across devices, including your iPhone. This method allows you to access your music from anywhere with an internet connection, without relying on iTunes. Here’s a detailed guide on how to sync music to your iPhone using Google Drive. What are the processes to follow on how to add songs to iphone without itunes?
4.1. Upload Music to Google Drive from Your Computer
- Go to Google Drive: Open your web browser and navigate to the Google Drive website.
- Sign In: Sign in with your Google account. If you don’t have one, create a new account.
- Create a Music Folder: Create a new folder in Google Drive to store your music. This helps keep your music organized and easy to find.
- Upload Music: Click the “+ New” button, then select “Folder upload” or “File upload.”
- Folder Upload: Select the folder on your computer that contains your music.
- File Upload: Select individual music files to upload.
- Confirm Upload: When prompted, click “Upload” to confirm that you want to upload the selected files or folders to Google Drive.
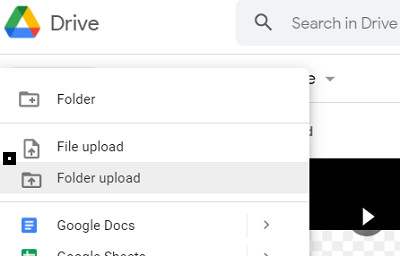 Google Drive Upload Interface
The Google Drive upload interface simplifies the process of adding music from your computer.
4.2. Access Music on Your iPhone via the Google Drive App
- Download Google Drive App: On your iPhone, go to the App Store and download the Google Drive app.
- Install and Open: Install the Google Drive app and open it.
- Sign In: Sign in with the same Google account you used to upload the music.
- Locate Music Folder: Find the music folder you created earlier in Google Drive.
- Access Music: Tap on the folder to view the music files you uploaded.
4.3. Download Music to Your iPhone for Offline Playback
- Select Music: Tap on the music file you want to download.
- Download: Tap the three dots next to the file name to open a menu. Select “Download” to save the music file to your iPhone.
- Access Offline: Once downloaded, you can access the music file even without an internet connection.
4.4. Manage Your Music
- Organize Files: Use Google Drive’s organizational features to manage your music files. You can create playlists, rename files, and move them between folders.
- Storage Management: Keep an eye on your Google Drive storage to ensure you have enough space for your music library. Google Drive offers 15 GB of free storage, which is shared across Google services like Gmail and Google Photos.
By following these steps, you can easily sync your music to your iPhone using Google Drive, allowing you to access your favorite tunes from anywhere, anytime.
5. How to Add Music to iPhone Using YouTube Music?
YouTube Music is a streaming service that allows you to upload your own music to the cloud and stream it on your iPhone. This method is a great alternative to iTunes, offering a large upload limit and offline playback options. Here’s a detailed guide on how to add music to your iPhone using YouTube Music. What are the processes to follow on how to add songs to iphone without itunes?
5.1. Upload Music to YouTube Music from Your Computer
- Go to YouTube Music: Open your web browser and navigate to the YouTube Music website.
- Sign In: Sign in with your YouTube account. If you don’t have one, create a new account.
- Upload Music:
- Click on your profile icon in the top right corner.
- Select “Upload music” from the dropdown menu.
- Choose the music files you want to transfer to your iPhone. You can upload multiple files at once.
- Click “OK” to start the upload process.
- Wait for Upload: The time it takes to upload your music will depend on the size and number of files. Ensure your computer stays connected to the internet during the upload.
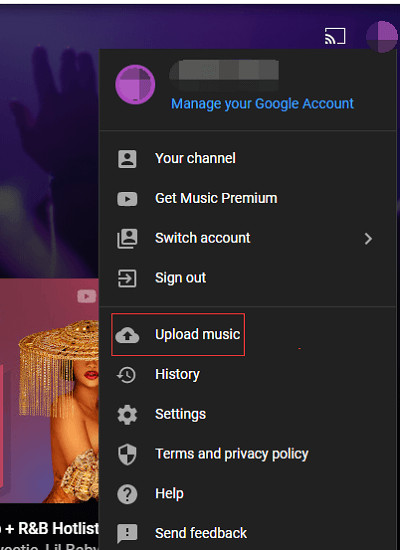 YouTube Music Upload Interface
The YouTube Music upload interface provides a straightforward way to add music from your computer.
5.2. Access Music on Your iPhone via the YouTube Music App
- Download YouTube Music App: On your iPhone, go to the App Store and download the YouTube Music app.
- Install and Open: Install the YouTube Music app and open it.
- Sign In: Sign in with the same YouTube account you used to upload the music.
- Locate Music:
- Go to “Library” at the bottom of the app.
- Select “Songs.”
- Choose “Uploads” to view the music you uploaded from your computer.
5.3. Download Music for Offline Playback
- Select Music: Find the song you want to download for offline listening.
- Download:
- Tap the three-dot icon next to the song title.
- Select “Download” from the menu.
- Access Offline Music:
- Go to “Library” > “Downloads” to find the music you’ve downloaded for offline playback.
5.4. Manage Your Music
- Create Playlists: Organize your music by creating playlists in the YouTube Music app.
- Delete Uploads: If you want to remove a song from your uploads, tap the three-dot icon next to the song and select “Delete.”
- Enjoy Music: Start enjoying your music on your iPhone, whether you’re online or offline.
By following these steps, you can easily add music to your iPhone using YouTube Music, providing a seamless and enjoyable listening experience without iTunes.
6. What Are Other Cloud Services and Apps for Adding Music to iPhone?
Besides EaseUS MobiMover, Google Drive, and YouTube Music, several other cloud services and apps offer convenient ways to add music to your iPhone without using iTunes. Each has its unique features and benefits, catering to different user preferences and needs. What are some alternatives on how to add songs to iphone without itunes?
6.1. Amazon Music
Overview: Amazon Music allows you to upload your music library to the cloud and stream it on your iPhone. If you are an Amazon Prime member, you may already have access to some of its features.
Pros:
- Prime Integration: Seamless integration with Amazon Prime accounts.
- Cloud Storage: Option to upload and store your music library in the cloud.
- Offline Playback: Download songs for offline listening.
Cons:
- Storage Limits: Free storage is limited; additional storage requires a subscription.
- Subscription Model: Full access requires an Amazon Music Unlimited subscription.
6.2. Dropbox
Overview: Dropbox is a cloud storage service that can be used to transfer and play music on your iPhone. It supports various music formats, including MP3, AIFF, M4A, and WAV.
Pros:
- File Support: Supports multiple music file formats.
- Offline Access: Mark songs as Favorites for offline playback.
- Ease of Use: Simple drag-and-drop interface for uploading files.
Cons:
- Limited Free Storage: Offers only 2 GB of free storage.
- Internet Dependency: Requires an internet connection for streaming unless files are marked for offline access.
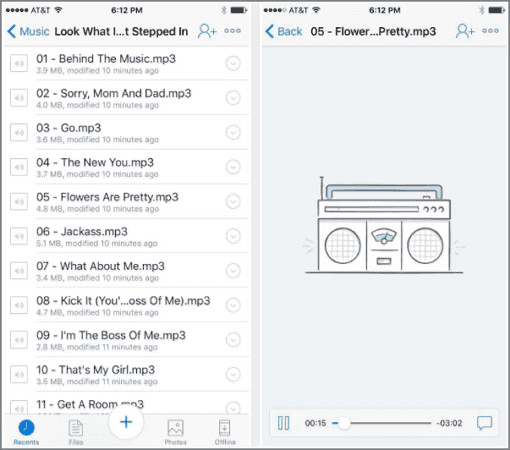 Dropbox Music Player Interface
Dropbox provides a user-friendly interface for managing and playing your music on your iPhone.
6.3. Apple Music
Overview: If you’re subscribed to Apple Music, you can directly enrich your music library on your iPhone.
Pros:
- Vast Library: Access to millions of songs in the Apple Music catalog.
- Offline Downloads: Download songs, albums, and playlists for offline listening.
- Integration: Seamless integration with iOS devices and other Apple services.
Cons:
- Subscription Required: Requires an Apple Music subscription.
- DRM Protection: Music is DRM-protected and can only be played within the Apple Music app.
6.4. MediaMonkey
Overview: MediaMonkey is a music management tool that can transfer music from your computer to your iPhone. It works as a music player and can manage music, videos, podcasts, and other audio files.
Pros:
- Comprehensive Management: Manages music, videos, and podcasts.
- Auto-Sync: Automatically syncs music between your computer and iPhone.
- Customization: Offers various customization options for managing your music library.
Cons:
- Windows Only: Compatible with Windows operating systems only.
- Complex Interface: The interface can be complex for new users.
6.5. CopyTrans Manager
Overview: CopyTrans Manager is an iTunes alternative that allows you to transfer music from your computer to your iPhone. It supports various file types, including music, photos, and videos.
Pros:
- Simple Interface: Easy-to-use interface for transferring files.
- No iTunes Required: Does not require iTunes to transfer music.
- File Support: Supports various file types, including music, photos, and videos.
Cons:
- Windows Only: Compatible with Windows operating systems only.
- Limited Features: Offers fewer features compared to other music management tools.
By exploring these alternative cloud services and apps, you can find the perfect solution to add music to your iPhone without the constraints of iTunes.
7. How to Choose the Right Method for Adding Music to Your iPhone?
Choosing the right method to add music to your iPhone without iTunes depends on your specific needs and preferences. Consider factors such as the size of your music library, your budget, and how you prefer to access your music. What factors to consider when choosing how to add songs to iphone without itunes?
7.1. Consider Your Music Library Size
- Small Library: If you have a small music library, cloud services like Google Drive or Dropbox might be sufficient.
- Large Library: For larger libraries, consider YouTube Music or Apple Music, which offer extensive storage and streaming options.
7.2. Evaluate Your Budget
- Free Options: Google Drive, Dropbox (limited storage), and YouTube Music (free uploads) offer free options.
- Subscription Services: Apple Music and Amazon Music require a subscription fee.
- One-Time Purchase: Software like EaseUS MobiMover requires a one-time purchase for advanced features.
7.3. Assess Your Internet Connectivity
- Reliable Connection: Cloud services like Google Drive and YouTube Music require a stable internet connection for streaming.
- Offline Playback: If you prefer offline listening, choose services that allow you to download music to your device.
7.4. Determine Your Ease of Use Preference
- Simple Interface: EaseUS MobiMover and CopyTrans Manager offer simple, user-friendly interfaces.
- Familiar Ecosystem: If you’re already invested in the Apple ecosystem, Apple Music might be the most seamless option.
7.5. Assess Additional Features
- File Management: MediaMonkey offers comprehensive file management features.
- Backup and Conversion: EaseUS MobiMover provides additional features like file conversion and iPhone backup.
By carefully considering these factors, you can choose the method that best suits your needs and ensures a seamless music listening experience on your iPhone without iTunes.
8. How to Manage and Organize Your Music on iPhone After Adding?
After successfully adding music to your iPhone without iTunes, effective management and organization are crucial to ensure a seamless listening experience. Whether you’ve used cloud services, third-party software, or streaming platforms, these tips will help you keep your music library in order. What are some ways to organize your music after transferring using methods on how to add songs to iphone without itunes?
8.1. Create Playlists
- Genre-Based: Group songs by genre to easily find music based on your mood.
- Mood-Based: Create playlists for specific moods like “Relaxing,” “Workout,” or “Party.”
- Artist-Specific: Compile playlists featuring your favorite artists for easy access.
8.2. Use Folders in Cloud Services
- Organize by Album: Create folders for each album to keep your music neatly organized.
- Categorize by Genre: Use folders to separate different genres of music.
- Label Clearly: Use clear and descriptive labels for your folders to easily find what you’re looking for.
8.3. Utilize Metadata Tagging
- Correct Song Titles: Ensure all your songs have accurate titles.
- Add Album Art: Include album art to make your library visually appealing and easy to navigate.
- Edit Artist Information: Correct any inaccuracies in artist names to maintain consistency.
8.4. Leverage Streaming Service Features
- Like Songs: Use the “like” feature to mark your favorite songs for quick access.
- Create Stations: Create radio stations based on your favorite songs or artists to discover new music.
- Follow Artists: Stay updated on new releases by following your favorite artists on the streaming platform.
8.5. Regularly Update Your Library
- Remove Duplicates: Periodically check your library for duplicate songs and remove them.
- Delete Unwanted Songs: Get rid of songs you no longer enjoy to keep your library clutter-free.
- Add New Music: Regularly add new music to keep your library fresh and exciting.
By implementing these management and organization tips, you can maintain a well-organized and enjoyable music library on your iPhone, enhancing your overall listening experience.
9. What are the Legal Considerations When Adding Music to Your iPhone?
When adding music to your iPhone, it’s important to consider the legal aspects to ensure you’re not violating any copyright laws. Understanding these considerations can help you enjoy your music responsibly and ethically. What are the laws that users should be aware of on how to add songs to iphone without itunes?
9.1. Copyright Law
- Definition: Copyright law protects the rights of music creators, including composers, lyricists, and recording artists.
- Protection: It grants exclusive rights to reproduce, distribute, and publicly perform their work.
9.2. Fair Use
- Definition: Fair use allows limited use of copyrighted material without permission for purposes such as criticism, commentary, news reporting, teaching, scholarship, and research.
- Limitations: Fair use is subject to interpretation and depends on factors such as the purpose and character of the use, the nature of the copyrighted work, the amount used, and the effect on the market value of the original work.
9.3. Personal Use vs. Commercial Use
- Personal Use: Downloading and listening to music for your personal enjoyment is generally acceptable if you’ve legally acquired the music (e.g., purchased from iTunes or subscribed to a streaming service).
- Commercial Use: Using copyrighted music for commercial purposes, such as in advertisements or public performances, requires obtaining proper licenses from the copyright holders.
9.4. Obtaining Licenses
- Licensing Agencies: Organizations like ASCAP, BMI, and SESAC license the public performance rights of musical works.
- Direct Licensing: In some cases, you may need to obtain licenses directly from the copyright holders, particularly for synchronization rights (using music in videos) or mechanical rights (reproducing the music). According to the National Music Publishers’ Association (NMPA), in July 2023, direct licensing is becoming increasingly common, especially for independent artists.
9.5. Streaming Services
- Legal Agreements: Streaming services like Apple Music, Spotify, and YouTube Music have agreements with copyright holders to legally stream music to subscribers.
- Terms of Service: Adhering to the terms of service of these platforms ensures you’re using the music legally.
By understanding and respecting these legal considerations, you can enjoy your music on your iPhone responsibly and avoid potential copyright infringement issues. If you’re looking for royalty-free music options, consider exploring resources like payoffsong.com for legally licensed tracks.
10. What are the Common Issues and Troubleshooting Tips?
Even with the best methods, you might encounter issues when adding music to your iPhone without iTunes. Here are some common problems and troubleshooting tips to help you resolve them effectively. What are some solutions when running into common errors on how to add songs to iphone without itunes?
10.1. Music Not Transferring
- Problem: Music files fail to transfer from your computer to your iPhone.
- Troubleshooting Tips:
- Check USB Connection: Ensure your USB cable is securely connected to both your computer and iPhone.
- Trust This Computer: Make sure you’ve tapped “Trust” on your iPhone when prompted to allow your computer to access your device.
- Restart Devices: Restart both your computer and iPhone.
- Update Software: Ensure you’re using the latest versions of the transfer software and iOS.
- Check Storage: Verify that your iPhone has enough storage space for the music files.
10.2. Music Not Syncing on Cloud Services
- Problem: Music files uploaded to cloud services like Google Drive or YouTube Music are not syncing to your iPhone.
- Troubleshooting Tips:
- Check Internet Connection: Ensure both your computer and iPhone have a stable internet connection.
- Sign In Correctly: Verify that you’re signed in with the same account on both devices.
- Sync Settings: Check the sync settings in the cloud service app to ensure music syncing is enabled.
- Clear Cache: Clear the cache in the cloud service app on your iPhone.
- Update App: Ensure you’re using the latest version of the cloud service app.
10.3. Music Files Not Playing
- Problem: Transferred music files are not playing on your iPhone.
- Troubleshooting Tips:
- Check File Format: Ensure the music files are in a compatible format (e.g., MP3, AAC).
- Corrupted Files: Try transferring the music files again, as they may have been corrupted during the initial transfer.
- Restart Music App: Close and reopen the Music app on your iPhone.
- Update iOS: Ensure your iPhone is running the latest version of iOS.
- Check Storage: Verify that your iPhone has enough storage space for the music files.
10.4. Software Compatibility Issues
- Problem: Third-party software like EaseUS MobiMover is not working correctly with your iPhone or computer.
- Troubleshooting Tips:
- Update Software: Ensure you’re using the latest version of the software.
- Check System Requirements: Verify that your computer meets the system requirements for the software.
- Reinstall Software: Try uninstalling and reinstalling the software.
- Contact Support: Reach out to the software provider’s support team for assistance.
10.5. Streaming Service Issues
- Problem: Music files are not streaming correctly from services like Apple Music or Spotify.
- Troubleshooting Tips:
- Check Subscription: Ensure your subscription is active and up-to-date.
- Check Internet Connection: Verify that your iPhone has a stable internet connection.
- Restart App: Close and reopen the streaming service app.
- Clear Cache: Clear the cache in the streaming service app on your iPhone.
- Update App: Ensure you’re using the latest version of the streaming service app.
By following these troubleshooting tips, you can resolve common issues and enjoy a seamless music listening experience on your iPhone without iTunes.
FAQ: How to Add Songs to iPhone Without iTunes
Can I add music to my iPhone without iTunes?
Yes, you can add music to your iPhone without iTunes using methods like third-party software (e.g., EaseUS MobiMover), cloud services (e.g., Google Drive), and streaming services (e.g., YouTube Music).
Is it safe to use third-party software to transfer music to my iPhone?
Yes, as long as you download the software from a reputable source and ensure it is up-to-date.
How much free storage do I get with Google Drive?
Google Drive offers 15 GB of free storage, which is shared across Google services like Gmail and Google Photos.
Can I listen to music offline with YouTube Music?
Yes, YouTube Music allows you to download songs for offline playback.
Do I need a subscription to use Apple Music?
Yes, Apple Music requires a subscription to access its full range of features.
What file formats are compatible with Dropbox for music?
Dropbox supports music in .mp3, .aiff, .m4a, and .wav formats.
How do I ensure my music transfers legally to my iPhone?
Ensure you’re using legally acquired music, such as purchased songs or music from streaming services with proper licensing agreements.
What should I do if my music files are not playing on my iPhone?
Check the file format, ensure the files are not corrupted, and restart the Music app on your iPhone.
Can I manage and organize my music on my iPhone after adding it without iTunes?
Yes, you can create playlists, use folders in cloud services, and utilize metadata tagging to manage and organize your music.
How do I troubleshoot issues when adding music to my iPhone without iTunes?
Check your USB connection, internet connection, software versions, and ensure you have enough storage space on your iPhone.
Ready to revolutionize your music experience? Visit payoffsong.com today and discover a world of opportunities to license your music or find the perfect track for your project. Our platform offers comprehensive information, valuable tips, and connections to industry experts, ensuring your musical journey is both successful and rewarding. Take the next step and unlock your music’s potential with payoffsong.com.
Address: 1601 Vine St, Los Angeles, CA 90028, United States
Phone: +1 (323) 469-2211
Website: payoffsong.com