Personalizing your iPhone goes beyond just wallpapers and cases. Setting a custom ringtone, especially using a favorite song, is a fantastic way to make your device truly yours. While iPhones come with a set of default ringtones, using a song adds a unique touch and personality to your incoming calls. If you’re wondering how to ditch the standard tones and change your ringtone to a song, you’re in the right place. This guide will walk you through the simple steps using GarageBand, a free app available on your iPhone, to turn your favorite tunes into custom ringtones.
What You Need to Get Started
Before diving into the process, ensure you have the following:
-
GarageBand App: This powerful, yet user-friendly, music creation app from Apple is essential for this process. If you don’t already have it, you can easily download it for free from the App Store.
-
The Song You Want to Use: You can choose a song from your Apple Music library or an audio file saved on your iPhone or iCloud. For Apple Music songs, ensure they are downloaded to your device, as streamed songs cannot be used directly as ringtones due to copyright restrictions.
Step-by-Step Guide: Setting a Song as Your Ringtone
Let’s break down the process of How To Change Your Ringtone To A Song on your iPhone using GarageBand. Follow these steps carefully to create your personalized ringtone:
1. Install GarageBand (If You Haven’t Already)
If GarageBand isn’t already on your iPhone, head to the App Store. Search for “GarageBand” and download the app. It’s free and essential for creating custom ringtones.
2. Create a New Audio Recording Project
From your iPhone’s Home Screen, locate the GarageBand app icon. Instead of just tapping to open, touch and hold the GarageBand app icon. A quick action menu will appear. Tap on “Create New Audio Recording”. This will directly open a new audio project in GarageBand, streamlining the process for ringtone creation.
3. Navigate to Tracks View
Once GarageBand opens to a new recording project (usually defaulting to the “Voice” instrument), look towards the top left of your screen. You’ll see a button that looks like tracks stacked on top of each other. This is the “Tracks” button. Tap it to switch to the Tracks View. This view allows you to edit and arrange audio files.
4. Open the Loops Browser to Access Your Music
In the Tracks View, look to the top right corner of the screen. You’ll find a button that resembles a loop. This is the “Loops Browser” button. Tap this button to open it. The Loops Browser is where you’ll access pre-recorded loops, but more importantly for our purpose, it’s also where you can import audio files and music.
5. Select Your Desired Song
Within the Loops Browser, you have options to choose your song:
-
From Files: If your song is an audio file stored on your iPhone or in iCloud Drive, tap “Files”. Then, tap “Browse items from the Files app” to navigate and select your audio file.
-
From Apple Music: If you want to use a song from your Apple Music library, tap “Music”. Here you can browse your Apple Music library. Important: Ensure the song is downloaded to your iPhone (indicated by a download icon next to the song). Dimmed songs are either protected or not downloaded and cannot be used as ringtones.
6. Add the Song to the Tracks View
Once you’ve located your song (either in “Files” or “Music”), touch and hold the song title. Without lifting your finger, drag the song to the left into the Tracks View. You’ll see the audio waveform of your song appear in the track area.
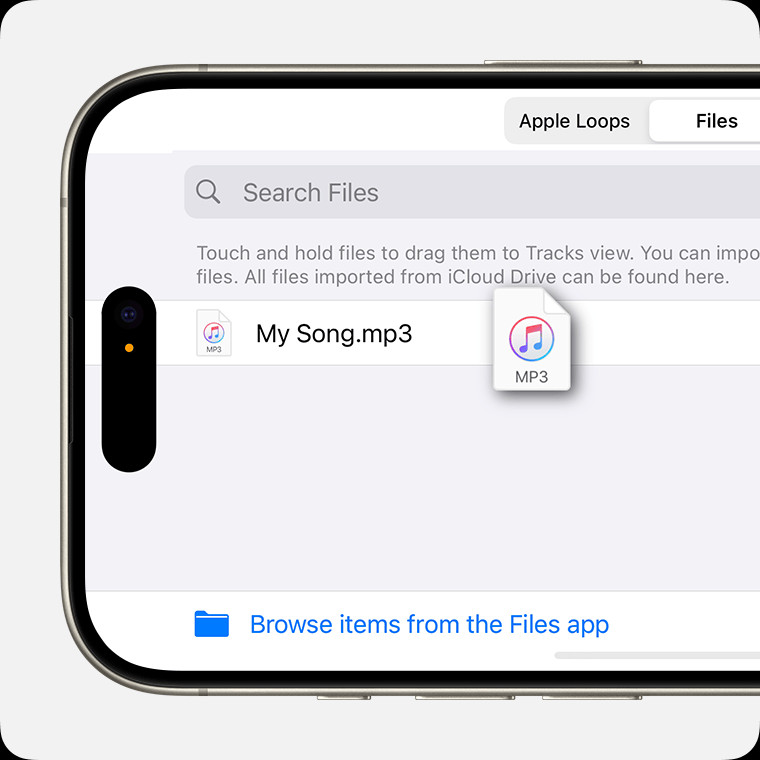 Selecting and dragging an audio file from the browser to the Tracks view in GarageBand
7. Trim and Edit Your Ringtone (Optional but Recommended)
Ringtones can be up to 30 seconds long. You likely won’t want the entire song as your ringtone. Here’s how to select a specific section:
- Select the Audio Region: Tap the audio file (the waveform) in the Tracks View. Yellow handles will appear at the left and right edges of the region.
- Trim the Region: Drag the left or right yellow handle inwards to shorten the song to your desired 30-second (or shorter) clip.
- Zoom for Precision: For finer adjustments, touch and hold either yellow handle to zoom in on the waveform, allowing for more precise trimming.
- Position at the Start: After trimming, drag the audio region all the way to the left so there’s no empty space at the beginning of your ringtone. This ensures your ringtone starts playing immediately when your phone rings.
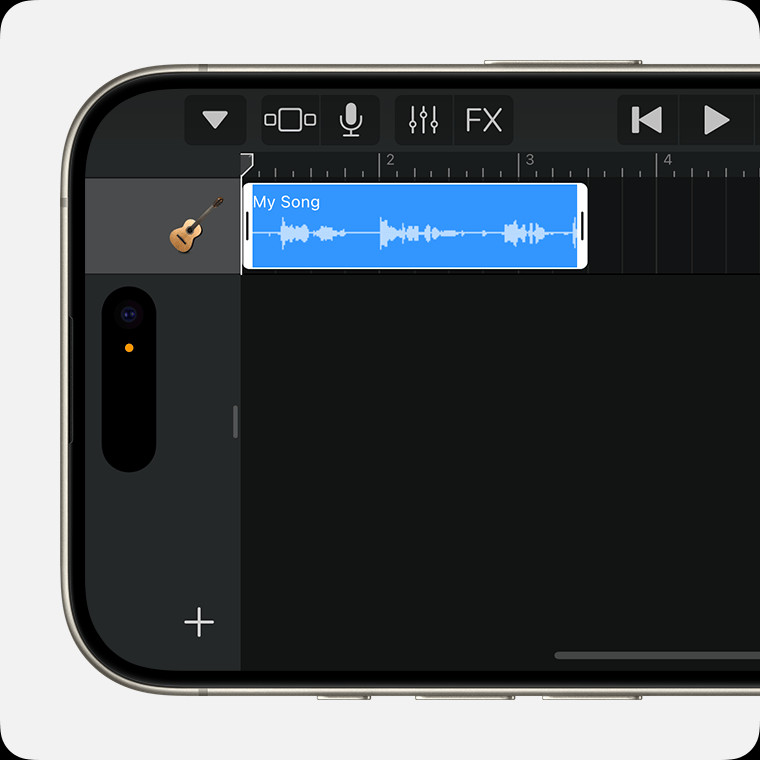 A trimmed audio file located all the way to the left in Tracks view in GarageBand
8. Save Your Project to “My Songs”
Tap the “Navigation” button, which looks like an inverted triangle or a play button, typically located on the top left. Then, tap “My Songs”. This saves your GarageBand project. Don’t worry, this is just saving the project file, not exporting the ringtone yet.
9. Share and Export as Ringtone
In the “My Songs” browser, you’ll see your newly created project (it might be named “My Song” by default). Touch and hold the project icon. A menu will pop up. Tap “Share” from this menu.
On the Share sheet, you’ll see different options. Choose “Ringtone”.
10. Name Your Ringtone and Export
GarageBand will prompt you to name your ringtone. Enter a descriptive name so you can easily identify it later. Once named, tap “Export” in the top right corner.
If your ringtone is longer than 30 seconds after exporting, GarageBand will notify you and offer to shorten it automatically. Tap “Continue” to let GarageBand shorten it, or “Cancel” to go back and manually trim it further in the Tracks View.
11. Set Your New Ringtone
After exporting, a pop-up will appear saying “Ringtone Export Successful”. Tap “Use sound as…” to directly set your new ringtone. You’ll be presented with options:
- Standard Ringtone: Sets your new creation as your default ringtone for all calls.
- Standard Text Tone: Sets it as your default text message tone.
- Assign to contact: This is a great feature! You can assign this specific ringtone to a particular contact, so you know who’s calling without even looking at your phone. Choose this option and then select a contact from your list.
- Done: If you just want to save the ringtone for later use, tap “Done”.
Congratulations! You’ve successfully learned how to change your ringtone to a song on your iPhone. Now you can enjoy a personalized ringtone every time you receive a call.
Beyond Basic Ringtones: Explore GarageBand
While this guide focuses on creating ringtones, GarageBand is a powerful tool for music creation. Feel free to explore further and experiment with creating your own songs using the built-in instruments and loops. You can even record your own voice or instruments to make truly unique ringtones and sounds for your iPhone. Customizing your ringtone is just the beginning of what you can do with GarageBand!