
Want to know How Do You Transfer Songs From One Iphone To Another effortlessly and legally, ensuring your music library stays with you? At payoffsong.com, we provide expert guidance on navigating the music landscape, and transferring music between iPhones is a common need for music lovers and professionals alike. Whether it’s your own compositions or favorite tracks, we’ll show you how to move your music collection while exploring opportunities for music licensing, royalties, and song promotion. Discover the best methods, from Apple’s built-in features to third-party apps, and learn how to keep your tunes flowing smoothly. Let’s explore audio file sharing, song migration and music portability.
1. Understanding Your Music Transfer Needs
Before diving into the methods, it’s essential to understand the different scenarios and their requirements.
1.1. Identifying the Types of Music Files
Not all music files are created equal. Knowing the types of files you’re dealing with will help you choose the right transfer method.
- Purchased Music from iTunes Store: These files are usually DRM-protected, meaning they can only be played on authorized devices.
- Apple Music Downloads: Music downloaded through an Apple Music subscription is also DRM-protected and tied to your subscription.
- DRM-Free Music Files (e.g., MP3, WAV): These are typically songs you’ve ripped from CDs, purchased from other online stores, or created yourself.
- Music from Other Sources: This could include music from streaming services like Spotify or Amazon Music, which usually require their respective apps to play.
1.2. Assessing Your Transfer Requirements
Consider these factors when choosing a transfer method:
- Quantity of Songs: Are you transferring a few songs or an entire music library?
- Internet Availability: Do you have a stable internet connection? Some methods rely on cloud services.
- Computer Access: Do you have access to a computer? Some methods require one.
- Apple Music Subscription: Do you subscribe to Apple Music? This unlocks certain transfer options.
- Technical Skill Level: Are you comfortable with technical processes, or do you prefer simpler solutions?
- Security & Privacy: Ensure the method you choose is secure and respects your privacy.
Understanding these aspects ensures a smooth and efficient music transfer process.
2. Apple’s Built-In Methods for Music Transfer
Apple provides several built-in methods to transfer music between iPhones, each with its own advantages and limitations.
2.1. Using iTunes (or Finder) for Purchased Music
iTunes (or Finder in macOS Catalina and later) can transfer music purchased from the iTunes Store.
How it works:
- Connect: Connect your old iPhone to your computer via USB.
- Open iTunes/Finder: Launch iTunes (or Finder on newer Macs).
- Transfer Purchases: In iTunes, go to File > Devices > Transfer Purchases from [Your iPhone]. In Finder, select your iPhone in the sidebar, then click “Manage Music, Movies, and TV Shows” and sync your purchased content.
- Connect New iPhone: Disconnect the old iPhone and connect the new one.
- Sync Music: In iTunes/Finder, select the music you want to sync to the new iPhone.
Pros:
- Great for transferring purchased music.
- Works without internet access.
Cons:
- Does not transfer non-purchased songs.
- Requires a computer.
- Can be cumbersome for large libraries.
2.2. Leveraging iCloud Music Library (Apple Music)
If you subscribe to Apple Music, iCloud Music Library syncs your music across all your devices.
How it works:
- Enable Sync Library: On both iPhones, go to Settings > Music and toggle on “Sync Library.”
- Sign In: Ensure both iPhones are signed into the same Apple ID.
- Wait for Sync: Your music library will automatically sync across devices.
Pros:
- No cables required.
- Automatically syncs music across devices.
- Access your music on multiple devices.
Cons:
- Requires an Apple Music subscription.
- Won’t work for non-Apple Music tracks.
- Relies on a stable internet connection.
2.3. Utilizing AirDrop for DRM-Free Songs
AirDrop allows you to wirelessly transfer DRM-free music files directly between iPhones.
How it works:
- Enable AirDrop: On both iPhones, swipe down from the top-right corner to open Control Center. Tap and hold the Wi-Fi or Bluetooth icon, then tap “AirDrop” and choose “Everyone” or “Contacts Only.”
- Share Music: On the old iPhone, open the Music app, select the song, tap the share icon, and choose AirDrop.
- Accept Transfer: On the new iPhone, tap “Accept” to receive the song.
Pros:
- Wireless and easy to use.
- No need for extra apps or software.
- Quick and efficient for individual songs.
Cons:
- Works only for DRM-free songs.
- Cannot transfer entire playlists.
- Requires both devices to be nearby.
2.4. Setting Up Home Sharing for Streaming
Home Sharing allows you to stream music from one iPhone to another if both are on the same Wi-Fi network.
How it works:
- Enable Home Sharing: On the old iPhone, go to Settings > Music > Home Sharing and turn it on.
- Enter Apple ID: Enter your Apple ID credentials.
- Access Shared Music: On the new iPhone, open the Music app, tap Library > Home Sharing to access shared music.
Pros:
- No need to copy files.
- No cables required.
Cons:
- Only streams music (does not permanently transfer).
- Requires the same Apple ID on both devices.
- Performance depends on Wi-Fi network speed.
These built-in methods offer a range of options for transferring music, depending on your specific needs and preferences.
3. Third-Party Apps for Seamless Music Transfer
For more comprehensive and flexible music transfer options, consider using third-party apps.
3.1. MobileTrans – Phone Transfer: A Comprehensive Solution
MobileTrans – Phone Transfer is a powerful tool that simplifies transferring music and other data between iPhones.
How it works:
- Download and Install: Download and install MobileTrans on your computer.
- Connect iPhones: Connect both iPhones to your computer via USB.
- Select “Phone Transfer”: Launch MobileTrans and select the “Phone Transfer” option.
- Choose Data to Transfer: Select “Music” from the list of data types.
- Start Transfer: Click “Start” to begin transferring music from one iPhone to another.
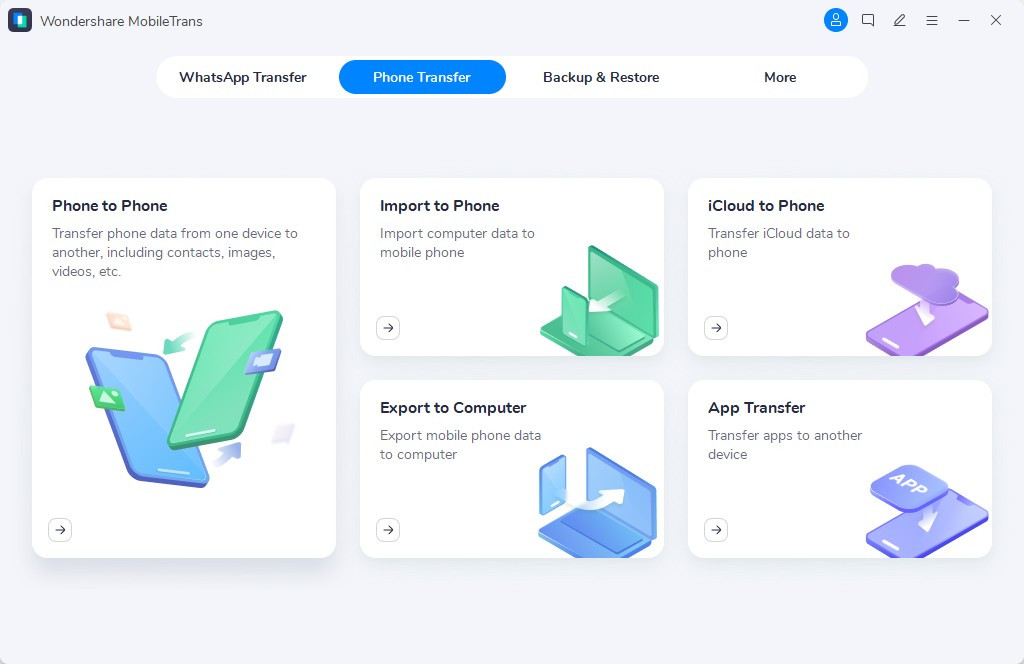 MobileTrans home screen showcasing the Phone Transfer feature
Pros:
- Transfers all types of music files.
- Supports transferring other data like contacts, photos, and videos.
- User-friendly interface.
- Fast transfer speeds.
Cons:
- Requires a computer.
- May require a paid license for full functionality.
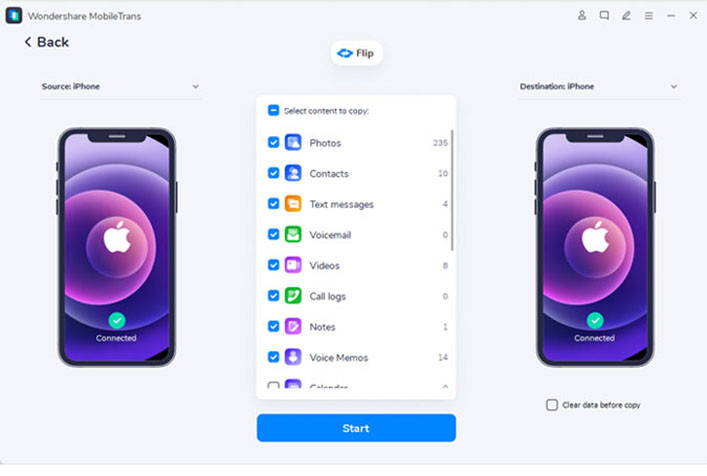 MobileTrans interface showing iPhone to iPhone transfer
3.2. Dropbox: Cloud-Based Music Transfer
Dropbox is a cloud storage service that allows you to upload music from one iPhone and download it to another.
How it works:
- Download and Install: Download and install the Dropbox app on both iPhones.
- Upload Music: On the old iPhone, upload your music files to Dropbox.
- Download Music: On the new iPhone, sign in to Dropbox and download the music files.
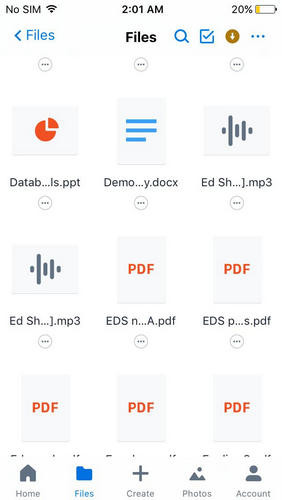 Screenshot of music files in a Dropbox account
Pros:
- Accessible anywhere with an internet connection.
- Easy to use.
Cons:
- Requires internet connection.
- Limited free storage space.
- Can be slow for large music libraries.
3.3. Other Cloud Storage Services: Google Drive, OneDrive
Similar to Dropbox, Google Drive and OneDrive can also be used to transfer music between iPhones.
How it works:
- Upload Music: Upload your music files to Google Drive or OneDrive from the old iPhone.
- Download Music: On the new iPhone, sign in to the same account and download the music files.
Pros:
- Accessible anywhere with an internet connection.
- May offer more free storage than Dropbox.
Cons:
- Requires internet connection.
- Can be slow for large music libraries.
3.4. WiFi Transfer Apps: Documents by Readdle, Feem
WiFi transfer apps allow you to transfer music files between iPhones over a local WiFi network.
How it works:
- Install App: Install a WiFi transfer app like Documents by Readdle or Feem on both iPhones.
- Connect to WiFi: Ensure both iPhones are connected to the same WiFi network.
- Transfer Files: Follow the app’s instructions to transfer music files from one iPhone to another.
Pros:
- Fast transfer speeds over local WiFi.
- No need for a computer.
Cons:
- Requires both devices to be on the same WiFi network.
- May have limitations on file size or type.
These third-party apps provide versatile solutions for transferring music, offering features that Apple’s built-in methods may lack.
4. Managing Apple Music and Subscription-Based Music
Transferring music from subscription services like Apple Music requires a different approach.
4.1. Understanding DRM and Subscription Restrictions
Digital Rights Management (DRM) protects copyrighted music, restricting how it can be used and transferred. Music downloaded through subscriptions like Apple Music is DRM-protected and tied to your subscription.
4.2. Syncing Apple Music Library Across Devices
The easiest way to access your Apple Music library on a new iPhone is to enable “Sync Library” in Settings > Music. This requires an active Apple Music subscription and the same Apple ID on both devices.
4.3. Downloading Music for Offline Playback
To ensure you can listen to your Apple Music tracks without an internet connection, download them for offline playback. In the Music app, tap the “+” button next to a song, album, or playlist to download it.
4.4. Exporting Playlists (Limited)
While you can’t directly transfer DRM-protected Apple Music files, you can export your playlists as a text file. This allows you to recreate the playlist on another device or platform, but you’ll need to add the songs manually.
4.5. Alternatives for Other Streaming Services
If you use other streaming services like Spotify or Amazon Music, follow their respective instructions for syncing your music library across devices. These services typically offer similar features to Apple Music’s “Sync Library.”
5. Best Practices for Music File Management
Proper music file management ensures your library is organized and easy to transfer.
5.1. Organizing Your Music Library
- Use Consistent Naming Conventions: Name your music files consistently (e.g., Artist – Song Title.mp3).
- Create Playlists: Organize your music into playlists based on genre, mood, or activity.
- Use Metadata Tags: Ensure your music files have accurate metadata tags (e.g., artist, album, track number).
- Remove Duplicates: Regularly scan your library for duplicate files and remove them.
5.2. Backing Up Your Music Library
- Cloud Backup: Use cloud storage services like iCloud, Google Drive, or Dropbox to back up your music library.
- External Hard Drive: Copy your music files to an external hard drive for a local backup.
- NAS Device: Use a Network Attached Storage (NAS) device for a more advanced backup solution.
5.3. Converting Music File Formats
- Choose the Right Format: MP3 is a widely compatible format, but consider lossless formats like FLAC or WAV for higher quality audio.
- Use a Reliable Converter: Use a reliable audio converter to convert music files between formats.
- Consider Bitrate: When converting to MP3, choose a bitrate of 192kbps or higher for good audio quality.
5.4. Understanding Copyright and Legal Issues
- Respect Copyright: Only transfer music that you own or have permission to use.
- Avoid Illegal Downloads: Do not download music from unauthorized sources.
- Understand DRM Restrictions: Be aware of the restrictions imposed by DRM-protected music.
- Seek Licensing for Commercial Use: If you plan to use music for commercial purposes, obtain the necessary licenses.
6. Troubleshooting Common Music Transfer Issues
Even with the best methods, you may encounter issues during music transfer.
6.1. Identifying Common Problems
- Files Not Transferring: Check for DRM restrictions, file corruption, or compatibility issues.
- Slow Transfer Speeds: Check your internet connection or USB cable.
- Music Not Appearing on New iPhone: Ensure you’re signed into the correct Apple ID or have enabled “Sync Library.”
- Error Messages: Read error messages carefully and search online for solutions.
6.2. Solutions and Workarounds
- Restart Devices: Restart both iPhones and your computer.
- Update Software: Ensure you have the latest versions of iOS, iTunes, and any third-party apps.
- Check Storage Space: Ensure you have enough storage space on both iPhones.
- Reauthorize Computer: In iTunes, go to Account > Authorizations > Authorize This Computer.
- Contact Apple Support: If you’re still having trouble, contact Apple Support for assistance.
6.3. When to Seek Professional Help
If you’re unable to resolve the issue yourself, consider seeking professional help from a tech support service or an Apple Store.
7. Real-World Scenarios and Examples
Let’s look at some real-world scenarios and how to approach them.
7.1. Transferring a Large Music Library
- Scenario: You have a large music library (over 100GB) and want to transfer it to a new iPhone.
- Solution: Use MobileTrans – Phone Transfer or a similar tool, as it can handle large libraries more efficiently than Apple’s built-in methods.
7.2. Moving Music from an Old iPhone to a New One After Upgrading
- Scenario: You’ve upgraded to a new iPhone and want to transfer all your music from your old iPhone.
- Solution: Use iCloud Music Library if you have an Apple Music subscription. Otherwise, use MobileTrans or iTunes.
7.3. Sharing Music with a Friend or Family Member
- Scenario: You want to share a few songs with a friend or family member who also has an iPhone.
- Solution: Use AirDrop for DRM-free songs or a cloud storage service like Dropbox for other files.
7.4. Using Music for Commercial Projects
- Scenario: You’re a filmmaker and want to use a song in your upcoming film.
- Solution: Ensure you have the necessary licenses to use the music commercially. Contact the copyright holder or a music licensing agency to obtain the rights. Consider exploring royalty-free music options if your budget is limited. Payoffsong.com can help you navigate music licensing and find the perfect tracks for your project.
8. The Future of Music Transfer and Technology
The future of music transfer is likely to be more seamless and integrated with cloud services.
8.1. Emerging Technologies and Trends
- 5G and Faster Wireless Transfers: Faster wireless speeds will make AirDrop and cloud-based transfers even quicker.
- AI-Powered Music Management: AI could help organize and manage your music library more efficiently.
- Blockchain and Music Rights: Blockchain technology could revolutionize music rights management, making it easier to track and license music.
8.2. Predictions for the Future of Music Consumption
- Streaming Dominance: Streaming will continue to be the dominant form of music consumption.
- Personalized Music Experiences: AI will enable more personalized music experiences, with music recommendations tailored to your tastes.
- Interactive Music: Emerging technologies will allow for more interactive music experiences, where listeners can participate in the creation and performance of music.
8.3. How to Stay Updated with the Latest Developments
- Follow Music Industry News: Stay updated with the latest news and trends in the music industry.
- Read Tech Blogs: Follow tech blogs and websites to learn about new technologies and apps for music transfer.
- Join Online Communities: Join online communities and forums to discuss music transfer and management with other enthusiasts.
- Visit Payoffsong.com: For comprehensive information and resources on music licensing, royalties, and promotion, visit payoffsong.com.
9. Maximizing Your Music’s Potential with Payoffsong.com
Now that you know how to transfer your music, let’s explore how to make the most of it.
9.1. Discovering Opportunities for Music Licensing
- Licensing Your Music: If you’re a musician or songwriter, consider licensing your music for use in films, TV shows, commercials, and video games.
- Joining a Performing Rights Organization (PRO): Join a PRO like ASCAP, BMI, or SESAC to collect royalties for public performances of your music.
- Working with a Music Licensing Agency: A music licensing agency can help you find opportunities to license your music and negotiate licensing fees.
- Using Online Music Licensing Platforms: Online platforms like Songtradr and Musicbed connect musicians with potential licensees.
9.2. Understanding Music Royalties and How to Collect Them
- Types of Royalties: Understand the different types of music royalties, including performance royalties, mechanical royalties, and synchronization royalties.
- Registering Your Music: Register your music with a PRO and the U.S. Copyright Office to protect your rights and collect royalties.
- Tracking Your Music’s Usage: Use tools like SoundExchange and Nielsen Music to track how your music is being used and ensure you’re getting paid properly.
- Working with a Royalty Collection Agency: A royalty collection agency can help you collect royalties from various sources.
9.3. Promoting Your Music and Reaching a Wider Audience
- Creating a Professional Website: Create a professional website to showcase your music and connect with fans.
- Using Social Media: Use social media platforms like Facebook, Instagram, and Twitter to promote your music and engage with your audience.
- Releasing Music on Streaming Services: Release your music on streaming services like Spotify, Apple Music, and Amazon Music to reach a wider audience.
- Performing Live: Perform live shows to connect with fans and promote your music.
- Collaborating with Other Artists: Collaborate with other artists to reach new audiences.
9.4. Connecting with Industry Professionals
- Networking at Industry Events: Attend music industry events to network with other professionals.
- Joining Online Communities: Join online communities and forums to connect with other musicians and industry professionals.
- Working with a Manager or Publicist: Consider working with a manager or publicist to help you promote your music and career.
- Contacting Payoffsong.com: Reach out to Payoffsong.com for expert guidance and resources to help you succeed in the music industry. Address: 1601 Vine St, Los Angeles, CA 90028, United States. Phone: +1 (323) 469-2211. Website: payoffsong.com.
10. Frequently Asked Questions (FAQ)
Here are some frequently asked questions about transferring music between iPhones:
10.1. Can I transfer music from my iPhone to another without a computer?
Yes, you can use AirDrop, iCloud Music Library, or cloud storage services like Dropbox.
10.2. How do I transfer non-purchased music from one iPhone to another?
Use AirDrop for DRM-free files, MobileTrans – Phone Transfer, or cloud storage services.
10.3. Is it possible to transfer Apple Music songs to another iPhone?
Yes, by enabling “Sync Library” in Settings > Music on both devices, provided you have an active Apple Music subscription and use the same Apple ID.
10.4. What is the fastest way to transfer music between iPhones?
AirDrop is the fastest for individual DRM-free songs. MobileTrans – Phone Transfer is faster for large libraries.
10.5. How much does MobileTrans – Phone Transfer cost?
MobileTrans – Phone Transfer offers a free trial, but full functionality requires a paid license. Check their website for pricing details.
10.6. Can I transfer music from an iPhone to an Android device?
Yes, MobileTrans – Phone Transfer supports transferring music between iPhones and Android devices.
10.7. What do I do if my music is not transferring?
Check for DRM restrictions, file corruption, or compatibility issues. Restart your devices and update your software.
10.8. How can I back up my music library?
Use cloud storage services like iCloud, Google Drive, or Dropbox, or copy your music files to an external hard drive.
10.9. Is it legal to transfer music between iPhones?
It is legal to transfer music that you own or have permission to use. Avoid transferring illegally downloaded music.
10.10. Where can I find royalty-free music for commercial use?
Explore online music licensing platforms like Songtradr and Musicbed, or contact a music licensing agency. Payoffsong.com can also help you find suitable tracks.
Conclusion
Transferring music from one iPhone to another can be a seamless process with the right methods and tools. Whether you choose Apple’s built-in features or third-party apps, understanding your needs and following best practices will ensure a smooth transition. Remember to manage your music library effectively, respect copyright laws, and explore opportunities to maximize your music’s potential with payoffsong.com. From licensing to royalties and promotion, payoffsong.com is your go-to resource for navigating the music industry.