Do you want to know How To Fade Out A Song In Garageband to give it a professional, polished sound? Fading out a song, whether it’s a complete composition or individual tracks, adds a professional touch, creating smooth transitions and resolving endings. At payoffsong.com, we’ll walk you through the steps, offering solutions and insights to make your music shine. We will explore methods to create a fade effect in GarageBand and other essential audio editing tips to enhance your tracks, so whether you’re working on a master track or individual audio tracks, we’ve got you covered with expert techniques and music licensing information.
1. What is a Fade Out in Music Production and Why Use It?
A fade-out in music production is a technique where the volume of a song gradually decreases, leading to silence.
Why Use a Fade-Out?
Fade-outs are used for several reasons:
- Resolving Endings: They provide a natural and smooth conclusion to a song that may lack a definitive ending.
- Smooth Transitions: Fade-outs and fade-ins can create seamless transitions between different sections of a song.
- Minimizing Imperfections: They can mask unwanted clicks, pops, or background noise that may occur at the end of a recording.
The Fade-Out Debate
While fade-outs were once a staple in pop music, their popularity has waned over the years. An article in Slate discusses the decline of the fade-out, noting that many modern pop songs opt for abrupt endings. Despite this trend, fade-outs remain a valuable tool for music producers.
2. How to Access the Master Track in GarageBand
The master track in GarageBand allows you to control the overall sound of your song, including adding fade-out effects to the entire mix.
What is the Master Track?
The master track affects the entire song’s output. It is where you can adjust the final volume, EQ, and other effects that apply to all tracks combined.
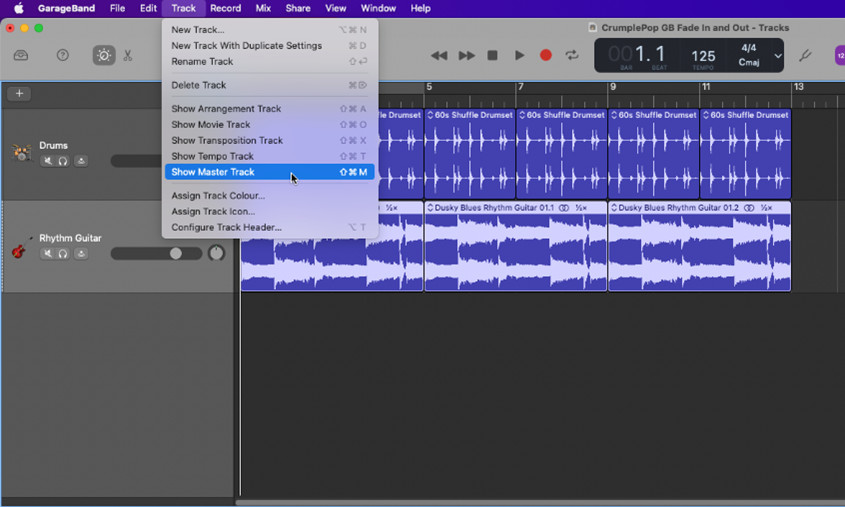
How to Reveal the Master Track
By default, the master track is hidden in GarageBand. Here’s how to reveal it:
- Open GarageBand: Launch the GarageBand application on your Mac.
- Select “Track”: Navigate to the “Track” menu in the menu bar at the top of your screen.
- Show Master Track: Click on “Show Master Track.”
Once revealed, the master track appears as a new track below the last track in your GarageBand project.
Understanding the Master Track Header
The master track header includes an automation icon, which toggles the automation curves (or lines) on or off. These curves allow you to visualize and control parameters like volume and pan. For creating fade-outs, we will focus on the volume parameter.
3. How to Automatically Fade Out Your Whole Song in GarageBand
GarageBand offers an automatic fade-out option that applies to the entire song via the master track.
Step-by-Step Guide to Automatic Fade-Out
-
Show the Master Track:
- Select “Track” > “Show Master Track.”
- Shortcut: Use the keyboard shortcut SHIFT + COMMAND + M to toggle the master track on or off.
 How to Fade Out in GarageBand
Master track displayed in GarageBand.
-
Add the Fade-Out Option:
- Select “Mix” > “Create Volume Fade-Out on Main Output.”
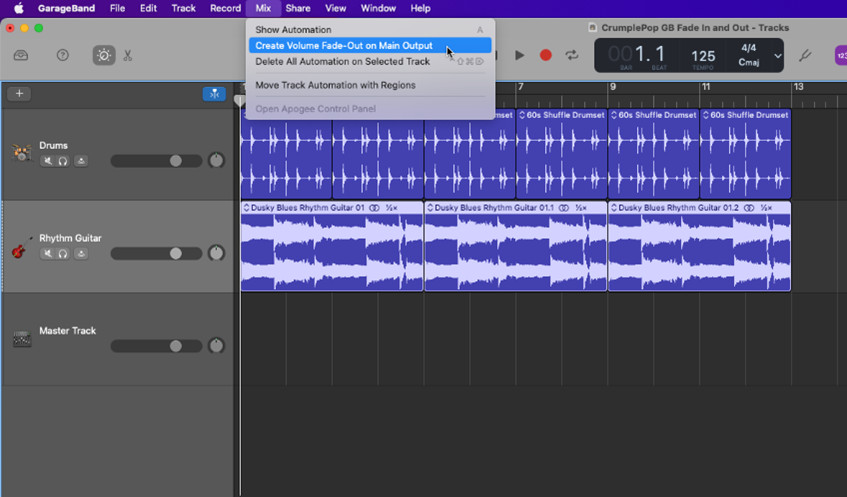 Selecting the Fade-Out option
Selecting the fade-out option in GarageBand.
After this step, automation controls will appear on all tracks.
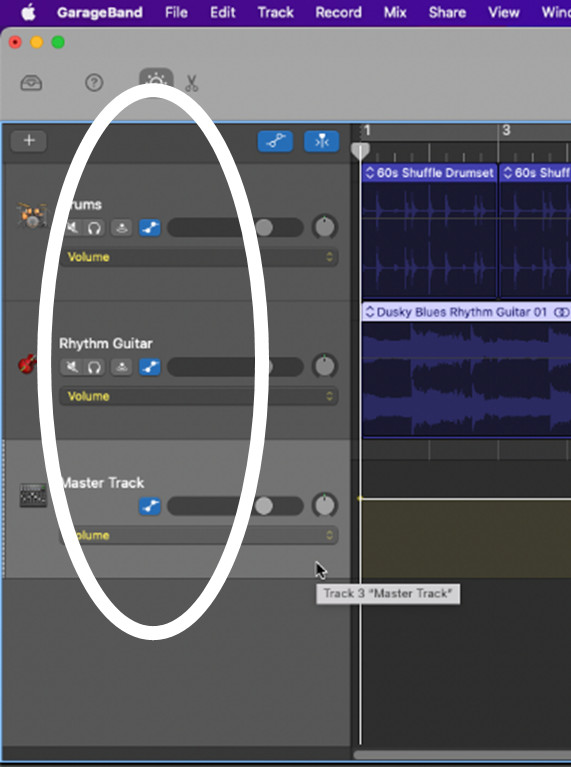 Automation controls on tracks
Automation controls shown on tracks.
-
Ensure Volume is Selected in the Automation Menu:
- In the automation menu (located in the master track header), select “Volume.”
 Selecting the Volume parameter in the automation menu
Selecting the volume parameter in GarageBand.
A yellow line, the automation line, appears across the track’s length, indicating the volume level at each point. If it’s faint, click on the track.
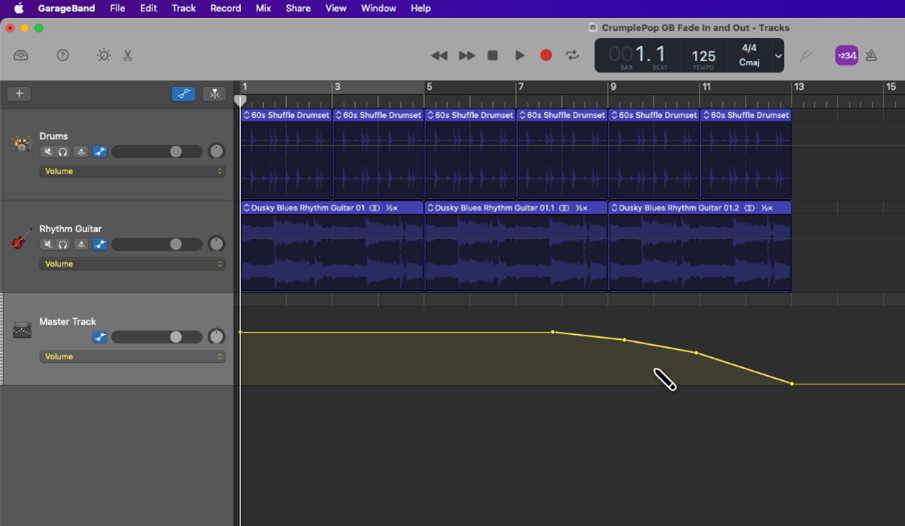 The Master Track
Master track volume controls in GarageBand.
Tips for Automation Controls
- Toggle Automation On/Off:
- Select “Mix” > “Show Automation.”
- Type “A.”
- Click the automation icon in the Tracks area menu bar.
4. How to Customize the Amount and Timing of Your Fade-Out Effects
Once the automatic fade-out is applied, you can adjust its intensity and timing.
Understanding Volume Points
The fade-out effect begins where the automation line starts to descend. By default, there are four volume points.
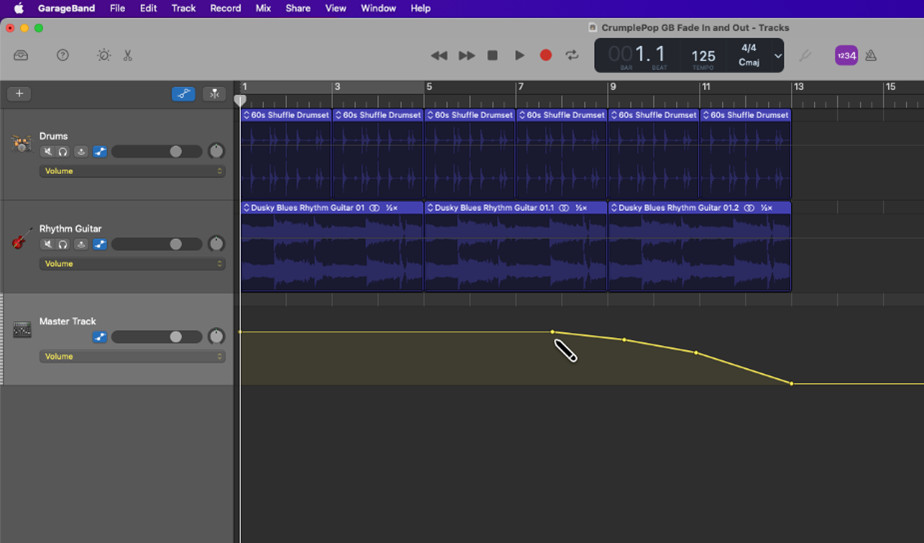 Volume point on the Master Track automation line
Volume points on the master track automation line.
Adjusting Volume Points
These volume points act as smart controls, allowing you to fine-tune the fade-out:
- Amount (Intensity): Drag a volume point vertically (up or down) to change the intensity of the fade-out.
- Timing: Drag a volume point horizontally (left or right) to adjust when the fade-out starts and ends.
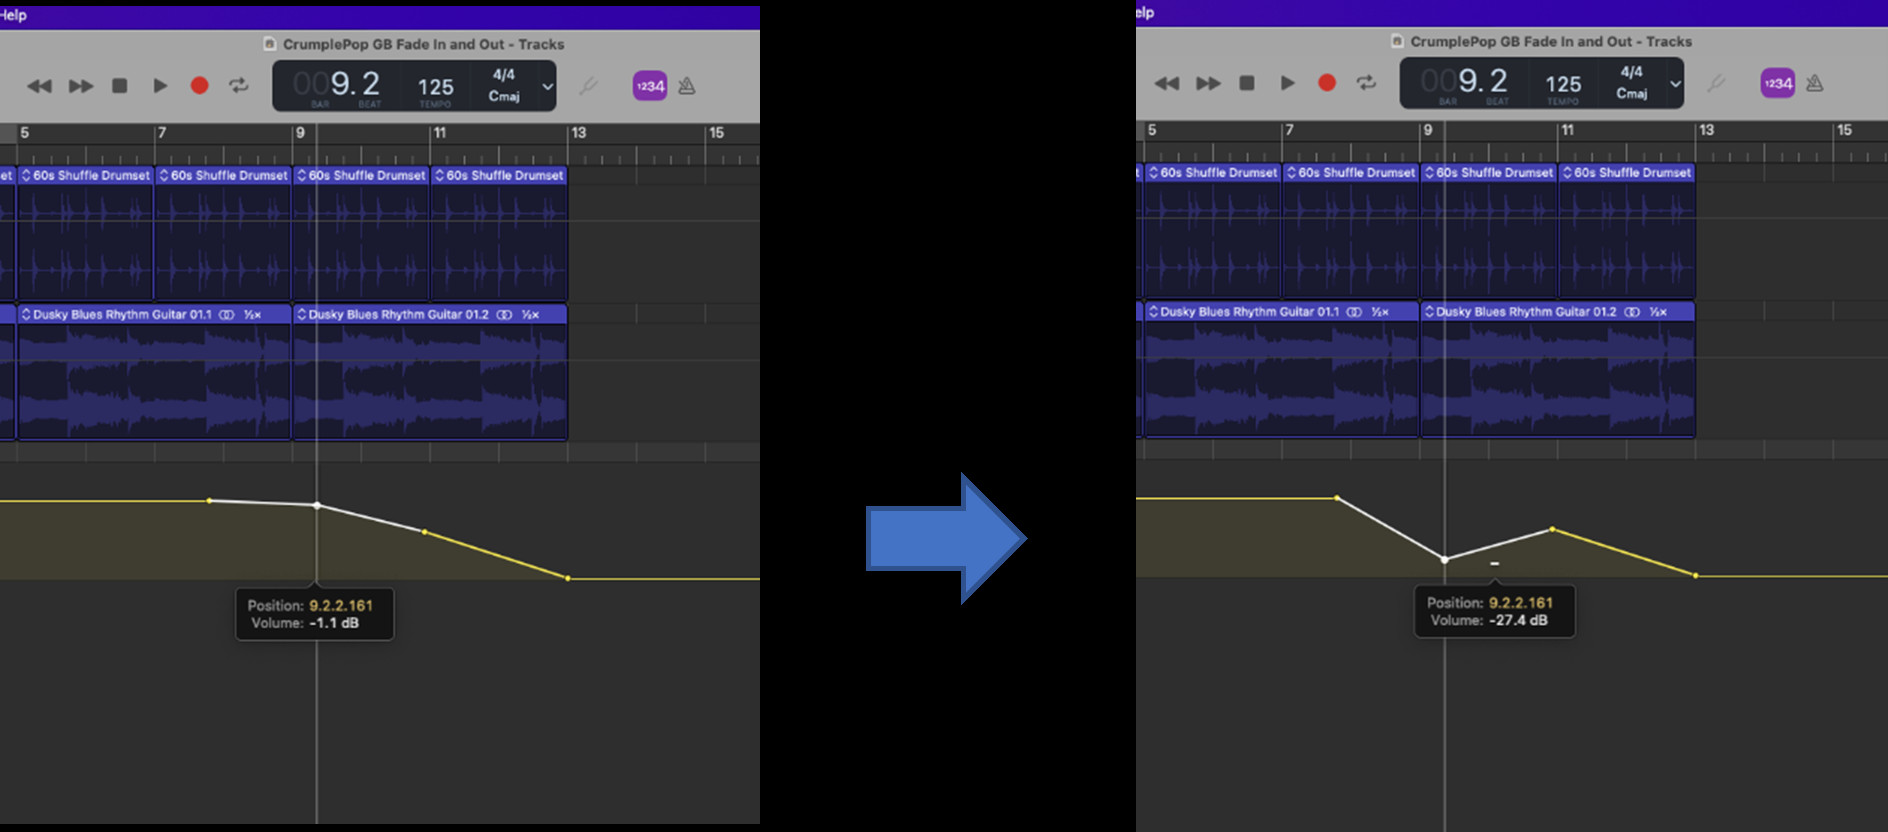 Moving a volume point to adjust amount and timing of fade-out effect
Adjusting volume point location in GarageBand.
Toggling Fade-Out On/Off
You can quickly enable or disable the fade-out by clicking the automation icon in the master track header.
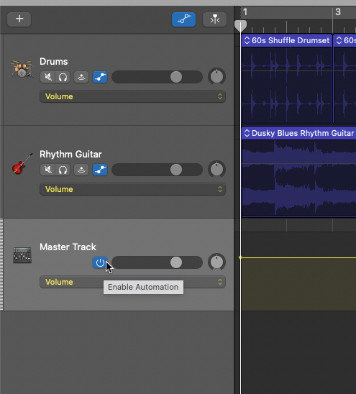 Enabling automation with the automation icon on the Master Track Header
Enabling automation with the automation icon on the master track header.
5. How to Manually Fade Out Your Whole Song in GarageBand
For more precise control, you can manually fade out your entire song.
Step-by-Step Guide to Manual Fade-Out
-
Show the Master Track’s Volume Line:
- Follow steps 1 to 3 in the “Automatically Fade Out Your Whole Song” section.
-
Add Volume Points:
- Position your cursor on the volume line where you want to add a point and click.
-
Control Intensity and Timing:
- Drag the volume points up, down, left, or right to adjust the fade-out effect.
6. How to Manually Fade Out a Single Track in GarageBand
Fading out individual tracks can add depth and nuance to your mix.
Considerations Before Starting
- Master Track Fade-Out: If the master track fade-out is enabled, it will affect the entire mix, regardless of individual track fade-outs.
- Toggling Master Track Fade-Out: Turn off the master track fade-out to apply only the individual track fade-outs you set.
Step-by-Step Guide to Manual Fade-Out for a Single Track
-
Set Master Track Fade-Out:
- Enable or disable the master track fade-out as needed.
-
Select the Track:
- Enable the automation icon for the track you want to fade out. All tracks may toggle on, but only activated tracks will fade out.
- In the automation menu, select “Volume.” A flat automation line indicates no fade-out is applied yet.
-
Add Volume Points:
- Click on the volume line to add points where you want to make adjustments.
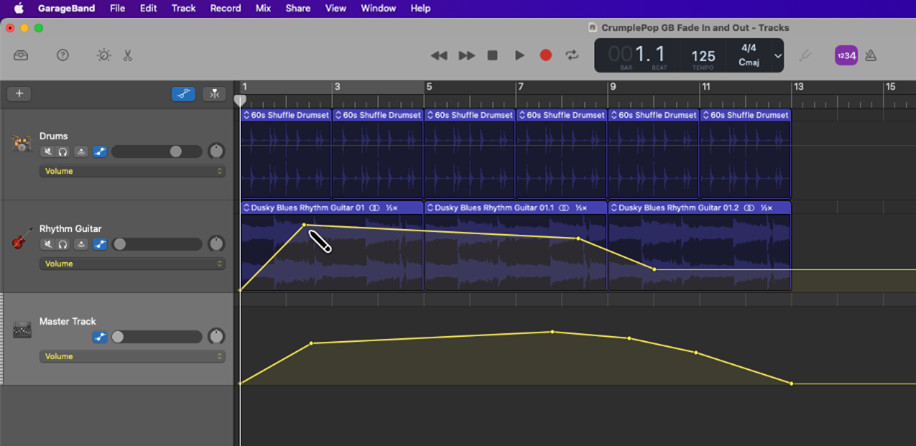
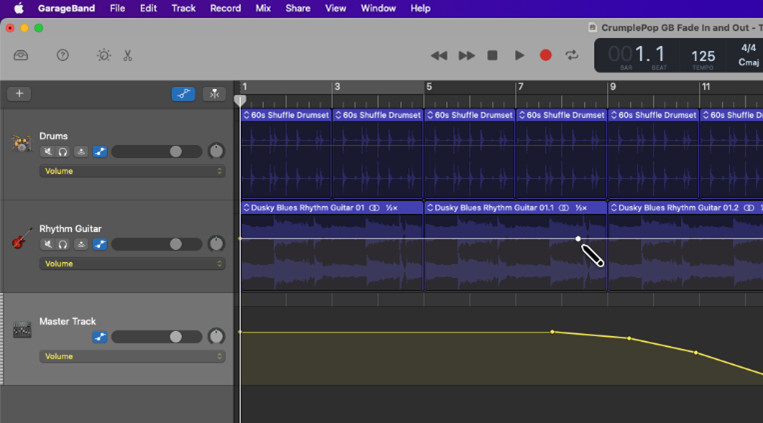 Adding a volume point for a single track
Adding a volume point for a single track.
- Tip: To remove a volume point, select it and double-click.
-
Adjust Amount and Timing:
- Drag the volume points to control the fade-out effect.
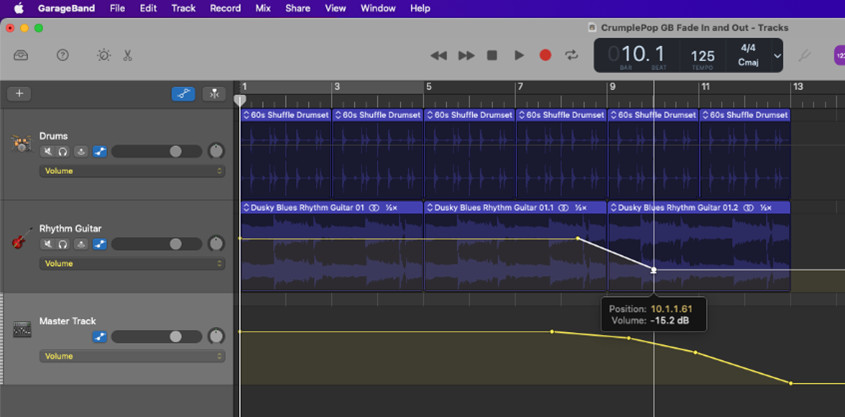 Moving a volume point for a single track
Moving a volume point for a single track.
- Tip: Ensure the volume slider doesn’t accidentally move to zero.
7. How to Manually Fade In Music in GarageBand
Fading in is just as important as fading out, creating a smooth entry for your song or individual tracks.
Manually Fade In Your Whole Song
-
Show the Master Track’s Volume Line:
- Follow steps 1 to 3 of “Automatically Fade Out Your Whole Song.” Note that this adds a fade-out effect, which you can remove or alter as needed.
-
Set Up the Fade-In Effect:
- Click on the automation line to add volume points where you want the fade-in to occur.
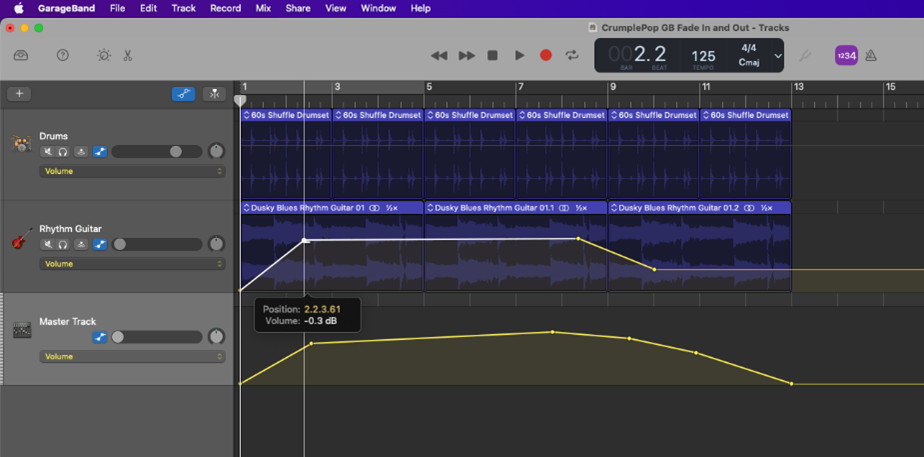
 Adding a volume point to the Master Track
Adding a volume point to the Master Track.
-
Control Intensity and Timing:
- Adjust the volume points to fine-tune the fade-in effect.
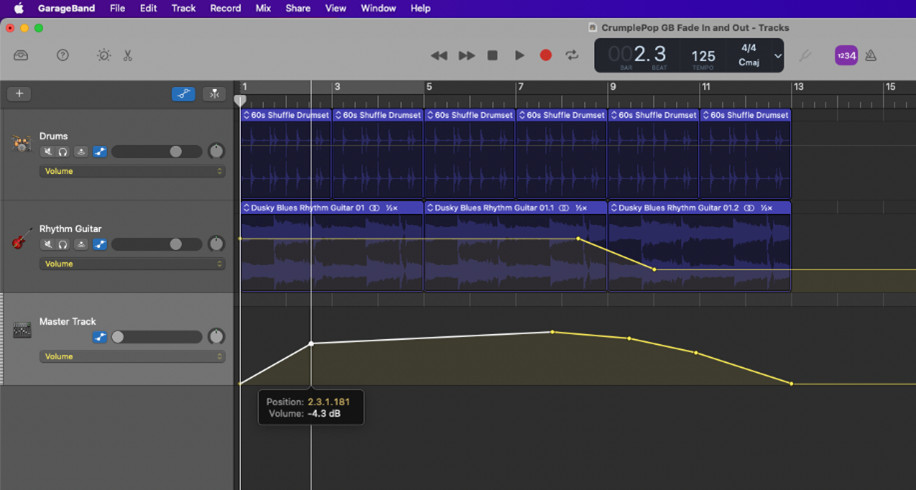 Moving a volume point on the Master Track
Moving a volume point on the Master Track.
Manually Fade In a Single Track
Similar to fading out, you can fade in individual tracks for greater control.
-
Set Master Track Fade-In (or Out):
- Enable or disable the master track automation icon.
-
Select the Track:
- Enable the automation icon for the track you want to fade in.
- In the automation menu, select “Volume.” A flat line indicates no fade-in is applied.
-
Add Volume Points:
- Click on the volume line to add points where you want to make adjustments.
 Adding a volume point to a single track
Adding a volume point to a single track.
-
Adjust Amount and Timing:
- Move the volume points to adjust the fade-in effect.
 Moving a volume point on a single track
Moving a volume point on a single track.
- Tip: Watch the volume sliders to see the volume curves in action.
8. Mastering Audio and Music Licensing: A Comprehensive Guide
Navigating the world of music production extends beyond simply understanding how to fade in or out. To truly excel, particularly if you’re aiming to monetize your music, you must grasp the essentials of audio mastering and music licensing. Mastering ensures your track meets industry standards, while licensing protects your rights and opens revenue streams.
What is Audio Mastering?
Audio mastering is the final step in the music production process, enhancing the overall sound of a song to achieve consistency and optimal playback quality across various devices and platforms.
Key Aspects of Audio Mastering
- Balancing Frequencies: Adjusting the EQ to ensure a balanced sound across all frequencies.
- Enhancing Loudness: Optimizing the volume without causing distortion.
- Creating Cohesion: Ensuring consistency in volume and sound across all tracks in an album.
Why is Music Licensing Important?
Music licensing is the legal process of granting permission to another party to use your copyrighted music. It ensures you get compensated when your music is used commercially.
Types of Music Licenses
- Synchronization License: Needed when your music is used in visual media like films, TV shows, and commercials.
- Mechanical License: Required when your music is reproduced physically (CDs, vinyl) or digitally (downloads, streams).
- Performance License: Necessary when your music is performed publicly, either live or through broadcast.
How Does Music Licensing Impact Your Earnings?
Music licensing can be a significant source of revenue for musicians and songwriters. Platforms like payoffsong.com offer opportunities to connect with potential licensees, increasing your chances of earning from your music.
Maximizing Licensing Opportunities
- Register with a PRO: Join a Performing Rights Organization (PRO) like ASCAP or BMI to collect performance royalties.
- Use a Music Licensing Platform: List your music on platforms like payoffsong.com to increase visibility and licensing opportunities.
- Network with Industry Professionals: Connect with music supervisors, ad agencies, and filmmakers to promote your music for potential placements.
Case Study: Successful Music Licensing
Many artists have significantly boosted their income through strategic music licensing. For example, indie artist Emily Richards earned $50,000 in a single year by licensing her songs to various TV shows and commercials. Her success stemmed from:
- High-Quality Recordings: Ensuring her tracks were professionally mixed and mastered.
- Targeted Marketing: Focusing on specific genres and themes that matched the needs of potential licensees.
- Platform Utilization: Leveraging music licensing platforms to showcase her work and streamline the licensing process.
Music Licensing Trends in 2024
The music industry is constantly evolving, and staying updated on the latest licensing trends can help you maximize your earnings.
Key Trends
- Increased Demand for Indie Music: More brands and media outlets are seeking authentic and unique music from independent artists.
- Growth of Subscription-Based Services: Platforms offering royalty-free music subscriptions are becoming increasingly popular.
- Focus on Digital Licensing: With the rise of streaming and digital content, digital licensing is more critical than ever.
Legal Considerations
Understanding the legal aspects of music licensing is crucial to protect your rights and ensure you get fairly compensated.
Essential Legal Tips
- Copyright Your Music: Register your songs with the U.S. Copyright Office to establish legal ownership.
- Review Licensing Agreements Carefully: Ensure you understand the terms and conditions before signing any licensing agreement.
- Seek Legal Advice: Consult with an entertainment lawyer to navigate complex licensing issues.
Resources for Further Learning
- U.S. Copyright Office: Provides comprehensive information on copyright law.
- Performing Rights Organizations (PROs): ASCAP, BMI, and SESAC offer resources and support for songwriters and publishers.
- Music Licensing Platforms: payoffsong.com connects artists with potential licensees.
By mastering audio production techniques and understanding the intricacies of music licensing, you can create high-quality music and effectively monetize your work. Platforms like payoffsong.com are essential resources for navigating the complexities of the music industry and maximizing your earning potential.
9. Conclusion
Mastering fade-in and fade-out techniques in GarageBand can significantly enhance your music production, add dynamic transitions, and bring a professional feel to your tracks.
Final Thoughts
Whether you opt for automatic or manual control, GarageBand provides the tools you need to refine your sound. Remember that practice and experimentation are key to mastering these techniques.
Next Steps
Explore the various features of GarageBand, experiment with different automation settings, and don’t hesitate to seek inspiration from your favorite songs. At payoffsong.com, we encourage you to leverage these skills to create compelling music and explore the potential for commercial success through music licensing.
10. FAQ
How do you fade out in GarageBand on IOS?
You can automatically fade out a whole song in GarageBand IOS by selecting the “Fade-Out” option under “Settings.” To fade out individual tracks, enable automation (tap the track and select from the pop-up menu) and adjust the automation curves.
Can I use fade-ins and fade-outs on individual tracks?
Yes, you can manually add fade-ins and fade-outs to individual tracks in GarageBand. This allows for more precise control over specific elements in your song.
What is the master track used for?
The master track controls the overall output of your song, affecting all tracks combined. It is useful for applying final touches like fade-outs and overall volume adjustments.
How do I remove a volume point in GarageBand?
To remove a volume point, simply select it and double-click. The point will disappear, and the automation line will adjust accordingly.
What are some common mistakes to avoid when using fade-outs?
Avoid letting the volume accidentally drop to zero on individual tracks and ensure that your fade-outs are smooth and natural-sounding.
Where can I learn more about music licensing?
Visit payoffsong.com for comprehensive information, tips, and resources on music licensing, copyright, and maximizing your earnings from your music.
What is the best way to ensure my music is ready for licensing?
Ensure your tracks are professionally mixed and mastered. High-quality recordings are more attractive to potential licensees.
How do I register my music for copyright protection?
Register your songs with the U.S. Copyright Office. This establishes legal ownership and protects your rights.
What is a Performing Rights Organization (PRO)?
A PRO like ASCAP, BMI, or SESAC collects performance royalties on behalf of songwriters and publishers when their music is played publicly.
Can I use music licensing platforms to find opportunities?
Yes, platforms like payoffsong.com connect artists with potential licensees, increasing visibility and licensing opportunities for your music.
By understanding these techniques and resources, you can elevate your music production skills and explore new avenues for success in the music industry. Whether you are a musician, songwriter, or content creator, mastering these skills can open doors to exciting opportunities and financial rewards. Visit payoffsong.com today to discover how you can leverage your music for commercial success.