
Adding songs to your iPhone from iTunes is a straightforward process, allowing you to enjoy your favorite music on the go, and payoffsong.com can guide you through maximizing your music’s potential. This guide explores how to transfer music from iTunes to your iPhone, covering both automatic syncing and manual management. Unlock the full potential of your music and explore opportunities for monetization and licensing through platforms like payoffsong.com. Discover music licensing, royalties, and song monetization strategies today.
1. What Are The Two Main Ways To Add Music From iTunes To My iPhone?
The two primary methods for adding music from iTunes to your iPhone are automatic syncing and manual management. Automatic syncing allows iTunes to automatically update your iPhone with selected music, while manual management lets you drag and drop individual songs or playlists directly onto your device.
Expanding on Automatic Syncing
- Convenience: Automatic syncing is the quickest way to keep your iPhone’s music library up-to-date with your iTunes library.
- Customization: You can choose to sync your entire music library or select specific playlists, artists, or albums.
- Efficiency: iTunes automatically updates your iPhone whenever it’s connected to your computer.
Expanding on Manual Management
- Control: Manual management gives you complete control over which songs are added to your iPhone.
- Flexibility: You can add or remove individual songs without affecting the rest of your library.
- Suitability: Ideal for managing smaller music collections or when you only want to add a few specific tracks.
2. How Do I Set Up Automatic Syncing In iTunes?
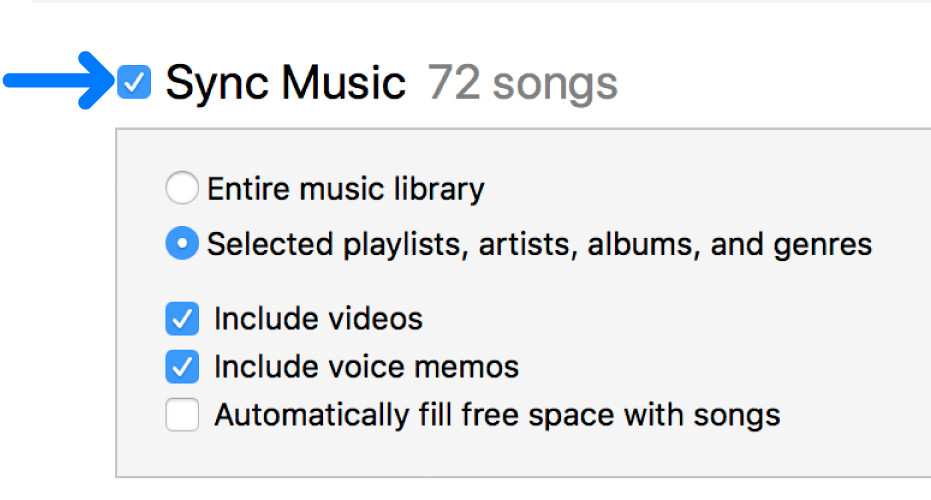
To set up automatic syncing in iTunes, connect your iPhone to your computer, select your device in iTunes, choose the “Music” tab, and then select “Sync Music.” You can choose to sync your entire library or selected playlists, artists, or albums.
Here’s a detailed breakdown:
- Connect Your iPhone: Use a USB cable to connect your iPhone to your computer.
- Open iTunes: Launch the iTunes application on your computer.
- Select Your Device: Click on the iPhone icon that appears in the top left corner of the iTunes window.
- Navigate to the Music Tab: In the sidebar on the left, under “Settings,” click on “Music.”
- Enable Sync Music: Check the box next to “Sync Music.”
- Choose Sync Options:
- Entire music library: Select this option to sync all the music in your iTunes library to your iPhone.
- Selected playlists, artists, albums, and genres: Choose this option to sync only specific items. You can then select the desired playlists, artists, albums, and genres from the lists below.
- Apply Changes: Click the “Apply” button in the bottom right corner of the iTunes window.
 iTunes sync music selection showing options to sync entire library or selected items.
Additional Tips for Automatic Syncing
- iCloud Music Library: If you use iCloud Music Library, your music is automatically synced across all your devices, and you won’t see the option to sync music through iTunes.
- Storage Space: Ensure your iPhone has enough storage space for the music you want to sync. You can check your iPhone’s storage usage in Settings > General > iPhone Storage.
- Sync Over Wi-Fi: You can enable syncing over Wi-Fi by connecting your iPhone to your computer via USB, selecting your device in iTunes, clicking “Summary,” and then checking the box next to “Sync with this iPhone over Wi-Fi.”
3. How Do I Manually Manage Music On My iPhone Using iTunes?
To manually manage music on your iPhone, connect your device to your computer, select your device in iTunes, click “Summary,” and then select “Manually manage music.” You can then drag and drop songs from your iTunes library directly onto your iPhone.
Here’s how to do it step by step:
- Connect Your iPhone: Connect your iPhone to your computer using a USB cable.
- Open iTunes: Launch the iTunes application on your computer.
- Select Your Device: Click on the iPhone icon that appears in the top left corner of the iTunes window.
- Navigate to the Summary Tab: In the sidebar on the left, click on “Summary.”
- Enable Manual Management: Under the “Options” section, check the box next to “Manually manage music.”
- Confirm Changes: A warning message will appear, stating that all existing media on your iPhone will be erased and replaced with the content you manually add. Click “Apply” to confirm.
- Add Music:
- Navigate to Your Music Library: Choose “Music” from the library menu at the top left.
- Drag and Drop Songs: Select the songs you want to add to your iPhone and drag them onto your iPhone icon in the sidebar.
- Eject Your iPhone: Once the transfer is complete, click the “Eject” button next to your iPhone in iTunes to safely disconnect your device.
Advantages of Manual Management
- Granular Control: You can add or remove specific songs, albums, or playlists without syncing your entire library.
- Multiple Libraries: You can manage music from multiple iTunes libraries on your iPhone, which is useful if you have different music collections on different computers.
- Flexibility: Manual management is ideal for adding content that is not available in the iTunes Store, such as music from CDs or other sources.
4. What If My Music Doesn’t Appear On My iPhone After Syncing With iTunes?
If your music doesn’t appear on your iPhone after syncing with iTunes, ensure that the music is checked in your iTunes library, that you have enough storage space on your iPhone, and that you have authorized your computer to play iTunes Store purchases.
Let’s explore the common causes and solutions in more detail:
- Check if the Music is Checked in iTunes
- Issue: If the checkboxes next to the songs in your iTunes library are not checked, they will not be synced to your iPhone.
- Solution: Open iTunes, go to your Music library, and make sure that the checkboxes next to the songs you want to sync are checked. If the checkboxes are not visible, go to View > View Options and make sure “Check Boxes” is selected.
- Insufficient Storage Space on Your iPhone
- Issue: If your iPhone is full, iTunes will not be able to sync all of your music.
- Solution: Check your iPhone’s storage usage in Settings > General > iPhone Storage. If you are running low on space, you can delete unnecessary apps, photos, or other files to free up space for your music.
- Computer Authorization
- Issue: If your computer is not authorized to play iTunes Store purchases, you will not be able to sync purchased music to your iPhone.
- Solution: In iTunes, go to Account > Authorizations > Authorize This Computer. Enter your Apple ID and password to authorize your computer.
- iCloud Music Library Issues
- Issue: If you are using iCloud Music Library, your music may not be syncing properly due to iCloud issues.
- Solution: Make sure that iCloud Music Library is enabled on both your computer and your iPhone. On your computer, go to Edit > Preferences > General and make sure “iCloud Music Library” is checked. On your iPhone, go to Settings > Music and make sure “Sync Library” is turned on.
- Software Updates
- Issue: Outdated software on your computer or iPhone can cause syncing issues.
- Solution: Make sure that you are running the latest version of iTunes on your computer and the latest version of iOS on your iPhone. You can check for software updates in iTunes by going to Help > Check for Updates and on your iPhone by going to Settings > General > Software Update.
- Syncing Errors
- Issue: Syncing errors can occur due to various reasons, such as corrupted files or connectivity issues.
- Solution: Try restarting your computer and your iPhone. You can also try resetting the sync history in iTunes by going to Edit > Preferences > Devices and clicking “Reset Sync History.”
5. Can I Use iTunes To Add Music From A CD To My iPhone?
Yes, you can use iTunes to add music from a CD to your iPhone by importing the CD into your iTunes library and then syncing your iPhone with iTunes.
Here’s a detailed guide on how to do it:
- Insert the CD into Your Computer: Place the music CD into the CD/DVD drive of your computer.
- Open iTunes: Launch the iTunes application on your computer.
- Import the CD:
- When you insert the CD, iTunes should automatically detect it and ask if you want to import the CD. Click “Yes” to start the import process.
- If iTunes doesn’t prompt you automatically, go to File > Add Folder to Library, navigate to your CD drive, and select the CD.
- Choose Import Settings (Optional):
- Before importing, you can adjust the import settings to control the quality and file format of the imported music. Go to Edit > Preferences > General > Import Settings.
- You can choose the format (AAC, MP3, WAV, AIFF, Apple Lossless) and the quality (bitrate). For most users, AAC or MP3 at 128kbps or 256kbps provides a good balance between quality and file size.
- Import the Songs:
- iTunes will display a list of songs on the CD. By default, all songs are selected for import. If you only want to import specific songs, uncheck the boxes next to the songs you don’t want.
- Click the “Import CD” button in the top right corner of the iTunes window.
- Sync Your iPhone:
- Connect your iPhone to your computer using a USB cable.
- Select your iPhone in iTunes (click on the iPhone icon in the top left corner).
- Go to the “Music” tab in the sidebar.
- Check the “Sync Music” box. You can choose to sync your entire music library or selected playlists, artists, albums, and genres.
- If you choose to sync selected items, make sure the songs you just imported from the CD are selected.
- Click the “Apply” button in the bottom right corner of the iTunes window to start the sync process.
- Eject Your iPhone: Once the sync is complete, click the “Eject” button next to your iPhone in iTunes to safely disconnect your device.
Additional Tips
- CD Information: iTunes will attempt to retrieve track names and album information from the internet. If it doesn’t, you can manually enter the information by right-clicking on the song and selecting “Get Info.”
- File Management: The imported songs will be stored in your iTunes Media folder. You can change the location of this folder in Edit > Preferences > Advanced.
- Error Correction: If you experience errors during the import process, try enabling error correction in the Import Settings. This can help to improve the accuracy of the import, especially for older or scratched CDs.
- Copyright: Be aware of copyright laws when importing music from CDs. It is generally legal to import CDs for personal use, but distributing the music to others may violate copyright laws.
6. What Are Some Common iTunes Syncing Problems And How Can I Fix Them?
Common iTunes syncing problems include issues with device recognition, sync errors, and slow syncing speeds. Solutions include updating iTunes, restarting your computer and iPhone, and checking your USB connection.
Let’s explore some of the most frequent iTunes syncing challenges and their solutions:
-
Device Not Recognized
-
Problem: iTunes doesn’t recognize your iPhone when you connect it to your computer.
-
Solutions:
- Check the USB Connection: Ensure that the USB cable is properly connected to both your computer and your iPhone. Try using a different USB port or a different USB cable.
- Trust This Computer: When you connect your iPhone to your computer, a prompt may appear on your iPhone asking if you trust this computer. Tap “Trust” to allow iTunes to access your device.
- Update iTunes: Make sure that you are running the latest version of iTunes on your computer. You can check for updates in iTunes by going to Help > Check for Updates.
- Restart Your Devices: Restart both your computer and your iPhone. This can often resolve temporary software glitches that may be causing the issue.
- Reinstall iTunes: If none of the above solutions work, try uninstalling and reinstalling iTunes.
-
-
Sync Errors
-
Problem: iTunes displays an error message during the syncing process.
-
Solutions:
- Check for Corrupted Files: Corrupted music or video files in your iTunes library can cause syncing errors. Try removing recently added files from your library and then syncing again.
- Reset Sync History: Resetting the sync history in iTunes can sometimes resolve syncing errors. Go to Edit > Preferences > Devices and click “Reset Sync History.”
- Disable Third-Party Security Software: Some security software can interfere with the syncing process. Try temporarily disabling your antivirus or firewall software and then syncing again.
- Check Disk Space: Make sure that you have enough free disk space on both your computer and your iPhone.
- Update Device Drivers: Ensure that your device drivers are up to date. You can update device drivers in the Device Manager on Windows.
-
-
Slow Syncing Speeds
-
Problem: iTunes takes a long time to sync your iPhone.
-
Solutions:
- Use a USB 3.0 Port: If your computer has USB 3.0 ports (usually blue), use one of these ports for faster syncing speeds.
- Close Unnecessary Applications: Close any unnecessary applications on your computer to free up system resources and improve syncing speeds.
- Sync Over Wi-Fi: Syncing over Wi-Fi can be slower than syncing over USB. If you are experiencing slow syncing speeds over Wi-Fi, try syncing over USB instead.
- Reduce the Number of Items to Sync: If you are syncing a large number of items, try reducing the number of items to sync by syncing only selected playlists, artists, albums, and genres.
- Optimize Your iTunes Library: Optimize your iTunes library by removing duplicate songs, updating song information, and organizing your playlists.
-
-
Missing Music
-
Problem: Some of your music is not appearing on your iPhone after syncing.
-
Solutions:
- Check if the Music is Checked in iTunes: Make sure that the checkboxes next to the songs in your iTunes library are checked.
- Authorize Your Computer: Make sure that your computer is authorized to play iTunes Store purchases. Go to Account > Authorizations > Authorize This Computer.
- iCloud Music Library: If you are using iCloud Music Library, make sure that it is enabled on both your computer and your iPhone.
- Check for Hidden Purchases: Sometimes, iTunes Store purchases may be hidden. Go to Account > View My Account > Hidden Purchases and make sure that your music is not hidden.
-
-
Software Issues
-
Problem: General software issues can sometimes interfere with the syncing process.
-
Solutions:
- Restart Your Devices: Restart both your computer and your iPhone.
- Update Software: Make sure that you are running the latest versions of iTunes, iOS, and your computer’s operating system.
- Restore Your iPhone: As a last resort, you can try restoring your iPhone to its factory settings. This will erase all of your data, so make sure to back up your iPhone before restoring it.
-
7. How Do I Remove Music From My iPhone Using iTunes?
To remove music from your iPhone using iTunes, connect your device to your computer, select your device in iTunes, go to the “Music” tab, uncheck the songs you want to remove, and then sync your iPhone.
Here’s a detailed guide on how to remove music from your iPhone using iTunes:
- Connect Your iPhone to Your Computer: Connect your iPhone to your computer using a USB cable.
- Open iTunes: Launch the iTunes application on your computer.
- Select Your Device: Click on the iPhone icon that appears in the top left corner of the iTunes window.
- Go to the Music Tab: In the sidebar on the left, under “Settings,” click on “Music.”
- Uncheck the Songs You Want to Remove:
- If you are syncing your entire music library, you will need to uncheck the songs you want to remove from your iTunes library.
- If you are syncing selected playlists, artists, albums, and genres, you can uncheck the items you want to remove from the selection.
- Sync Your iPhone: Click the “Apply” button in the bottom right corner of the iTunes window to start the sync process. iTunes will remove the unchecked songs from your iPhone.
- Eject Your iPhone: Once the sync is complete, click the “Eject” button next to your iPhone in iTunes to safely disconnect your device.
Alternative Method: Manual Management
If you are manually managing music on your iPhone, you can remove songs directly from your device in iTunes:
- Connect Your iPhone to Your Computer: Connect your iPhone to your computer using a USB cable.
- Open iTunes: Launch the iTunes application on your computer.
- Select Your Device: Click on the iPhone icon that appears in the top left corner of the iTunes window.
- Go to On My Device > Music: In the sidebar on the left, under “On My Device,” click on “Music.”
- Remove the Songs:
- Select the songs you want to remove.
- Right-click on the selected songs and choose “Delete” or press the “Delete” key on your keyboard.
- Confirm that you want to delete the songs.
- Eject Your iPhone: Once the songs are removed, click the “Eject” button next to your iPhone in iTunes to safely disconnect your device.
Additional Tips
- Check iCloud Music Library: If you are using iCloud Music Library, deleting songs from your iPhone will also delete them from your iCloud Music Library and all other devices that are connected to your Apple ID.
- Storage Space: Removing music from your iPhone will free up storage space on your device. You can check your iPhone’s storage usage in Settings > General > iPhone Storage.
- Syncing Issues: If you experience syncing issues after removing music from your iPhone, try restarting your computer and your iPhone.
- iTunes Match: If you are using iTunes Match, your music library will be automatically synced across all of your devices. Removing songs from one device will remove them from all devices.
8. How Does iCloud Music Library Affect Syncing Music With iTunes?
iCloud Music Library allows you to access your music library on all your devices, but it also disables the ability to sync music with iTunes in the traditional way. To add music, you must upload it to iCloud Music Library.
Here’s how iCloud Music Library impacts music syncing with iTunes:
-
Centralized Music Library
- Functionality: iCloud Music Library stores your entire music collection in the cloud, making it accessible on all your devices signed in with the same Apple ID.
- Impact: When enabled, it replaces the traditional method of syncing music via USB with iTunes. Instead, music is synced wirelessly through iCloud.
-
No Direct USB Syncing
- Limitation: With iCloud Music Library turned on, you cannot directly sync music from your computer to your iPhone using a USB cable and iTunes in the same way as before.
- Reason: The “Sync Music” option in iTunes is disabled because iCloud Music Library manages the music syncing process.
-
Uploading Music to iCloud
- Process: To add music to your iPhone, you need to upload it to iCloud Music Library from your computer.
- Steps:
- Enable iCloud Music Library on Your Computer: In iTunes, go to Edit > Preferences > General and check the box next to “iCloud Music Library.”
- Add Music to Your iTunes Library: Add the music files to your iTunes library by dragging them into the iTunes window or by going to File > Add File to Library.
- iCloud Upload: iTunes will automatically upload the music to iCloud Music Library. This process may take some time, depending on the size of your music collection and your internet connection speed.
-
Accessing Music on Your iPhone
- Enable iCloud Music Library on Your iPhone: Go to Settings > Music and turn on “Sync Library” (iCloud Music Library).
- Automatic Syncing: Your music library will automatically sync to your iPhone, allowing you to stream or download songs as needed.
-
Managing Music
- Adding Music: Any music you add to your iTunes library on your computer will be automatically uploaded to iCloud and made available on your iPhone.
- Removing Music: Deleting music from your iTunes library on your computer will also remove it from iCloud Music Library and your iPhone.
-
Matching and Uploading
- Matching: Apple attempts to match the songs in your iTunes library with songs in the iTunes Store catalog. If a match is found, the matched song is made available to you in high quality (256kbps AAC).
- Uploading: If a match is not found, the song is uploaded from your computer to iCloud Music Library.
-
Troubleshooting
- Syncing Issues: If your music is not syncing properly, make sure that iCloud Music Library is enabled on both your computer and your iPhone, and that you are signed in with the same Apple ID.
- Internet Connection: A stable internet connection is required to upload and download music from iCloud Music Library.
-
Subscriptions and Services
- Apple Music: iCloud Music Library is included with an Apple Music subscription.
- iTunes Match: If you don’t have an Apple Music subscription, you can subscribe to iTunes Match, which provides similar functionality.
9. Can I Add Music To My iPhone Without Using iTunes?
Yes, you can add music to your iPhone without using iTunes by using alternative methods such as Apple Music, iCloud Music Library, or third-party apps.
Here are several methods for adding music to your iPhone without using iTunes:
-
Apple Music
- Subscription Service: Apple Music is a subscription-based music streaming service that allows you to access millions of songs on your iPhone without needing to sync with iTunes.
- How to Use:
- Subscribe to Apple Music: If you don’t already have a subscription, sign up for Apple Music through the Music app on your iPhone.
- Stream or Download Music: Browse the Apple Music catalog, find the songs or albums you want to add, and either stream them or download them for offline listening.
- Add to Library: Add songs to your library by tapping the “+” button next to the song or album.
- Advantages: Large music library, offline playback, integration with other Apple devices.
-
iCloud Music Library
- Cloud Storage: iCloud Music Library stores your music in the cloud, making it accessible on all your devices signed in with the same Apple ID.
- How to Use:
- Enable iCloud Music Library: On your iPhone, go to Settings > Music and turn on “Sync Library” (iCloud Music Library).
- Upload Music to iCloud: On your computer, enable iCloud Music Library in iTunes (Edit > Preferences > General) and add your music files to your iTunes library. iTunes will upload the music to iCloud.
- Access Music on Your iPhone: Your music library will automatically sync to your iPhone, allowing you to stream or download songs as needed.
- Advantages: Wireless syncing, access to your entire music library on all devices.
-
Third-Party Apps
- Cloud Storage Services: Apps like Google Play Music, Amazon Music, and Spotify allow you to upload your music to their cloud storage and then stream or download it to your iPhone.
- File Transfer Apps: Apps like Documents by Readdle or File Transfer allow you to transfer music files directly to your iPhone from your computer or other devices.
- How to Use:
- Download and Install the App: Download and install the app of your choice from the App Store.
- Upload Music to the App: Follow the app’s instructions to upload your music files from your computer or other devices.
- Access Music on Your iPhone: Use the app to stream or download your music to your iPhone.
- Advantages: Flexible, allows you to use alternative cloud storage services.
-
Wireless Transfer
- AirDrop: Apple’s AirDrop feature allows you to wirelessly transfer files between Apple devices, including music files.
- How to Use:
- Enable AirDrop: On both your iPhone and the source device (e.g., another iPhone, iPad, or Mac), enable AirDrop in the Control Center.
- Share the Music File: On the source device, select the music file you want to transfer, tap the “Share” button, and choose AirDrop.
- Accept the Transfer: On your iPhone, accept the incoming file. The music file will be saved to the Files app.
- Advantages: Quick and easy, no need for iTunes or third-party apps.
-
Email
- Emailing Music Files: You can email music files to yourself and then download them to your iPhone.
- How to Use:
- Attach the Music File to an Email: On your computer, compose an email and attach the music file to it.
- Send the Email to Yourself: Send the email to your own email address.
- Download the Music File: On your iPhone, open the email and download the music file. The file will be saved to the Files app.
- Advantages: Simple, no need for special software or services.
10. What File Formats Are Compatible With iTunes And iPhone?
iTunes and iPhone support a variety of audio file formats, including MP3, AAC, WAV, AIFF, and Apple Lossless.
Let’s explore the supported audio file formats and their characteristics in more detail:
-
MP3 (MPEG-1 Audio Layer 3)
- Description: MP3 is one of the most popular and widely supported audio file formats. It uses lossy compression, which reduces file size by discarding some audio data.
- Compatibility: Fully compatible with iTunes and iPhone.
- Advantages: Small file size, good compatibility.
- Disadvantages: Lossy compression can result in some loss of audio quality.
-
AAC (Advanced Audio Coding)
- Description: AAC is another lossy audio format that offers better audio quality than MP3 at the same bitrate. It is the default audio format used by iTunes and Apple Music.
- Compatibility: Fully compatible with iTunes and iPhone.
- Advantages: Better audio quality than MP3, efficient compression.
- Disadvantages: Lossy compression can still result in some loss of audio quality, though less noticeable than MP3.
-
WAV (Waveform Audio File Format)
- Description: WAV is an uncompressed audio format that preserves all of the original audio data. It is commonly used for professional audio recording and editing.
- Compatibility: Fully compatible with iTunes and iPhone.
- Advantages: High audio quality, no loss of data.
- Disadvantages: Large file size.
-
AIFF (Audio Interchange File Format)
- Description: AIFF is another uncompressed audio format that is similar to WAV. It is commonly used on macOS systems.
- Compatibility: Fully compatible with iTunes and iPhone.
- Advantages: High audio quality, no loss of data.
- Disadvantages: Large file size.
-
Apple Lossless (ALAC)
- Description: Apple Lossless is a lossless audio compression format developed by Apple. It reduces file size without discarding any audio data.
- Compatibility: Fully compatible with iTunes and iPhone.
- Advantages: High audio quality, smaller file size compared to WAV and AIFF.
- Disadvantages: Larger file size compared to lossy formats like MP3 and AAC.
Additional Considerations
-
Bitrate: Bitrate is the amount of data used to encode audio. Higher bitrates generally result in better audio quality but larger file sizes. For MP3 and AAC files, bitrates of 128kbps to 256kbps are commonly used.
-
Sample Rate: Sample rate is the number of samples of audio carried per second, measured in Hz or kHz. Higher sample rates generally result in better audio quality. Common sample rates include 44.1 kHz and 48 kHz.
-
Choosing the Right Format:
- For Everyday Listening: MP3 and AAC are good choices for everyday listening due to their small file sizes and good compatibility.
- For High-Quality Audio: Apple Lossless, WAV, and AIFF are good choices for high-quality audio, especially if you are an audiophile or a music professional.
- For Archiving: WAV and AIFF are good choices for archiving audio, as they preserve all of the original audio data.
-
Converting Audio Files: You can use iTunes or other audio conversion software to convert audio files from one format to another.
Navigating the world of music licensing and monetization can be complex, but payoffsong.com simplifies the process, connecting creators with opportunities to earn from their work. Whether you’re looking to license your music for commercial use or find the perfect track for your project, payoffsong.com offers the resources and expertise you need. Take the next step in your music journey and discover the possibilities at payoffsong.com. Explore your potential today!
Address: 1601 Vine St, Los Angeles, CA 90028, United States
Phone: +1 (323) 469-2211
Website: payoffsong.com