
“blues”
For many guitarists, learning to play “Mustang Sally” feels like hitting a roadblock. It’s not the chords themselves, which are quite straightforward, nor the song structure, which follows familiar patterns. The real challenge lies in capturing the authentic guitar part from the original recording. It often sounds like a single guitar track, leaving aspiring players struggling to replicate the sound. For years, many guitarists, including myself, have resorted to simplified rhythm accompaniments during performances, lacking the nuanced guitar work of the recorded version. It wasn’t until later, through dedicated listening and practice, that I finally deciphered the secret: there are actually two guitars intertwining on the recording.
In this in-depth “Mustang Sally Song” guitar lesson, I’m excited to break down the chords, rhythms, and scales, empowering you to confidently jam this iconic song today! We’ll dissect the individual guitar parts from the recording and guide you on how to combine them effectively for a rich and complete performance on a single guitar.
“Mustang Sally” isn’t just a fun song to play; it’s a crucial addition to your repertoire. It’s a staple at jam sessions and parties, frequently requested and performed by musicians of all levels. Knowing this song is your ticket to joining in the musical fun.
So, tune up your guitar and let’s dive deep into the world of “Mustang Sally”!
The Story Behind the Mustang Sally Song
“Mustang Sally” was originally conceived and first brought to life by Mack Rice. He recorded it in 1965, releasing it under the moniker “Sir Mack Rice.”
The story goes that Rice initially penned the song as a lighthearted jest for a fellow gospel singer from Della Reese’s band who had a penchant for a brand new Ford Mustang.
Interestingly, the song was initially titled “Mustang Mama,” but it was reportedly Aretha Franklin who suggested the catchier and more specific title, “Mustang Sally.”
If this anecdote is true, Franklin’s contribution arguably deserves songwriting credit. The change in title undeniably enhanced the song’s appeal and focus. However, research suggests she unfortunately didn’t receive official credit for this impactful suggestion.
The song’s popularity surged when Wilson Pickett covered “Mustang Sally” the following year. Pickett’s rendition was initially released as a single and later featured on his 1966 album, The Wicked Pickett. This version cemented “Mustang Sally” as a soul classic.
Adding to the song’s intriguing history, 1966 also saw John Lee Hooker record a completely different song with a remarkably similar title: “Mustang Sally & GTO.” This highlights the cultural resonance and automotive themes prevalent in music of the era.
Decoding the Mustang Sally Chords
The beauty of “Mustang Sally” lies in its simplicity, built upon just three chords. The song is rooted in the key of C major, employing the fundamental I, IV, and V chords: C, F, and G. Let’s explore how to play these essential chords.
The C major chord can be easily played in the open position:
F major can be played as a barre chord at the 1st fret:
Image: F major barre chord at the 1st fret for Mustang Sally song.
Lastly, G major is played in this common open position:
In the key of C major, these chords hold specific designations:
C major = I chord
F major = IV chord
G major = V chord
Understanding this I-IV-V chord structure is fundamental to grasping the harmonic foundation of “Mustang Sally” and countless other songs.
Mustang Sally: A 24-Bar Blues?
The question often arises: Is “Mustang Sally” a 12-bar blues? The nuanced answer is both yes and no. Technically, it’s more accurately described as a 24-bar blues progression. However, its essence is deeply rooted in the 12-bar blues structure, with a simple yet significant modification. It essentially expands upon the traditional 12-bar form by doubling the duration of each chord.
Let’s compare the structure. A typical 12-bar blues progression unfolds like this:
C (4 bars)
F (2 bars)
C (2 bars)
G (1 bar)
F (1 bar)
C (2 bars)
To adapt this to “Mustang Sally,” we simply extend each chord’s duration:
C (8 bars)
F (4 bars)
C (4 bars)
G (2 bar)
F (2 bar)
C (4 bars)
While technically a 24-bar blues, it’s more insightful to recognize “Mustang Sally” as a variation of the 12-bar blues, demonstrating how the basic structure can be adapted and expanded. This kind of modification is common in blues music, where musicians frequently tweak the 12-bar blueprint to create fresh and engaging songs.
This underscores the importance of mastering blues fundamentals. A solid foundation in blues unlocks a deeper understanding and appreciation of a vast spectrum of popular music. Many musicians are unaware of the profound blues roots underlying their favorite genres. Delving into these roots illuminates the origins and evolution of countless musical styles.
The blues serves as an ideal springboard for exploring diverse musical styles. Familiarity with its core principles empowers you to learn songs more efficiently and approach music-making with greater confidence.
Establishing the Basic Mustang Sally Rhythm
Before moving forward, ensure you have a firm grasp of the chord shapes and can smoothly transition between them while following the 24-bar progression. If you’re accustomed to a standard 12-bar blues, remember to hold each chord for twice as long in “Mustang Sally.” Familiarizing yourself with this extended blues progression is key.
Once comfortable with the chord changes, you can elevate your playing by incorporating a blues rhythm pattern for each chord. For the C chord, we’ll shift to the 8th position and employ a classic blues rhythm pattern, adding palm-muting for that characteristic percussive feel:
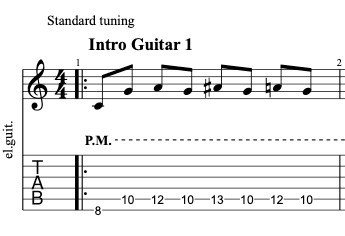 Image: C chord rhythm pattern in 8th position for Mustang Sally song.
This rhythm is achieved by plucking individual notes within a power chord shape and then extending the pinky finger to reach notes above it on the fretboard. (Refer to a video demonstration for visual clarity).
Apply this same rhythmic approach to the F and G chords within the progression. The F chord rhythm, in the corresponding position, looks like this:
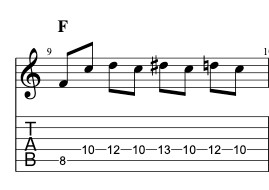 Image: F chord rhythm pattern for Mustang Sally song.
And the G chord rhythm is played in this manner:
Image: G chord rhythm pattern for Mustang Sally song.
Incorporating Riffs into Mustang Sally
Once you’ve mastered the fundamental rhythm, the next exciting step is to layer riffs over it. This is an excellent opportunity to utilize a looper pedal or record yourself playing the rhythm part to practice soloing and riffing.
Here’s a riff employing octaves, inspired by the second guitar part heard on the original recording. This riff works beautifully over the I chord, C:
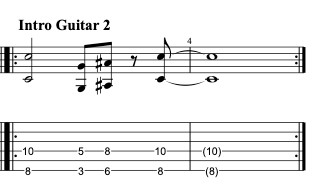 Image: Octave riff for Mustang Sally song.
To improvise effectively over the “Mustang Sally” progression, the C minor blues scale is your essential tool. Here’s a way to play it in the 8th position:
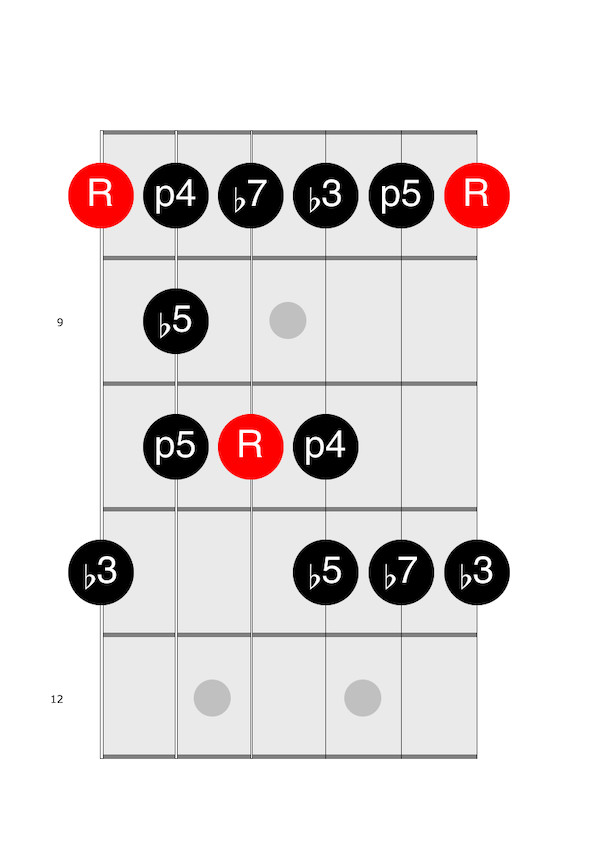 Image: C minor blues scale in 8th position for improvising over Mustang Sally song.
This scale pattern can be visualized as follows:
6th string = 8, 11
5th string = 8, 9, 10
4th string = 8, 10
3rd string = 8, 10, 11
2nd string = 8, 11
1st string = 8, 11
Familiarizing yourself with this C minor blues scale pattern in the 8th position will unlock improvisational possibilities within the “Mustang Sally song.”
Common Pitfalls for Beginners Learning Mustang Sally
Learning any new skill involves navigating challenges and mistakes. When tackling “Mustang Sally,” beginners often encounter these common pitfalls:
- Rushing the Tempo: It’s crucial to resist the urge to speed up. Focus on accurately executing the 24-bar song form at a comfortable pace.
- Incorrect Finger Placement: Ensure your fingers are precisely positioned on the fretboard. Sloppy placement can lead to unwanted buzzing or muted notes, hindering clarity and sound quality.
- Overzealous Strumming: Finding the right strumming intensity is key. Strumming too forcefully can cause string buzz or a muddy sound. Aim for a balanced strumming approach.
Essential Tips for Mastering Mustang Sally
Keep these valuable tips in mind as you progress in learning “Mustang Sally”:
- Play Along with Recordings: Immerse yourself in the song by playing along with recordings. This helps internalize the rhythm, timing, and overall feel of “Mustang Sally.”
- Consistent Practice is Key: Regular, focused practice is the cornerstone of guitar skill development. Dedicate consistent time to practicing “Mustang Sally” and watch your skills grow.
- Practice with a Metronome: A metronome is an invaluable tool for developing rock-solid timing. Practice with a metronome to refine your rhythm and groove.
- Experiment with Rhythms: Don’t be afraid to explore different rhythm patterns. Experimenting with variations can add your personal touch and keep the song fresh and engaging.
Conclusion: Your Mustang Sally Guitar Journey
Embarking on the journey of learning “Mustang Sally” on guitar is more than just mastering chords and riffs. It’s an exploration into the heart of rhythm and blues, and a valuable step in developing essential guitar techniques.
In this lesson, we’ve traced the captivating history of this timeless classic, deepening your appreciation for its cultural impact. We’ve also broken down the core chords and rhythms that fuel the infectious groove of “Mustang Sally.”
By mastering these chord progressions and strumming patterns, you’re building a robust foundation for your ongoing guitar development. Furthermore, we’ve explored scales and techniques for soloing over “Mustang Sally,” empowering you to infuse your unique musical voice into the song through improvisation and personal expression.
Embrace the learning process, enjoy each step, and allow yourself to grow as you continue to expand your guitar skills and repertoire. Happy playing! For another fantastic blues jam to learn, check out “Green Onions” next!